Miniature Warfare in the Thirty Years' War, 1618-1648
Guide to Play
By Arofan Gregory. Copyright (c) 2023 Bloody Scotsmen Games LLC. All rights reserved.
By Arofan Gregory. Copyright (c) 2023 Bloody Scotsmen Games LLC. All rights reserved.
"Trust in God ev'n while the Devil rules." (Frederick Swinborne, Gustavus Adolphus)
The Thirty Years War was a horrific period in European history, revealing the worst aspects of religious conflict and power politics. The population of Germany was devastated, in some areas falling by as much as half - the result not only of war but also of starvation and disease. Despite this, it was a fascinating watershed in the evolution of military tactics, witnessing the earliest form of linear warfare emerge from the massed pikes and charging lances of earlier periods. While we think of this as a single conflict, in fact there were several simultaneous wars in different parts of Europe. These rules are suited for recreating the battles of the era, extending even into the Swedish Deluge (or "Second Northern War") of 1655 involving the Poles, Musovites, and Transylvanian troops alongside the more familiar types seen in Western Europe. They are also suitable for the latter portion of the Eighty Years" War, and the continuing conflict between France and Spain after 1648. The English Civil War also falls into this era.
These rules are designed to produce fast games which capture the flavor of the period but which do not become an endless series of die-rolls and minute adjustments of individual bases - a form of arcane geometry which can be fascinating, but which bears little resemblance to any actual experience of command in battle. Because the app performs all calculations (and, if desired, die rolls), the game is easy to learn, and well-suited to both remote and convention play.
These rules are designed for use with 25mm miniatures - the easiest popular scale to see when remote gaming, and the most eye-catching in a crowded convention setting - but could be played with smaller miniatures by substituting centimeters for inches, or halving base sizes, ranges, and distances. (If a truly panoramic vista is desired, use basing as described and multiply the number of smaller figures.) Popular basing systems will work (basing is consistent with Pike & Shotte).
As with any miniatures game, figures and terrain are needed to represent the battlefield and combatants. This game is meant to represent entire field battles, and so is not a skirmish game in terms of tabletop representation. Exact man:figure ratios and ground scales are not specified, but guidelines are provided. Miniatures and terrain both may be understood to be representative, however: a couple of houses surrounded by a wall represent a village, etc. One figure is a larger number of actual combatants.
Rules and tape measures in inches are required for play. Dice are not, unless players wish to use them (random generation by the game app is optional). Markers are needed for Disorder and Demoralization - further losses are also marked, with chits, casualty counters, or similar. Small chits or other markers for showing which units and Leaders have already acted during the turn are useful for larger games. The use of a tablet or smart phone during play (rather than a PC) is not critical, but may prove convenient. Only one device for running the game app is required, and it is used by the game master (or whoever is appointed to act in that capacity). The game app will run on PCs, tablets, and smart phones: any device with a javascript-capable web browser may be used. If desired, more than a single device may be used during play.
A normal wargames table is required, although for most battles a fairly small one will suffice. 4 foot x 6 foot or larger is ideal. For smaller tables, players may wish to reduce figure scale to 15mm or smaller, and to reduce all distances and ranges by half, or replace inches with centimeters.
The following list provides all of the different troops types used in the game. As a general rule of thumb, a formed cavalry base represents 250 men, and a base of formed infantry 300-500, with the exception of pikemen, which represent 500-700 per base. Irregular cavalry bases are each about 150-200 men. Dragoons and Forlorn Hopes represent individual companies, with 150 men per unit (each "base" in game terms is several individually mounted figures). Each light artillery unit (base) represents six guns, and each field or heavy artillery unit (base) represents four individual pieces. (Note that artillery and skirmishing troops may be represented with more than single-base units for some atypical cases - the unit sizes here are considered to be usual.)
When recreating historical battles, the number of battlefield formations is more important than strict numbers, as some formations (and national versions of those formations) were distinctly more efficient in terms of manpower than others. Tercios, for example, were very wasteful of manpower, while Swedish Brigades were optimized to make the most of the available troops. These rules generalize across different nations use of the various formations to establish rquivalence despite differences in number of ranks typically deployed, number of ranks firing simultaneously, and so on. The use of regimental guns is reflected by assigning light artillery to armies - they are not considered integral to the larger infantry formations as they were not always available, even when doctrine demanded their use.
Dutch Battalion: An infantry formation of approximately 1,000 men, organized in a central block of pikes with two sleeves of musketeers on either side (two Dutch squadrons per Maurice). Represented by 3 bases (one pike, two musketeers). Used by Protestant German, Danish, Dutch, and later (post-1630) Catholic League/Imperialist German and post-1634 Swedish units, as well as by mercenary "German" infantry found in the east.
Tercio: An infantry formation of 2000-3000 men, arranged in a large central pike block (2 or 4 bases) with four "castles" of musketeers, one on each corner (each 1 base). Used by Spanish and earlier Imperialist troops.
Veteran Tercio: As above, but made up of veteran troops.
Swedish Brigade: An infantry formation of 1500-2500 men, arranged in a wedge formation involving 6 - 8 bases (3 pike, the rest musketeers). Used by the Dutch until the early 1620s and by the Swedes from 1628 until 1634. Always assumed to be very well-drilled ("veteran") troops, as it was not practical for others.
Commanded Shot: An infantry formation of 200-600 men, all armed with muskets. Represented by 1 - 3 bases. Common to many armies, but used especially by the Swedish in support of cavalry formations.
Streltsy: An infantry formation of 200-600 men, all armed with muskets and axes (typically the berdische type employed by Muscovites and cossacks, but other regional armies employed different forms). Such axes provided a modicum of protection against cavalry, but were not as effective as pikes. Represented by 1 - 3 bases. Found in many eastern armies, especially among the cossacks, Muscovites, and Poles, but also in the Transylvanian and Hungarian forces.
Sword & Bucklermen: Imperialist and some early Protestant forces employed formations of 200-600 infantrymen armed with sword and buckler, halberd, or other cutting weapons, and typically well-armored. Represented with 1 - 3 bases.
Militia/Levy: Variously armed, poorly trained units of 200 - 800 infantrymen (1 - 4 bases). Available to all armies at different points, typically as local garrison or similar units.
Forlorn Hope: Musket-armed skirmishing parties on foot, typically of 200 men. Used by all armies. Represented by a single "base" (eight individually mounted figures).
Dragoons: General-purpose musketeers mounted on second-rate horses for mobility, in units of around 200 men. Usually fought as skirmishers, but sometimes loosely formed. Used by all armies, and represented by a single "base" of 6 individually mounted figures on horse or foot (or a combination). Considered mounted for movement purpooses.
Guard Cuirassier/Lancers: Heavily armored men mounted on large horses, often carrying the lance and attacking at the gallop without firing. Usually in squadrons of 400-500 men, represented by a pair of bases. This category includes many Imperialist bodyguard units and the Polish winged hussars.
Cuirassier: Fully armored cavalrymen on heavy horses, attacking with sword and pistol at the trot in close formation. Organized in squadrons of 400-500 men (2 bases). Used by all armies, but more numerous in Imperialist and Catholic League armies. Replaced later in many armies by Reiters.
Harquebusier: Lightly armored cavalrymen using carbines from horseback, organized in formed squadrons of 400-500 men. They are reluctant to close with the sword, but will do so at the trot against disordered enemies. Represented with two bases. All armies used them, although they were gradually supplanted by Reiters.
Reiter: A less-armored style of cuirassiers, using sword and pistols at the trot. Organized in squadrons of 400-500 men. Represented by 2 bases. All armies used them but especially the Swedes. This type is also used to represent the general-purpose cavalry types in the east such as Muscovite boyars, armored cossacks, and Polish pancierni.
Finnish Hackapells: Finnish unarmored cavalry which charged at the gallop and used the sword in preference to pistols. Organized in squadrons of 400-500 men, represented by 2 bases. (There is some discussion as to whether the Finnish "hackapells" were any different from Swedish reiters, but they are included for those who wish to make the distinction.)
Irregular Light Horse: Imperial "Krabants" (Croats), cossacks, Wallachians, and other skirmishing light horse armed with firearms, bows, lances, swords, etc. Units are of 2 or 3 bases, representing squadrons of 300-500 men, operating in a swarm.
Light Artillery: Regimental artillery, organized usually in pairs. Each base represents 6 3- or 4-pounder guns, generally employed in an infantry support role. Used by all armies. Usually deployed as single bases, but may be organized in multi-base units.
Medium/Heavy Artillery: Field pieces and heavy guns of from 6 to 48 pounds. Some are capable of movement ("medium" guns) while others may only pivot in place ("heavy" mortars and seige guns of 24 pounds and up). Each base represents 4 medium or 2 heavy guns. May be deployed as single bases, or grouped into multi-base units.
Figures are based as described below.
| Type | Base Depth |
| Leaders | 40-60mm (square or round) |
| Commanded Shot/Streltsy | 80mm wide x 40mm deep |
| Pikes | 80mm wide x 60mm deep |
| Cavalry | 60mm wide x 40mm deep |
| Artillery | 60mm wide x 60-90mm deep |
| Dragoons/Forlorn Hope | Based individually |
| Levy, Sword & Buckler | 80mm wide x 40mm deep |
25/28mm Basing: Pike bases have 12 figures in three ranks. Musketeers (including Streltzy and Commanded Shot) have 8 figures in two ranks. Levy and Sword & Bucklermen are mounted the same as Musketeers, although you may wish to use fewer figures in staggered rows for peasant Levies to reflect disorder. All formed cavalry (all except Irregular Light Horse) are mounted 3 figures per base. Irregular Light Horse are 2 figures per base. Dragoons and Forlorn Hope are mounted on individual-size bases (25-30mm square or round for foot, twice as deep for mounted). Artillery bases are a gun and 2-6 crewmen (number of crew is unimportant). Leaders have 1 or more figures.
For smaller scales, bases may be reduced by 50% if desired, or the number of figures increased as appropriate to the size of figures. Basing should be the same for both sides.
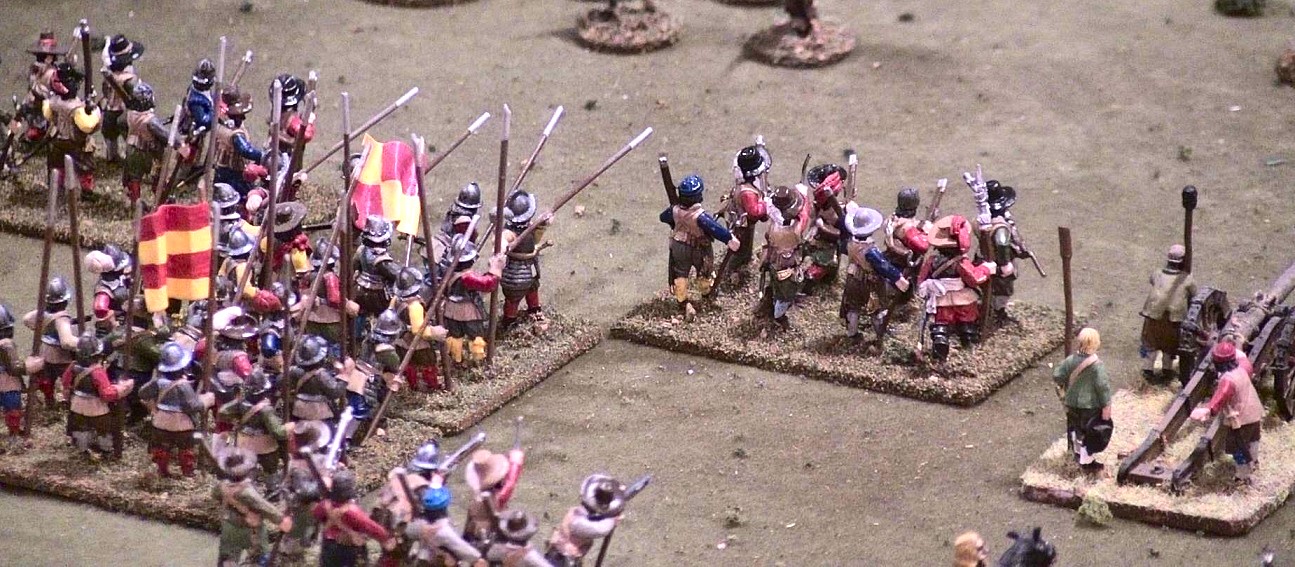
The elaborate "pike & shot" formations of this era are one of its most characteristic features, but one which does not feature largely in many tabletop systems for the period. While the Devil Rules makes this a central aspect of play: tercios function like tercios, and Swedish brigades likewise! Although composed of semi-independent sub-units, these sub-units acted in concert historically. Such related activity is enforced: all the bases of the unit will act together, even though they may perform different functions (the musketeers shooting, the pikemen engaging in melee, etc.)
Different types of troops will operate in specific formations when deployed for battle. They may also assume different formations when marching. The section below describes these. The front of the formations are toward the top of each diagram, and all bases share a single facing on the tabletop.
There are three basic types of formation used by massed pike and shot: Dutch battalions, tercios, and Swedish brigades. (Note that these names are short-hand based on current historical terminology - during the period, the names were often used in an inconsistent fashion, and were quite different as used by different authors.)
Tercios: These are large formations employed by the Spanish and troops within their dominions (including Italy and the Netherlands) during the 16th century. By the time of the Thirty Years War, they were not employed in their largest form, and were slowly being phased out. Early Imperialist armies used tercios, and the Spanish throughout the conflict. There are three basic ways to depict a tercio in this game system.
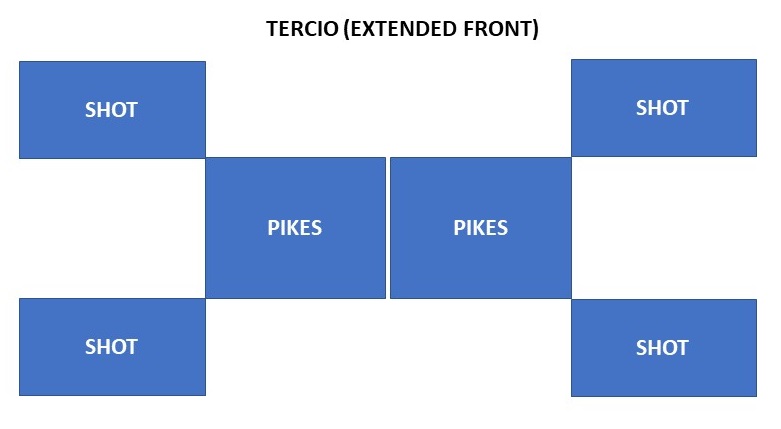
A tercio of around 2000 men in extended formation. It is made up of 6 bases, either Pikes or Musketeers (Shot) as indicated.
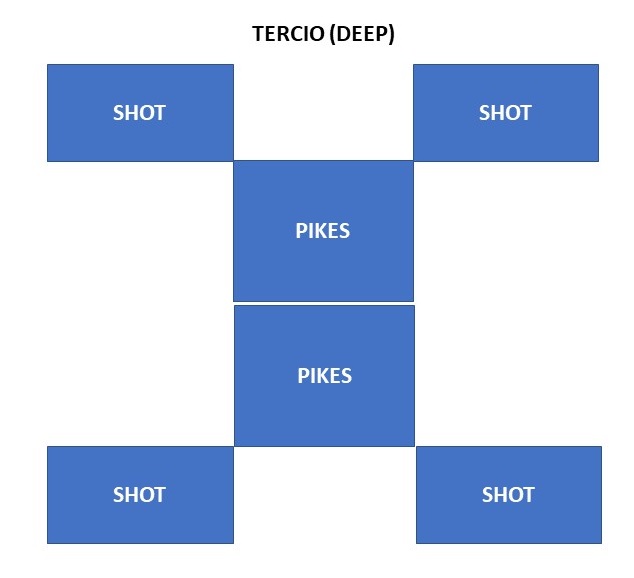
A tercio of around 2000 men in deep formation. It is made up of 6 bases, either Pikes or Musketeers (Shot) as indicated.
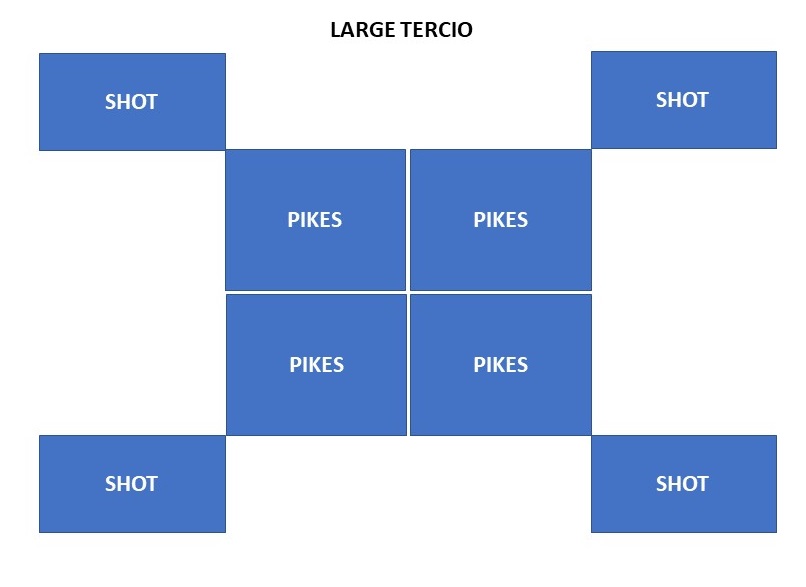
A large tercio of around 2500 - 3000 men. It is made up of 8 bases, either Pikes or Musketeers (Shot) as indicated.
The large tercios were used at the very beginning of the period, and earlier during the 80 Years War. They have a lower ratio of shot-to-pike characteristic of the earlier period. Note that the formation is unchanging - you do not manipulate individual bases within the formation during play - the sub-units would and did maneuver in relation to each other, but these are abstracted and accounted for in the rules (especially the sleeves of musketeers). A tercio may fire 1 base with each of its shot bases, and may fire in any direction, from any of its flat sides. No more than two bases may ever be used as part of a single firing in any direction, however. The arc of fire is determined by the firing aspect of the tercio as a whole.
An Imperialist deep tercio goes into action.
Dutch Battalions: These were pioneered by Maurice, Prince of Orange, and were at times employed by the Dutch, but were also used by the Swedes, Protestant Germans, Danes, Imperialists, Catholic Germans, and - by the end of the period - all other armies. They are units (per Maurice, paired "squadrons") of about 1,000 men (although often fewer in the field). They were less effective than tercios at non-frontal defense from charging enemies, as it was more difficult for the pikes to protect the infantry, but still far better than not having pikes at all! Dutch Battalions may fire two bases to front or rear, but only one base to either flank.
Veteran Dutch Battalion: As above, but composed of veteran troops.
This became the standard formation at the end of the period, and was used ubiquitously by both sides in the English Civil War, and by all the Westernized infantry formations during the Swedish Deluge.
A Dutch battalion of around 1000 men. It is made up of 3 bases, either Pikes or Musketeers (Shot) as indicated.
As for tercios, the bases are always in the same position relative to each other - the various maneuvers of the shot wings are abstracted during play.
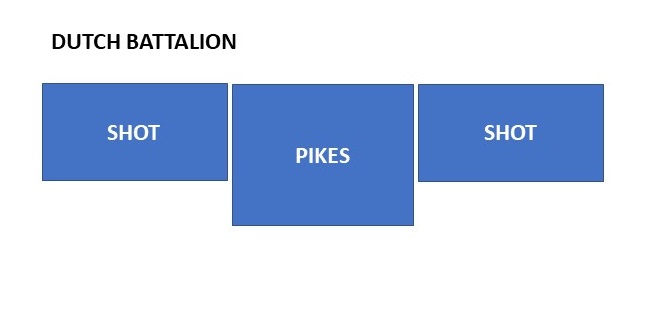
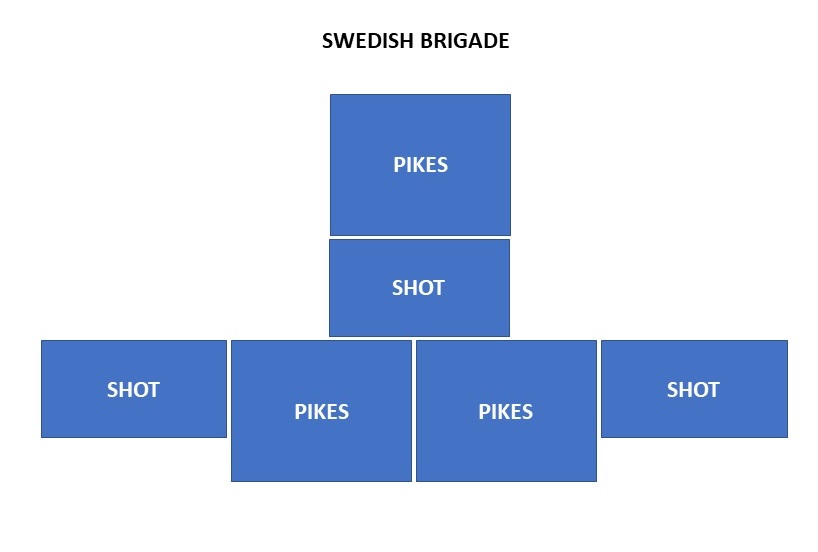
Swedish Brigade: This formation was made famous by Gustav Adolph, but was in fact first used by the Dutch. It was not possible for this formation to be used by troops which were not thoroughly drilled, however, so the Dutch had abandoned it by the 1620s. The Swedes first used it in 1628, and stopped employing it after 1634. Swedish troops which did not have sufficient numbers to form Swedish Brigades could alternately use Dutch Battalions, the formation they adopted after 1634. Swedish brigades could be made up of 3 or 4 "squadrons", with the larger formations used by the Swedes to counter the larger Imperialist tercios when they had enough men to do so. The smaller 3-squadron brigade was more common.
A Swedish brigade of around 1500 men. It is made up of 6 bases, either Pikes or Musketeers (Shot) as indicated.
A large Swedish brigade (4 squadrons instead of 3) of around 2000 men. It is made up of 8 bases, either Pikes or Musketeers (Shot) as indicated.
Swedish brigades were intentionally organized to maximize the firepower of their shot troops. The bases represent fewer ranks of troops than in other formations, which accounts for the lower number of men in them. The bases are what is important in game terms, as representing the unit of firepower.
Swedish brigades may fire 3 bases at targets within their front arc, and two bases to the rear and side arcs, but may only fire at targets in one arc in any given turn. As for other formations, the bases are always in the same position relative to one another during play, even though in reality they would maneuver in various ways to perform combat functions. With a large Swedish brigade, no more than an inch separates the rearmost line of shot from the main body of the formation.
Commanded Shot, Streltsy, Levy, and Sword & Bucklermen: These types of troops always form in a one-base-deep line with a single facing, regardless of how many bases they have, as shown for commanded shot, below. Note that Militia were typically also organized in this fashion, without pikes, but could be also represented as Dutch Battalions if they were so organized historically. Regardless, they will still use the "Levy/Militia" category for all game app functions.
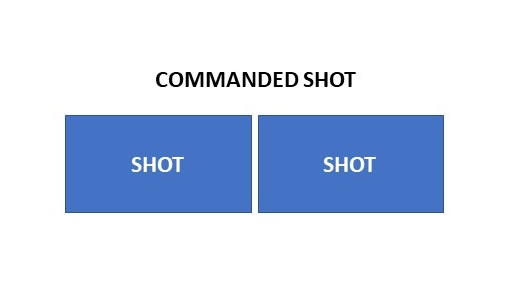
A contingent of 500 Commanded Shot (2 bases).
Formed Cavalry: Guard Cuirassier, Lancers, Cuirassiers, Harquebusiers, Reiters, and Hackapells always deploy as two bases side-by-side, with a single facing.
Dragoons and Forlorn Hopes: These units are made up of individually based figures. They will operate in swarms, and do not have flanks or rear per se, as they are in a fluid group. The figures in a unit must always be within 2 inches of another figure in their unit, measuring between the center point of their bases (basically, leave an inch between bases for normal base sizes).
Irregular Light Horse: These troops operated in denser swarms than skirmishers, but are still relatively fluid. The rule is that all bases in the unit must be in contact and share a facing - otherwise, they may be arranged as desired.
March Columns - All Formed Units: March columns are formed in a column of bases one base in width, with a half-inch gap separating bases, all of which will share a facing. Units based individually (Dragoons and Forlorn Hopes) will assume a formation no more than two figures wide, but otherwise within the normal distance restrictions (1 inch between bases).
As historically appropriate, units may be designated as "impetuous". This means that if deployed (that is, not in march formation) they must charge the nearest formed enemy whenever opportunity presents itself, at any point where they are activated. (If not activated, they will charge anyway!) That enemy target must be within charge range to trigger the mandatory charge. Typically, this category will include less-disciplined Tatar, Cossack and pancerni units in some Eastern armies, but will also include Rupert's horse in the English Civil War and similar examples from the Thirty Years War. This characteristic is always assigned by scenario, as such a lack of control was the exception, not the rule, in this era.
Note that the size of a unit at the start of play is significant. When a full half or more of the bases in a unit are destroyed, the unit is immediately removed from play. Note that bases are not actually removed from the table, but are left in place in order to preserve formations - "base" losses are marked with chits or similar.
A typical army will have three to nine units in each of three to five divisions/wings, with each one commanded by a leader, one of whom may also serve as the army commander (who may also be separate). Because this is not intended as a tournament rules set, point values and army lists are not provided: these can be taken from the usual sources to provide a sense of proportions and relative values of different troops types, in combination with historical sources.
The game is played as a sequence of turns, during which each unit notionally makes a single action (there are exceptions). During each turn, each leader on the tabletop will be given a single initiative, and will have a set number of activations which can be used to act with the units under their command.
At the start of play, units will be issued "standing orders" which will be followed - without requiring an activation - until the unit is engaged in any form of combat. After this point, they will require activation by their commander.
One side is designated the Attacker, and the other the Defender (the terms are only meaningful by scenario). The turn sequence is:
Note that using markers to indicate which units and Leaders have acted can be a good idea (small colored chits work well for this).
The tabletop game is run basically in the same fashion as a traditional paper-and-dice game, but instead of looking up modifiers and results during combat, you simply consult the app. In this system, players may choose to roll their own dice, in which case they must also determine the outcomes of fire and combat based on rolls, but this is very simple and easily memorized. If the app is used to "roll dice" then it will simply announce combat results. This has the effect of speeding play - the sequence of events is still driven by players, following the steps listed above.
The app interface is shown below:
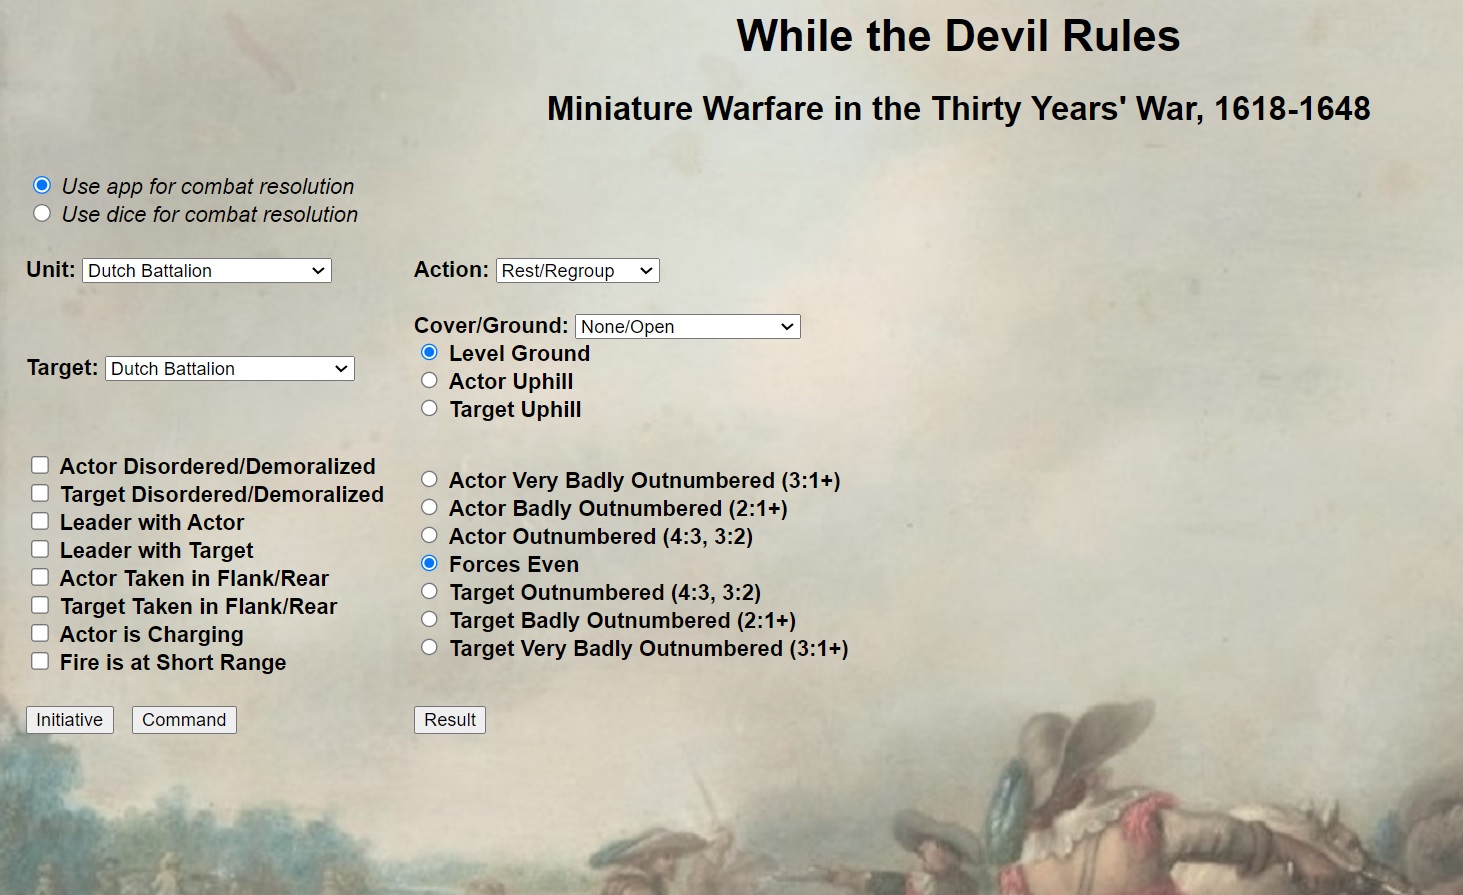
The Initiative and Command buttons are in the lower left-hand corner. Using these buttons requires no other fields to be set - you simply click, and a result box pops up, telling you which side has the initiative, or how many activations the Leader who is given the Initiative may use.
All other actions require that at least two of the app's controls be used: the "Unit" list, and the "Action" list. Other fields may also need to be set, as described in the Actions section, below. Once all needed fields have been set, the Result button in the lower right-hand corner is clicked, and a result box will pop up, explaining the results of the action, or asking a question.
When asked a question, "OK" always means "yes" and "Cancel" always means "no." Once any questions have been answered, a result box will appear. Click "OK" when you have read the result, to dismiss the box.
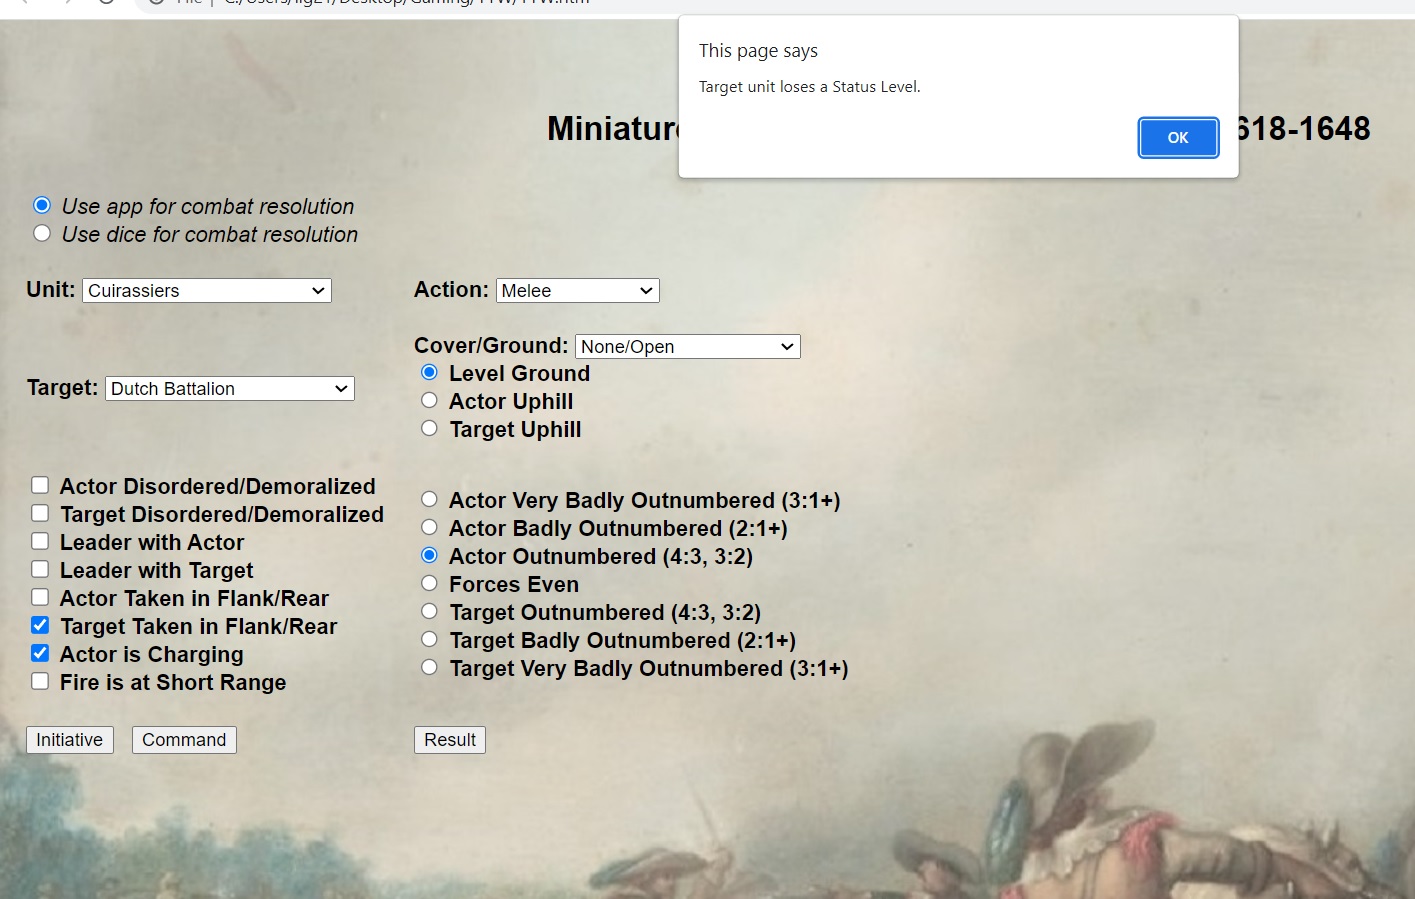
The screen below shows a result - a unit of cuirassiers has made a Melee action after charging into an enemy Dutch battalion from the flank. The Dutch battalion has three bases, and the cuirassiers only two. They are fighting in the open, on level ground. The actor - the cuirassiers - has gotten lucky: normally, the Dutch battalion's musketeers would hide under a wall of pikes, but it hasn't gone quite as planned and now they will lose a Status Level (if undisordered, they will become disordered, etc. - see below). The result appears in a pop-up box (center top of the screen).
If at any point if you put the wrong values into the app fields, you may simply ignore the result, correct the settings, and click again. (You will need to "click through" any questions just by answering anything to make them go away.) When letting the app decide results - instead of just generating modifiers - each click of the Result button is effectively a roll of the dice, but you can never keep a roll if you calculate the modifiers wrong! Think of the app interface as a checklist, which will help you remember all of the modifiers. As you learn the interface, you will find that it becomes easier to use, and that you will understand which actions use which fields. (Each field is essentially a dice modifier.)
When you are rolling your own dice, the app does not indicate results, just the modifiers to be rolled. The actor (the cuirassiers) and the target (the Dutch battalion) will each roll a six-sided die, and apply the modifiers indicated by the app (in this case, they are each getting a +1). The screen below shows what this looks like:
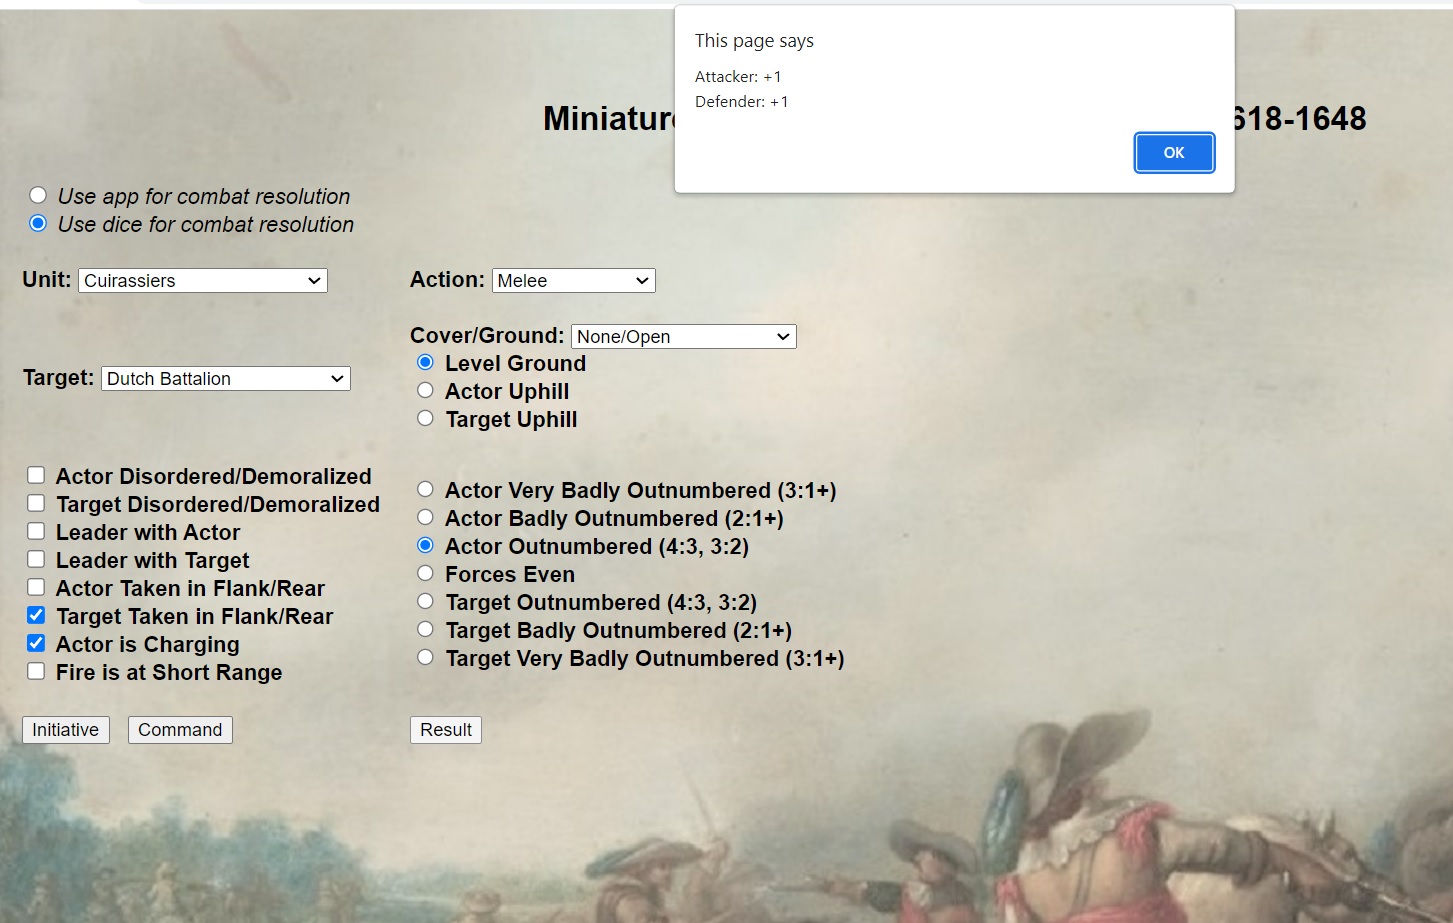
Notice that in the upper left-hand corner, "Use dice for combat resolution" has been checked. You may change this setting at any time - it will not influence play. When dice are used, however, players must calculate the result by comparing modified rolls (see below).
Leaders are the commanders of the divisions (often called "wings") of an army, one of whom will generally be the overall commander of the entire host. Any given Leader will have a set of units which they may activate - the units in their division/wing, or, for the overall commander, any unit in the army. It was normal in this period to have at least three wings - left, right, and center - and these were often supplemented with an adavcne guard made up of light troops, and a reserve. Any given commander will typically have from 3 to 7 units under their command (and sometimes more). Five is a reasonable average, but the game places no limits on the size of these formations.
Particularly good Leaders can be given a bonus rating, typically a +1. This will increase the number of activations they may use when they are given an Initiative by adding 1. An incredibly good Leader would be given a +2, and would increase the number of activations by 2 when given an Initiative. Poor leaders may be given negative modifiers, but this should never be more than a -2.
Leaders have a command radius of 12 inches: any unit under their command within 12 inches of their base - measured between any part of the Leader's base, and any part of any base in the unit - may be given an activation once per turn. When activated, that unit will immediately make whatever valid action the player chooses (see Actions, below). The Leader may give as many activations as they have for that Initiative: the number granted by the app, plus their personal Leader bonus (or minus their penalty) if they have one. The modifications must be made by players - the app will only generate the unmodified, base number.
Leaders always also have a 24-inch base move each turn, which they may make before or after any activations are given to units (or even in the case that they give no activations to units). They may activate closer units, then move, and then activate units which they have brought within command range while moving. They may only move once during the turn, however, and may not activate units during the course of their move.
Leaders may take personal command of a single unit at any point, by placing themselves into contact with the base of that unit. This is indicated on the app interface by checking the "Leader with Actor" or "Leader with Target" boxes. This can help with some actions (such as Melee and Rallying). When attached to a unit, however, it is possible for a Leader to be killed or captured in Melee. Leaders who have fallen are not replaced, and count heavily against the army's morale. An attached Leader may still give activations to units to which they are not attached, and is not required to activate the unit they are with. Attached Leaders may detach from a unit at any time, unless the unit they are with is in an ongoing combat: once a Leader has been involved in a Melee action (with either the Acting unit or the Target), they may no longer move in that turn.
Leaders may not be targeted for fire or charges, and are only involved in melees with the units to which they are attached. If "run over," they simply make an immediate free move to take them out of the way. They may use this move to attach to a nearby friendly unit.
A Leader who is not using an Initiative, and who is involved in a Melee as a result of an enemy Melee Action, will be considered to have used one of their Actions for the turn, on the unit engaged in the melee. They are deemed to have been "caught up in the struggle"! If they have not yet activated, this Action will be subtracted from the total they get to use that turn.
An army will have the ability to command all of its units as long as it still has a Leader on the table. When killed or captured, the command responsibility for that Leader is immediately assigned to any single surviving Leader at the player's discretion. When all Leaders have been killed or captured, the affected side may no longer make activations, although its units may still defend themselves in combat and fire on available targets at the end of each turn. With no Leaders, proactive charges and maneuvering are no longer possible, with the exception of obligatory charges by units rated "aggressive."
Note that a Leader who is attached to a unit will move with that unit at the player's discretion, even if the Leader has already used its movement for the turn. Similarly, Leaders may always move with the units they are attached to for any reason, in addition to their own independent move for the turn. Thus, a unit making a Retire action with an attached Leader would bring that Leader with it, and the Leader could then use his own movement to go elsewhere during the turn.
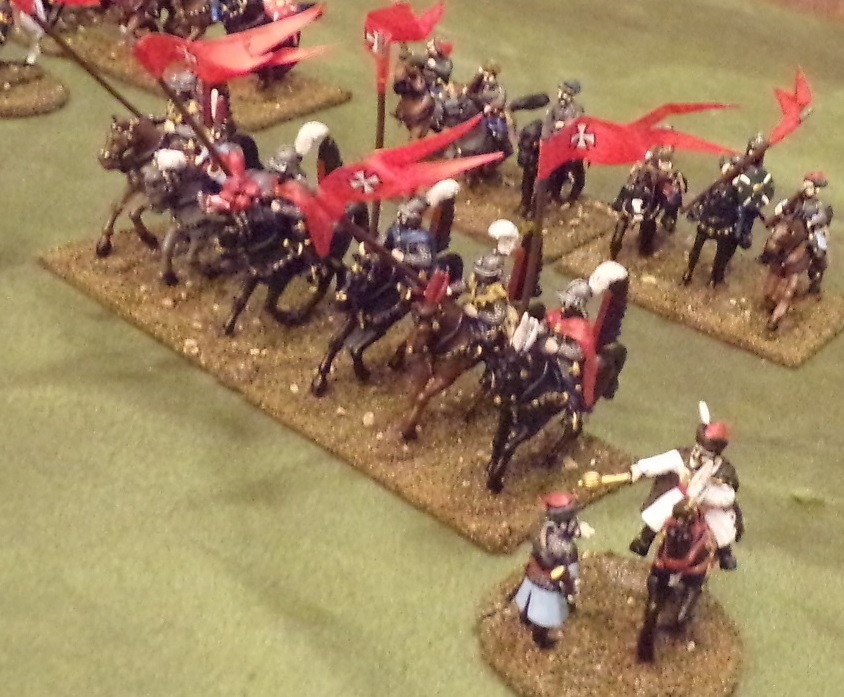
A Polish hetman rides into action alongside his winged hussars and pancierni cossacks.
The following is a list of the actions which may be taken in the game, as listed in the app "Action" list:
Rest/Regroup: This is the action taken if a unit chooses to do nothing (which does not actually require the app to perform), but is also used to Regroup (also called "rallying"). You must select the unit which will make the action, using the "Unit" list, and indicate if they have a Leader with them by checking the "Leader with Actor" box. No other fields are relevant. A Regroup action - if successful - will raise the Status Level of a unit by one (from Disordered to OK or Demoralized to Disordered) or by two (Demoralized or Disordered to OK). Regroup actions may be made by units involved in ongoing combats, but only if they have a Leader with them. In this case, the Melee action is immediately resolved (see below).
Advance: This is the most common move action, allowing a unit to move and wheel in a forward direction, as well as perform facing changes, etc. (see below). It requires only that the "Unit" list, and the "Action" list be filled out. If a Leader is with the unit, this should also be indicated by checking the "Leader with Actor" box. No other fields are relevant.
Retire: This action is performed by a unit which wishes to retire out of an ongoing combat (see below). If the retire fails, a Melee action is immediatley performed. It requires only that the "Unit" list, and the "Action" list be filled out. If a Leader is with the unit, this should also be indicated by checking the "Leader with Actor" box. No other fields are relevant.
March: This moves allows units to form a column one base wide, and to move further than with a typical Advance action. It requires only that the "Unit" list, and the "Action" list be filled out. If a Leader is with the unit, this should also be indicated by checking the "Leader with Actor" box. No other fields are relevant.
Charge: Charges start with a move into contact by the charging unit. If contact is made, a sequence of other actions is taken, which may include a Fire action by the Target of the charge, an evasion if the Target is Irregulars or Horsemen, and a Melee action. It requires that the "Unit" list, the "Target" list, the "Cover/Ground" list, and the "Action" list be filled out. If a Leader is with the unit, this should also be indicated by checking the "Leader with Actor" box. No other fields are relevant for the Charge action itself - other actions will use other fields.
Advancing Fire: Advancing fire is explained below. Needed fields include "Unit", "Target", "Cover/Ground", and "Action" lists, as well as the "Fire is at Short Range", "Actor is Disordered/Demoralized", and "Leader with Actor" check boxes, if relevant. Additionally, a selection from the force ratios must be made ("Actor Badly Outnumbered", "Actor Outnumbered", "Force Even", etc.). Other fields are not relevant.
Fire: Missile fire is explained below. Needed fields include "Unit", "Target", "Cover/Ground", and "Action" lists, as well as the "Actor is Disordered/Demoralized" and "Fire is at Short Range" check boxes, if relevant. Additionally, a selection from the force ratios must be made ("Actor Badly Outnumbered", "Actor Outnumbered", "Force Even", etc.). Other fields are not relevant.
Melee: Melee actions are described below. Melee requires that all fields in the app interface be correctly filled out.
Routed Through: This is not a normal Action, but is instead a test taken by a unit when another units routs through it, as described below. The Actor is the unit being routed through. The "Unit"and "Action" lists must be filled out, and the "Leader with Actor" and "Actor is Disordered/Demoralized" boxes checked if applicable. No other fields apply.
Generally speaking, a unit may make any single action of their choice in a turn, when activated by a Leader who has command of that unit (their battle or army commander). There are some restrictions to choice of actions, however, depending on whether a unit is locked in combat, and the formation it is currently in.
Units in an ongoing combat - that is, those units which start their action in contact with one or more enemy units - may only perform a Melee action, a Retire action (to pull out of combat, which may be followed by a Melee action if it fails), or a Regroup action followed immediately by a Melee action.
Units have two formations: deployed "battle" formation as described above, and a "march" formation one base wide (or, for skirmishers, two figures). In both types of formations, for formed troopps all bases must share a facing and be arranged according to their type, as described. Single-base units also always have a formation, even if this cannot be easily seen on the tabletop (formation should be noted as "march" when the unit has made a March action, and until it makes a non-March move again - otherwise it will be in "battle" formation, like any other unit).
Movement as provided by the app is in base inches: the number of inches which may be moved in open terrain. This base number is modified by terrain and by changes of formation and facing. You may always choose to move less than your full movement, except in the case of obligatory charges made by units rated "aggressive." Advance actions are used for normal maneuvering, including facing changes in place, regardless of direction of movement.
The following movement options are possible, in any combination which does not exceed total base movement:
Forward Movement: Unit moves straight forward in the direction of movement. No base in the formation may nove further than the total adjusted movement, measured from the center of the base in its starting and ending positions.
Wheels: The unit may move one front corner, while keeping the other in place, paying for the movement made by the moving corner. Wheels may only be made to a unit's front.
Facing Changes: Unit may change unit facing by rotating around their center point, or around the center or end of their frontage.
Formation Changes: Unit may switch from their battle formation into a column formation or back. For a unit in battle formation, this is done as part of a March order. The unit will orient itself directly twoard front, rear, or either flank, and be arranged into a 1-base-width column. If any movement other than March is performed in this formation, the unit must assume battle formation, again orienting itself to front, rear, or either flank. Note that the only orders permitted to units in March formation are March, Rest/Regroup, Melee, and Routed Through. The movement penalty for formation changes is applied to the movement for the order which requires that the formation be changed: March orders for forming into column, and other movement orders for coming out of column.
Forlorn Hopes, Irregular Light Horse, and Dragoons are a special case. They do not have regular formations. Dragoons and Forlorn Hopes operate without a front, flank, and rear - the "front" is whatever the player wishes at the moment. For Irregular Light Horse, the unit does have a front facing for movement purposes. For all, figures/bases should be arranged as described in Formations, above. No base/figure in the group may move further than the adjusted maximum move.
Movement made with a Retire action is a special case: the unit will move directly backward, up to 45 degrees to either side, paying normal terrain costs. Wheels are not allowed in a retire movement.
Note that you may not move within 1 inch of the front of an enemy unit except to make a Charge action to bring a unit into contact with that enemy, or to Retire out of contact.
Units may freely interpenetrate and be interpentrated by friendly Forlorn Hope, Dragoons, and Irregular Light Horse in any direction, but may not end their move in the same space. No other interpenetration is allowed.
Heavy Cannon (typically siege guns in static positions) cannot move except to change facing.
The table below shows the effects of terrain and facing changes ("factors") on base movement:
| Factor | Cost | Notes |
| Facing Change | 3 inches | Not needed for Forlorn Hopes or Dragoons |
| Rough Terrain | 2 inches/inch moved | Full speed for Forlorn Hopes, Dragoons, and Iregular Light Horse. |
| Very Rough Terrain | 3 inches/inch moved | 2 inches/inch moved for Forlorn Hopes and 4 inches/inch moved for all other Mounted. Impassable for Medium Field Artillery |
| Linear Obstacles | 2 inches to cross | Fences, hedges, walls, ditches, etc. Impassable for Medium Field Artillery. |
| Choke Point | 3 inches plus distance moved | Bridges, gates, etc. |
| Roads | 1 inch for every 1.5 inches moved | Only in March formation |
All types of terrain should be fully described by the scenario, or agreed by players before play begins. Some terrain (water-logged fields) will be rough or very rough for movement purposes, and combat, but will not provide cover from fire. Most rough terrain (open woods) would also provide cover.
Towns and villages may be counted as rough terrain for movement, but function as roads for the movement of units in column. They may provide soft or hard cover as specified by scenario, or even fortifications if fortified.
Units which are attacked while half-way through a choke point count as flanked, regardless of the type of troop or the angle of attack.
Cheveaux-de-frise, caltrops, and similar devices can be represented by giving any mounted unit frontally charging their users a setting of rough ground in the open (or very rough ground, depending) for the consequent Melee action.
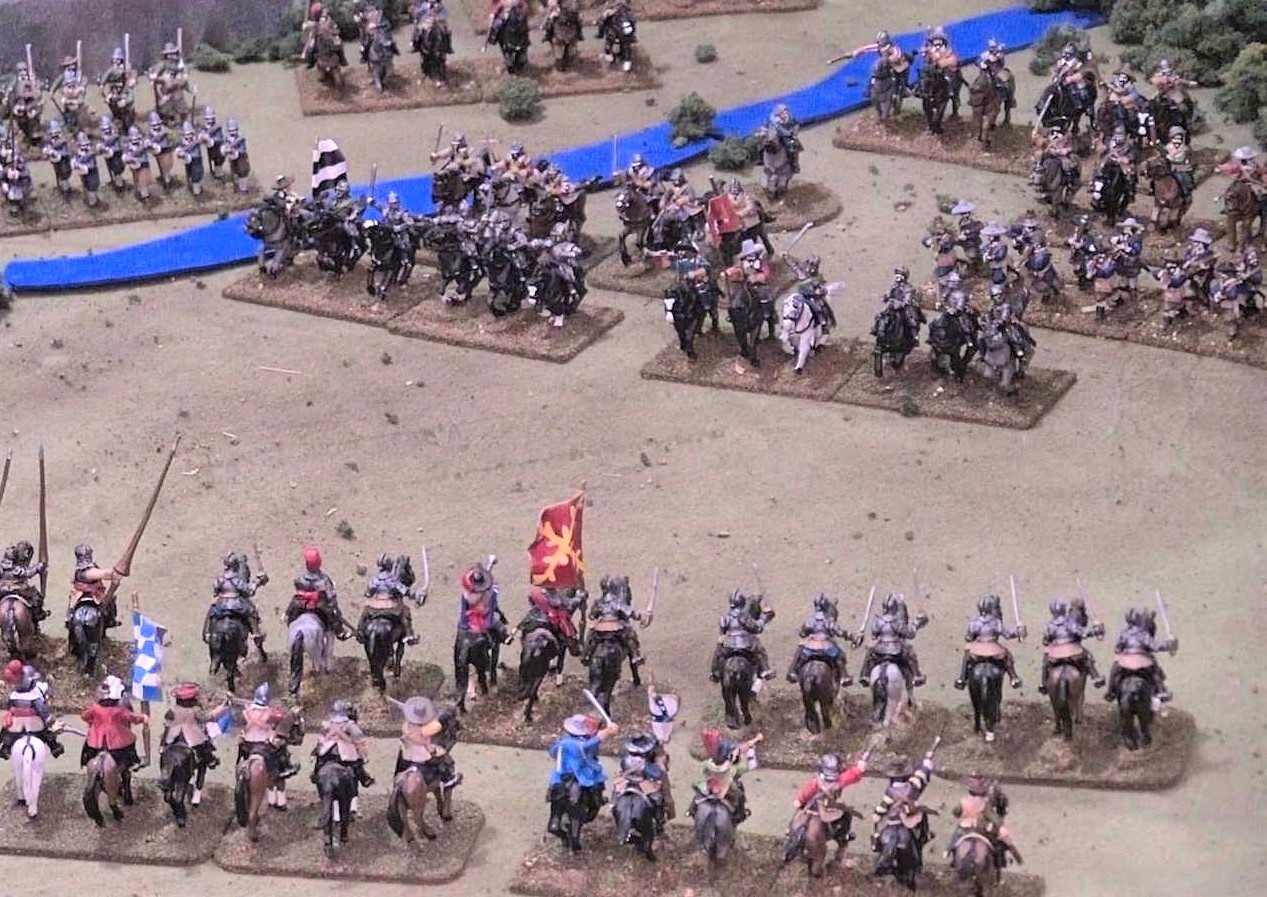
Imperialist and Protestant League horse ready to clash.
Dutch Battalions, Tercios, Swedish Brigades, Streltzy, Commanded Shot, Forlorn Hopes, Dragoons, Harquebusiers, Irregular Light Horse, Light Artillery, and Field (Medium and Heavy) Artillery may employ ranged fire. Cuirassiers, Reiters, and Militia/Levy may only use fire under specific circumstances. Sword & Bucklermen, Guard Cuirassier/Lancers, and Finnish Hackapells never fire.
Cuirassiers and Reiters will only fire when charging or being charged. In some cases, Eastern troops such as Mucovite boyars or pancierni cossacks armed with bows - classified as Reiters - may be given the ability to fire by scenario if so equipped. Levy/Militia may or may not be equipped with missile weapons, also by scenario - if they are so equipped, they will be allowed to fire.
Range if fire is given in the table below for each troop/weapon type. The range is the shortest line of fire between the firing unit and any point on the target base. (Note that sub-units in larger formations such as Tercios and Swedish brigades are assumed to move within their parent unit to optimize fire, but that this is not reflected by re-arranging bases on the tabletop.)
| Troop/Weapon Type | Short Range | Maximum Range | Notes |
| Musketeers | 6 inches | 12 inches | Dutch Battalions, Tercios, Swedish Brigades, Streltzy, Dragoons, Forlorn Hopes, Commanded Shot, and Militia/Levy |
| Harqebusier (Carbines), Bows | 3 inches | 6 inches | Includes Reiter-type general-purpose cavalry with a combination of bows and firearms |
| Cuirassiers, Reiters (Pistols) | Charging/Receiving Charge | Fire only during charges | |
| Light Artillery | 6 inches | 18 inches | Regimental guns of less than 6# |
| Medium Artillery | 9 inches | 24 inches | Field guns rated up to 24# |
| Heavy Artillery | 12 inches | 36 inches | Seige guns of 24# and higher |
Fire may only be conducted from the front of any base in the unit, and up to 45 degrees to either side of facing outward, measured from the edge of the base (the "arc of fire"). Only the front rank of bases may fire, with the exception of Swedish Brigades, which fire 3 bases frontally (see Formations, above).
Targets for fire must be within range and arc, as well as visible to the firing unit (within line of sight). Line of sight is determined by having a clear line between the front of the firing base and any point on a base in the Target unit, passing through a gap at least 2 inches in width. Line of sight extends 2 inches into, out of, or through woods or similar concealing terrain unless stated otherwise by scenario. All units block line of sight - you cannot shoot through friendly or enemy units, although you may shoot over them if at least one terrain level above them (that is, on a hill or similar) with no other unit closer than 2 inches to the target along the line of sight.
Note that for the purposes of fire, any side of a Dutch Battalion, Tercio, or Swedish Brigade may count as the "front" for determining line of sight and similar considerations.
Only bases within range, arc of fire, and with a clear line of sight may fire, but not all bases in a firing unit are required to fire on the same target. Some bases may be unable to fire, but the action may still be taken by those which are. Fire for each Target in a single Fire action will be conducted separately with the app. However, all fire on a single Target in a single Fire action must be performed with one calculation in the app. (If a Fire action has two Target units, then two calculations are performed with the app to determine the results - one for each target unit).
Players may choose to combine fire on a single target which is coming from more than one unit, but this is not required. When calculating fire, the type of firing base is the most numerous wone - when there are equal numbers of more than one type, the player may choose. Note that this choice will also determine whether the firer is disordered/demoralized. (Two bases of disordered mucketeers and a sihgle undisordered light artillery base will fire as if disordered musketeers. If there is only one base of each, the player may choose to fire with the undisordered light artillery.)
For any fire except Cannon, closer targets must be preferred to those which are further away. If equidistant, the player may decide which to fire on. It is always permitted to concentrate all of a unit's fire on the closest target unit, measured as the shortest distance between the firer and target. Split fire on a target which is closer only to some of the bases in a firing unit is always optional, and performed according to the player's choice - some bases may fire on a base closer to them (or equidistant) if desired. Cannon may select any valid Target for fire.
When calculating strength ratios for setting modifiers in the app, the number of firing bases (for the Actor) is compared to the total number of bases in the Target unit. "Outnumbered" is any difference in size which is more than exactly equal in bases, but which is less than fully twice ("Badly Outnumbered").
Advancing Fire: Advancing fire may be conducted by troops which are able to combine fire and massed missiles, including formed musketeers (including Streltsy, Militia/Levy, and Commanded Shot), Forlorn Hopes, Harquebusiers, Reiters (only if Eastern types armed with Bows/Firearms), Irregular Light Horse, and Dragoons. To conduct an Advancing Fire, you set the range at the distance before movement, and move directly toward the target. Fire must be allowed throughout the entire move. The game app will indiacte distance moved, and then the effects of fire. Advancing fire tends to be much less effective than regular fire.
Charges are a mechanism for initiating a combat with an enemy unit, used by a unit which is not already engaged in a melee. To make a Charge, a unit may wheel, and must then be able to move directly forward until some part of its front is in contact with some part of the Target unit. This movement may not cross the frontage of another enemy unit within 1 inch. Artillery and units in "march" (column) formation may not Charge, nor may Dragoons or Forlorn Hopes when in the open except against other Dragoons, Forlorn Hopes, or Artillery. Irregular Light Horse may not charge any but Irregular Light Horse, Dragoon, Forlorn Hope, or Artillery units unless the Target of the Charge is already engaged in an ongoing combat or is being charged in the flank or rear. Note that Harquebusier units will not charge an undisordered enemy (the game app will tell you when this is the case.)
Frontal charges against all troop types except Sword & Bucklermen, Lancers, Heavy Artillery and Hackapells may involve taking fire during the Charge action if the Charging unit at any point crosses the firing arc of the Target unit. This is done exactly as for normal Fire actions. If a "devastating fire" results (the loss of 2 Status Levels) then the charging unit will fail to contact its target, and end its move an inch short. No Melee action will follow. Units which have already acted for the turn will not be able to perform a Fire action at a charging unit.
If a Charging unit crosses the arc of fire of any non-Target unit capable of fire (except Heavy Artillery) during the Charge, within short range of that unit, then a pass-through fire may be conducted. Only units which have not yet acted for the turn may conduct pass-through fire, and only if they have not yet acted for the turn. Pass-though fire is conducted like other fire, and will use the firing unit's action for the turn.
Charging Harquebusiers, Cuirassiers, and Reiters will fire at their Target before contact, but after defensive fire is taken, and only if contact is made. This is conducted like regular fire. If the target is not disordered, Harquebusiers will refuse to contact the enemy frontally, stopping an inch short of contact.
When Charged, Forlorn Hopes, Dragoons, and Irregular Light Horse may attempt to evade the Charge. Once the Target unit has made its evade movement - which is performed like any other movement, including paying for the initial facing change by the evading unit - any movement remaining to the charging unit may be taken, in an attempt to contact the Target. Other Target units may be contacted, if they are exposed by the evade move, but these will not be able to themselves evade or conduct defensive fire. This charge movement in pursuit of an evading Target may not cross the front of a any non-Target enemy unit within 1 inch other than to come into combat contact with it.
Note that evade moves will use the evading unit's action for the turn, and thus remove the possibility of conducting defensive fire by the Target unit.
Whether contact (and a melee) results from a Charge action or not, any unit which Charged, evaded, or made a Fire action is considered to have acted for the turn.
Charges may not involve a change of formation of any type on the part of the charging unit. Unit depth and frontage must remain the same as at the start of the move. Only a wheel, followed by movement directly forward is allowed. The exception to this rules is for Irregular Light Horse, Dragoons, and Forlorn Hopes, which may adjust their formation as desired, as they have no regular formation per se. If contact is made, the front of the charging unit will wheel to either left or right in order to maximize the amount of contact between the two units, but must always wheel to the front of the Target if possible, even if the degree of contact would be less.
When a unit makes a Charge action resulting in contact, and a Melee action is made, the "Actor is Charging" box must be checked. This box is not important for conducting the Charge action itself - only the immediate Melee action occurring as part of that charge.
Note that it is not possible to Charge two units at a time, even if the Charge movement will bring the charging unit into contact with more than one enemy unit. The first enemy unit which would be contacted must be declared as the Target of the Charge. If there is a choice of Targets, it is the charging player's decision. Note that it is allowed for more than one enemy unit to be contacted by the move, and that both of the contacted enemy units may be involved in the combat, but the one designated the Target must be involved in the combat. The other may become a Supporting unit (see below).
Whenever an activated unit is in contact with an enemy unit, there may be a combat. This is the case if any part of the front of either unit is in contact with the enemy. This situation may result from a Charge action, in which case a Melee action is immediately made. This may result from two units being in combat at the start of the turn, which is termed an "ongoing combat."
Combat involves at least two units - an Actor and a Target - but may also involve others. Any unit involved in a combat which is neither the Actor nor the Target is termed a "Supporting" unit. The Actor is always the activated unit which triggered the combat - the unit which has just made a Charge action, or the unit selected by a player to be activated. The Target unit is either the one designated in the Charge which was just conducted, causing the melee, or is one of the enemy units (if more than one) in contact with the front edge of the acting unit, in a case where no Charge action has taken place immediately before the Melee. The acting unit's player may select which enemy unit is the Target under circumstances where there is more than one possibility.
Supporting units do not change the modifiers entered in the game app, except for the determination of force ratios, and whether the Acting or Target units are taken in flank or rear. Supporting units include:
All units involved in the combat will be considered to have acted, whether they are the Acting unit, the Target unit, or a Supporting unit. Any Leaders attached to any unit involved in the combat will also be considered to have spent one initiative activating the unit to which they are attached for the current turn, if they have not yet activated for the turn.
A unit is considered to be "Taken in Flank/Rear" for game purposes if any enemy unit has contacted them on their sides with any part of its front.
After a Melee has been conducted, any unit which is contacted on the flank, but which is not contacted on the front, may choose to change facing to face any contacted flank. This is always optional, and may only be done once per turn by any given unit. Note that flank contact does not include front-corner contact with an enemy unit: contact must be made along the side of the unit, on the rear of the unit, or on a rear corner. Front corners are only considered to be a part of the unit's front facing.
For determining force ratios in a Melee action, all bases in the involved units are counted, regardless of whether they are in contact or not, or have already been engaged in a Melee action during the turn. (In a push of pike, soldiers would press forward into the action [or shirk], unconstrained by the training which was common in later periods!)
The Cover/Ground selection always describes the situation of the targeted unit. In cases where a unit in cover or fortifications is meleeing a unit not in cover, the "None/Open" value should be selected, except in the case where the targeted unit is mounted. In this case, the "Rough No Cover" value should be selected, as the mounted unit will still be at a disadvantage.
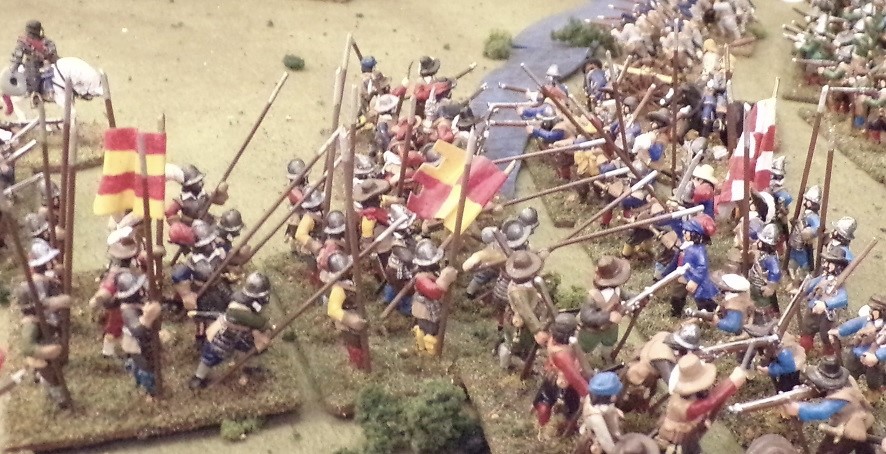
A Tercio pushes across a stream against opposing heretics.
When a Melee action is taken, but does not result in the destruction of one side or the other, the units will remain in contact after acting. This is considered to be an ongoing combat. Whenever either unit is activated, a new Melee action will be taken. There are some special cases which occur when an ongoing combat is involved.
One of these is when an activated unit attempts to perform a Retire action. If successful, the retiring unit will pull out of the combat and a Melee will not be fought if contact is broken. If unsuccessful, an immediate Melee action will be made.
If a Regroup action is made by a unit in an ongoing combat - something which requires the activating Leader to be attached to the unit - there will be an immediate Melee action, regardless of whether the Regroup action was a success or failure. The activating unit (the one attempting to Regroup) will trigger the Melee action, and its Leader will be involved in this Melee. Note that units which are contacted on more than one face at once (to front and flank, to rear and flank, etc.) may not perform Retire actions.
It is possible to charge into an ongoing combat, so long as the Charge action would involve no interpenetration of units, even if otherwise allowed (this is important: no interpenetration of units!). In such cases, neither evasion nor defensive Fire are allowed by the unit which is the Target of the Charge. Units in the Melee on both sides which have already acted may influence it as Supporting units (see above). The Target will engage in the Melee regardless of whether it has already acted or not.
Unit Status is a measure of how a unit is currently functioning, in terms of morale and losses. Combat outcomes are expressed as a change in Unit Status. All units begin the game with their full strength known (the number of bases in the unit), and all have a Unit Status of "OK". Unit Statuses are:
OK: The unit is good condition. The loss of bases does not stop a unit from having this status.
Disordered: The unit is in disarray. This situation is very common, and can be corrected by having the unit make successful Regroup action.
Demoralized: The unit is in a state of disarray bordering on panic: this is almost "sauve qui peut" territory. The situation can also be recovered from by Regrouping, but it may take more than one action.
Destroyed: The unit's soldiers have panicked, surrendered, become casualties, died, etc., and it is removed from play. Any time a unit has lost a full half or more of its starting number of bases, it is immediately destroyed.
Gaining a Status Level means going upward in the list above, and losing a Status Level is movement further toward the bottom of it. For example, an unit with an OK Status Level which goes down two levels will have a new Status Level of "Demoralized". Note that the Status Level does not correspond to the number of bases lost until the unit is destroyed. A unit with no losses can be Disordered or Demoralized, and a unit which has taken losses can be OK or have any other Status. A unit must first be Disordered, and then Demoralized before additional base losses are inflicted, even if it has previously suffered base losses. (Rallying units which have taken losses is a good way to keep them on the field!)
When an OK unit loses a Status Level, it becomes Disordered. When a Disordered unit loses a Status Level, it becomes Demoralized. When a Demoralized unit loses a Status Level, it loses a base. When a Demoralized unit loses two Status Levels, it loses two bases.
Any outcomes from Fire or Melee actions are implemented immediately. The exception to this is missile fire occurring at the end of the turn, which is simultaneous: any firing unit will make their Fire action before suffering from fire taken during the same portion of the turn. The effects of melee only impact the Actor or Target: Supporting units are not necessarily affected by combat outcomes, but in Melee actions, a player who is taking losses in status may choose to distribute half (rounded down) or less of the losses to supporting units in the combat. The Target unit must suffer at least as many status losses from the melee as any other unit.
Note that Disorder and Demoralization do not stop a unit from being activated. In many cases, however, it will reduce their effectiveness. These units may still move, charge, fire, and fight.
When a unit charges into a combat and destroys its enemy, it must move forward to occupy the space vacated by the Target of the Melee. In any other circumstance, such a move on the part of the Actor in the Melee is optional. In both cases, the occupying move is only permitted if no other enemy units are in contact with the Actor of the Melee.
Enemy camps and baggage trains may be destroyed if they are in contact with an enemy unit at the end of the turn, but only if the unit destroying the camp or baggage train is not itself in contact with an enemy unit. Once the camp or baggage train is destroyed, the destroying unit(s) will immediately become Disordered, reflecting the fact that troops will inevitably break ranks to loot. Units which are already Disordered will become Demoralized, reflecting an additional level of indiscipline (although not panic). Base losses will never occur from such a contact.
When dice are used to calculate combat outcomes, the following system is employed:
Fire: If the firer and the target have modified rolls which are equal, or if the target's roll is greater, the fire has no effect. A difference of 3 or less in the firer's favor inflicts 1 Status Level of damage; a difference of 4 or 5 inflicts 2 Status Levels; a difference of 6 or 7 inflicts 3 Status Levels; and a difference of 8 or more results in automatic destruction of the target unit. Any fire result which inflicts a loss of 2 or more status levels is termed "devastating fire" (this will halt a charging enemy).
Melee: If the attacker and the target have modified rolls which are equal, both sides suffer a single Status Level of damage. A difference of 3 or less inflicts 1 Status Level of damage on the side which scored lower; a difference of 4 or 5 inflicts 2 Status Levels; a difference of 6 or 7 inflicts 3 Status Levels; and a difference of 8 or more results in automatic destruction of the target unit.
A Leader attached to unit which suffers a loss of one or more Status levels in a melee may be killed, wounded, or captured. This will happen on a die roll on a single die, equal to or less than the number of Status Levels lost in that combat. The affected Leader is removed from play and not replaced.
Each army is given a Break Point. This is the total number of bases in all the units in the army, also counting the baggage or camp as a unit if there is one (generally as a single base). Each unit adds to the total (see below), but Leaders are not counted. As the battle progresses, each side will keep track of how many points it has lost toward breaking. The status of each army is checked at the end of each turn. Once the total of points toward breaking equals or exceeds the Break Point, the army is broken, and has lost the battle. It is possible for both sides to lose in the same turn, resulting in a draw.
The quality of the army determines the way in which the Break Point is calculated. For a typical army, each base counts as 1, with the resulting total of bases being the Break Point. For an army of higher quality, this total can be multiplied by 1.5 (rounded up), or for a lower-quality force by .75 (rounded up).
During play, a running total of damage inflicted on each army is calculated by adding up the following:
For each disordered unit: 1 point
For each demoralized unit: 2 points
For each base destroyed: 3 points
For a killed/captured Army Commander: 6 points
For a killed/captured Battle/Wing Commander: 4 points
For a sacked camp/bagge train: 6 points (suggested)
Once a unit is removed from play, Disorder and Demoralization are no longer counted, but every base in the unit is counted toward the total as destroyed.
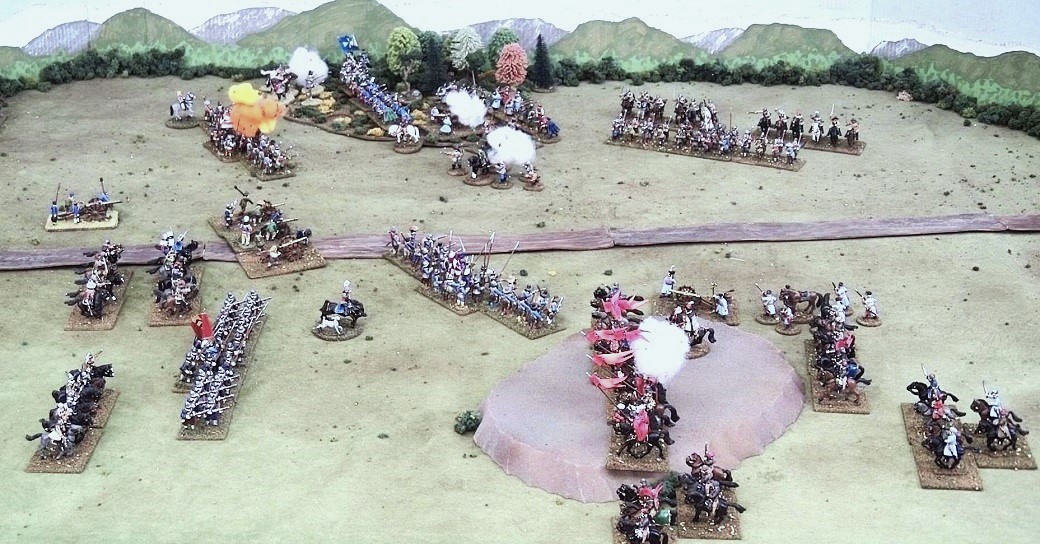
A view from the remote camera: Swedes and Poles clash near Warsaw.
This game was created to allow for remote games played using actual miniatures viewed by players over remote conferencing systems such as Skype or Zoom, and for use in convention settings. It is based on our earlier Medieval system A Bloody Dismal Fight and the Italian Wars game app El Gran Cápitan.. Remote play and convention play have some similarities, and we have found that this game works well for both applications.
As we conducted more remote games of different types, we learned several important facts. Games needed to be less finicky in terms of positioning of units on the tabletop. Lots of small units - a feature of many game systems - make for a slow and irritating game. It is too difficult for players to see the tabletop, and when each move must be described verbally to a game master, the entire thing quickly loses its appeal. Further, dice rolling - a critical part of the game - also becomes less important, because the only person who sees the rolls is either the player or game master, depending on how you do it. Virtual die rolling systems do exist, but you quickly reach a point where the dice become a distraction rather than a feature. Why not let the game system roll the dice?
Games also need to be relatively shorter than face-to-face games, because communications over the internet are inherently more tiring than in-person ones. It is also easier to get bored when it is the other guy's go, since there is not as much to see. When you are communicating through a system which only supports one spoken conversation at a time, side-talk is impossible. And you cannot walk around the table and admire it!
The use of larger 25mm/28mm figures is also a major advantage in remote play, because the camera view of the tabletop is limited in breadth, and must be "zoomed out" to show a big enough portion of the battlefield to the players in a single view. A 25mm figure over a web camera is effectively the same size as a 15mm figure in a face-to-face setting.
In a convention setting, a game which can be learned quickly, and does not require a lot of finicky positioning (and the body of rules which make such positioning significant) is also desirable. Players need to be able to pick up the game system and play the entire thing to completion in a matter of three or four hours, and to do so without rushing. And the larger figures are more eye-catching than smaller ones in a room full of tables with miniatures games on them, where many convention attendees will cruise through the room and look at the many different games as they pass by. The Renaissance has gorgeous figures and uniforms, and the larger scales allow them to be seen to best effect.
All of these factors have fed into the current design. The game is an easy one to explain and learn. Units are fewer in number and larger than in many other systems for the period, requiring fewer moves. Play goes back and forth between sides more rapidly, so that the game remains more interactive, leaving less uninterrupted "down time" for players. Armies break easier and faster, to accommodate the shorter overall length of games. The use of the app actually makes play go faster, since there is little time spent looking modifiers up or consulting charts in the rules, or, for that matter, rolling dice. This is a benefit because the general tendency of gaming remotely is to slow play down - anything which can be done to speed it up is welcome. (Since remote play of this type is, by its nature, moderated by a game master, anything which helps the GM get things resolved faster is a big plus. For a remote game, they are already sitting at their computer or using their device!)
Games designed to meet the requirements above benefit greatly from having a narrow focus on a specific period. Many of the modifiers and special rules found in other more generic systems covering all of the Renaissance are baked directly into the system, and require no thought on the part of the scenario designer or players. This system is anything but a tournament system: it is directly tied to the historical period it represents.
We sometimes hear the comment from players that the use of smart phones or other devices to run games "feels" somehow too modern, and clashes with the idea of a wargame set in the Renaissance. We reject this argument as bogus: you didn't see Wallenstein wandering around with a tape measure, a rule book, and a box full of dice, did you? Games can be played with whatever technology is available, and our experience of this (and similar) systems is that they speed play and allow players to focus more on the battle, and less on the game mechanics. To us, this is a good thing.
In terms of how the game reflects historical tactics, we have often felt that other rules systems did not coordinate the pike and shot elements of large formations correctly. The pikes and the musketeers were not separate bodies of troops acting independently - they were trained to be used together in a flexible fashion, but in a way that allowed both arms to rely on each other. This system reflects that dynamic. Further, pistol cavalry were a major force on the battlefield, but they are often portrayed in ways which do not make sense to us: point-blank firepower was an effective tactic against massed blocks of pike and shot - at least some of the time - and we wanted the game to reflect the way this worked on the field. Lower-quality mounted troops (harquebusiers) were often unwilling to charge, unless their fire was effective, however. We do not see them as being typical mounted skirmish troops or light cavalry, although this is sometimes how they are portrayed on the tabletop in other systems. We hope these aspects of the game give a more authentic period feel.
While we will undoubtedly continue to play other rules systems, for many types of games, While the Devil Rules will be the one we use for remote and convention play. We hope you find that it serves these purposes well, and enjoy it in the intended spirit.