The Caithness Castle Affair
A Coop Play Scenario for Viktoria!
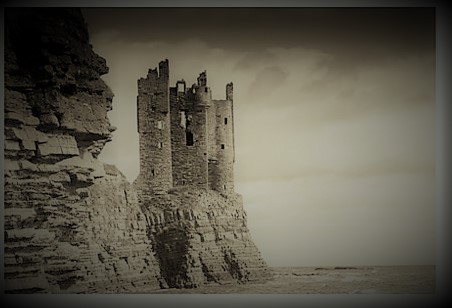
"Little more than a bloody broch!" - Lord Balfour's castle in Caithness.
"Little more than a bloody broch!" - Lord Balfour's castle in Caithness.
It has been a rough year for Lord Balfour. His estates in Hampshire have been over-run by the invading Prussians, and now the Caithness property he inherited from a rich uncle, in the far north of Scotland, has been seized. To add insult to injury, his niece Meredith - who had married a Prussian nobleman before the recent unpleasantness, saying "he has oodles of money, and is the same sort of swine as the English ones, but I can pretend I don't understand him when he talks, so that's all to the good, isn't it?" - turns out to have been an agent working for the Foreign Office. She has gotten herself unmasked as a spy, and is being held prisoner - where else? - in the draughty tower on the coast at his Caithness estate. (She has somehow managed to send word of her plight via homing pigeon.)
Given the personal nature of the mission - it is, after all, his family, and his crumbling tower in the far north of Scotland - he has been assigned to take command of her rescue, and to destroy the batteries which the Prussians have put in place nearby while he is about it. The naval chappies have taken an interest - apparently the coastal batteries are giving them headaches - and they have offered to give him the use of the HMS Dragonfly, the first of the aerial cruisers they have been developing. "A bloody great balloon, waiting to be popped, is what it is," Lord Balfour has decided, and he plans to use it as a diversion while he assaults the coast from good old-fashioned steam launches. "We'll come at them out of the fog!" he declares, thus providing all the salient details of his plan, which otherwise involves trusting to dumb luck, plain and simple.
His launches are towed to the scene of the action, loaded with assorted companies of regulars and his trusty Hampshire Yeomanry. They are supported by a heavy battery from the ship - an aging ironclad, HMS Deerhound - and a battery of guns from the Royal Artillery. With only two launches available, the landing will need to be made in waves, but it does mean that at least some of his fellows can bring their horses ashore, to hunt the Boche in proper style. He has recruited his gamekeeper - dubbed "Captain" Lewes, for the duration of hostilities - to command the second wave. A Scottish officer, seconded to the Foreign Office and familiar with the area, will also accompany the expedition, to act as a guide. The attack will be preceded by the appearance of the HMS Dragonfly, overhead.
Little is known about the enemy. The location of some coastal batteries has been pin-pointed, and it is known that a company of infantry is holding the castle, but the other enemy forces which may be in the area are anyone's guess. As the sun rises, "Balforce" (as Lewes has dubbed it) sails to rescue the Lady Meredith, and reclaim at least one of the family holdings.
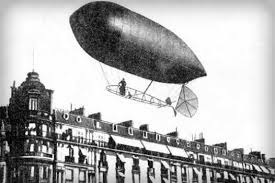
A photograph of HMS Dragonfly during her early trials, and before the addition of the armored cabin and 12-pounder battery.
The map below shows the tabletop. The brown areas are rocky hills, and provide hard cover and are rough for movement purposes. The tower is a partly-ruined structure sitting atop a headland which presents a cliff to the ocean side. This is impassable for troops, which cannot be landed anywhere on the coast of the headland (only to the south from the Prussian gun emplacement down, or north of the headland where the coast turns northeast). The village is made of old stone and stucco cottages which provide only soft cover. The Prussian gun emplacements are regular batteries which are fortified with sandbagged positions giving them hard cover from the seaward side only.
At the start of play, the Wind Conditions are a steady breeze blowing in an on-shore direction (that is, due west). Changes to the wind may occur at the start of each turn, as per the normal rules.
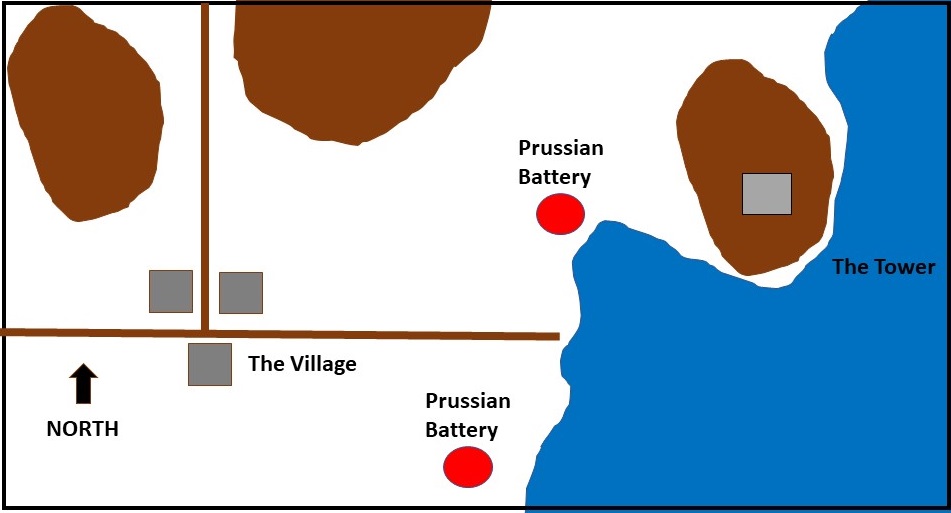
All units of Balforce will enter from the eastern table edge, including HMS Dragonfly. The ironclad will remain off-table and cannot be chosen as a target for fire (too foggy to see from the coast).
The Prussian gun emplacements each have 3 crew members and a field gun. There is a guard of 6 Average rifle-armed infantry at the Tower, where Lady Meredith is being held captive. They are accompanied by an officer. In the village, there is a unit of 12 Average rifle-armed Prussian infantry, who are stationed there for coastal guard duties. They also have an officer. Other Prussian forces are in the area, and will be as indicated by the game app. They will never appear in the ocean, but will always only appear on land.
Balforce is organized into three commands. Lord Balfour is the commander-in-chief, and will command the First Wave. Captain Lewes is the commander of the Second Wave. The third command - the Support Group - consists of HMS Dragonfly and the supporting iron-clad, plus the battery of the Royal Artillery, and is commanded by the seconded Scottish Officer.
First Wave
Lord Balfour: A mounted officer armed with sword and pistol.
South Wales Borderers: 14 Average rifle-armed Soldiers.
Hampshire Yeomanry (Dismounted): 15 Average carbine-armed infantry.
Hampshire Yeomanry (Mounted): 10 Average mounted Soldiers with swords and carbines.
Second Wave:
Captain Lewes: An officer on foot, accompanied by his trusty beagle, armed with a rifle.
Scots Guards: 14 Veteran rifle-armed infantry.
Connaught Rangers: 14 Veteran rifle-armed infantry.
Support Group
The Seconded Scottish Foreign-Office Bloke: A mounted Officer armed with sword and pistol. (Lord Balfour can never remember his name, so we have not bothered to incude it here, as it will certainly not be mentioned afterwards in any of the official reports, assuming there are any!)
HMS Dragonfly: An airship (a powered zeppelin-type affair: a Dirigible in game terms) with an armored cabin, a self-sealing balloon, and two twelve-pounder guns. The crew is integral to the vessel. She will always present a target which is deemed to be in hard cover. She moves at normal dirigible speeds, and her crew is considered to consist of ordinary Soldiers. She can drop a bomb with a 2-inch blast radius as if thrown from the center of the craft, once per turn, adding an inch to the range roll for each altitude level above 2. She has capacity to carry up to 3 additional passengers if she lands for them to board - there is no provision from boarding while she is at any altitude, as it is not in her mission plan (Lord Balfour expects her to explode, and is not terribly detail-minded in any case.)
HMS Deerhound: This iron-clad will remain off-table, serving only as a heavy artillery battery whose fire can be called in by the spotting party (3 Veteran infantrymen equipped with pistols and a semaphore). The spotters may accompany either wave of the landing but will occupy a space in one of the launches. They must have a clear line of sight out to sea to spot for the guns of the ironclad.
Royal Artillery: A Veteran field gun and four pistol-armed crew.
Lady Meredith: She is an officer figure (she can be very persuasive, and is certainly a commanding figure) armed with (if she escapes) a pistol. See rules below for how she enters play.
Balforce has two steam launches, each capable of carrying up to 2 units and an officer or two. Each wave must land together, but will include any number of units from the Support Group, as appropriate. The First Wave does not have to go first (they just named it that because it is Lord Balfour's command, and he gets stroppy when he doesn't go first). Note than the Seconded Scottish Foreign-Office Bloke must be on-shore to command the spotters and artillery, but that HMS Dragonfly is always in command, having her own officer on board. The steam launches must reach the center of the eastern table edge before they can be reloaded with a second wave (etc.)
Lady Meredith will roll two dice at the start of each turn following any aggressive action by Balforce (fire or coastal landing). On a score of 7 or better she escapes. On a score of 9 or 10 she will have seduced the officer of her guard, who will assist her in all subsequent endeavors. On an 11 or 12 she will have seduced the officer of her guard and he will bring all of his unit with him. She is capable of commanding any British unit on the table. When she escapes, she starts inside the Tower.
Any Conscript-rated enemy unit appearing at behest of the game app will, on a roll of 1 or 2 on 1 die, be a group of local members of the Scottish Labourer's Association who have decided to throw in their lot with the Prussians, against the properly constituted authorities. They will be in large units (add a couple of figures to normal unit size), and have been armed with rifles by the Prussians. They will only count as Civilian infantry in combat, however, being enthusiastic but untrained. (Lord Balfour has no concept of the extent of discontent among his tenants, seeing as how he has never met any of them.)
If Balforce can silence the Prussian coastal batteries and rescue Lady Meredith, then the game is a major victory, having achieved its objectives. Any lesser result is possibly a victory, and possibly not, depending on who gets killed and whether the Prussians are still able to deny passage to British ships through the channel to the east with their batteries. Lord Balfour would like to destroy all the Prussians and reclaim his estate for England (err, Scotland - well, the Crown, anyway), but that may be asking too much - if any Prussians are on-table at the end of play, Balforce is assumed to withdraw. Players will need to concede this as appropriate.