
Rules and Guide to Play
II. Troop Types, Scales, Force Organization, and Basing
V. Unit Status and Combat Effects
IX. Leaders, Command Control, and Regrouping
X. Vehicles and Scenario-Specific Rules
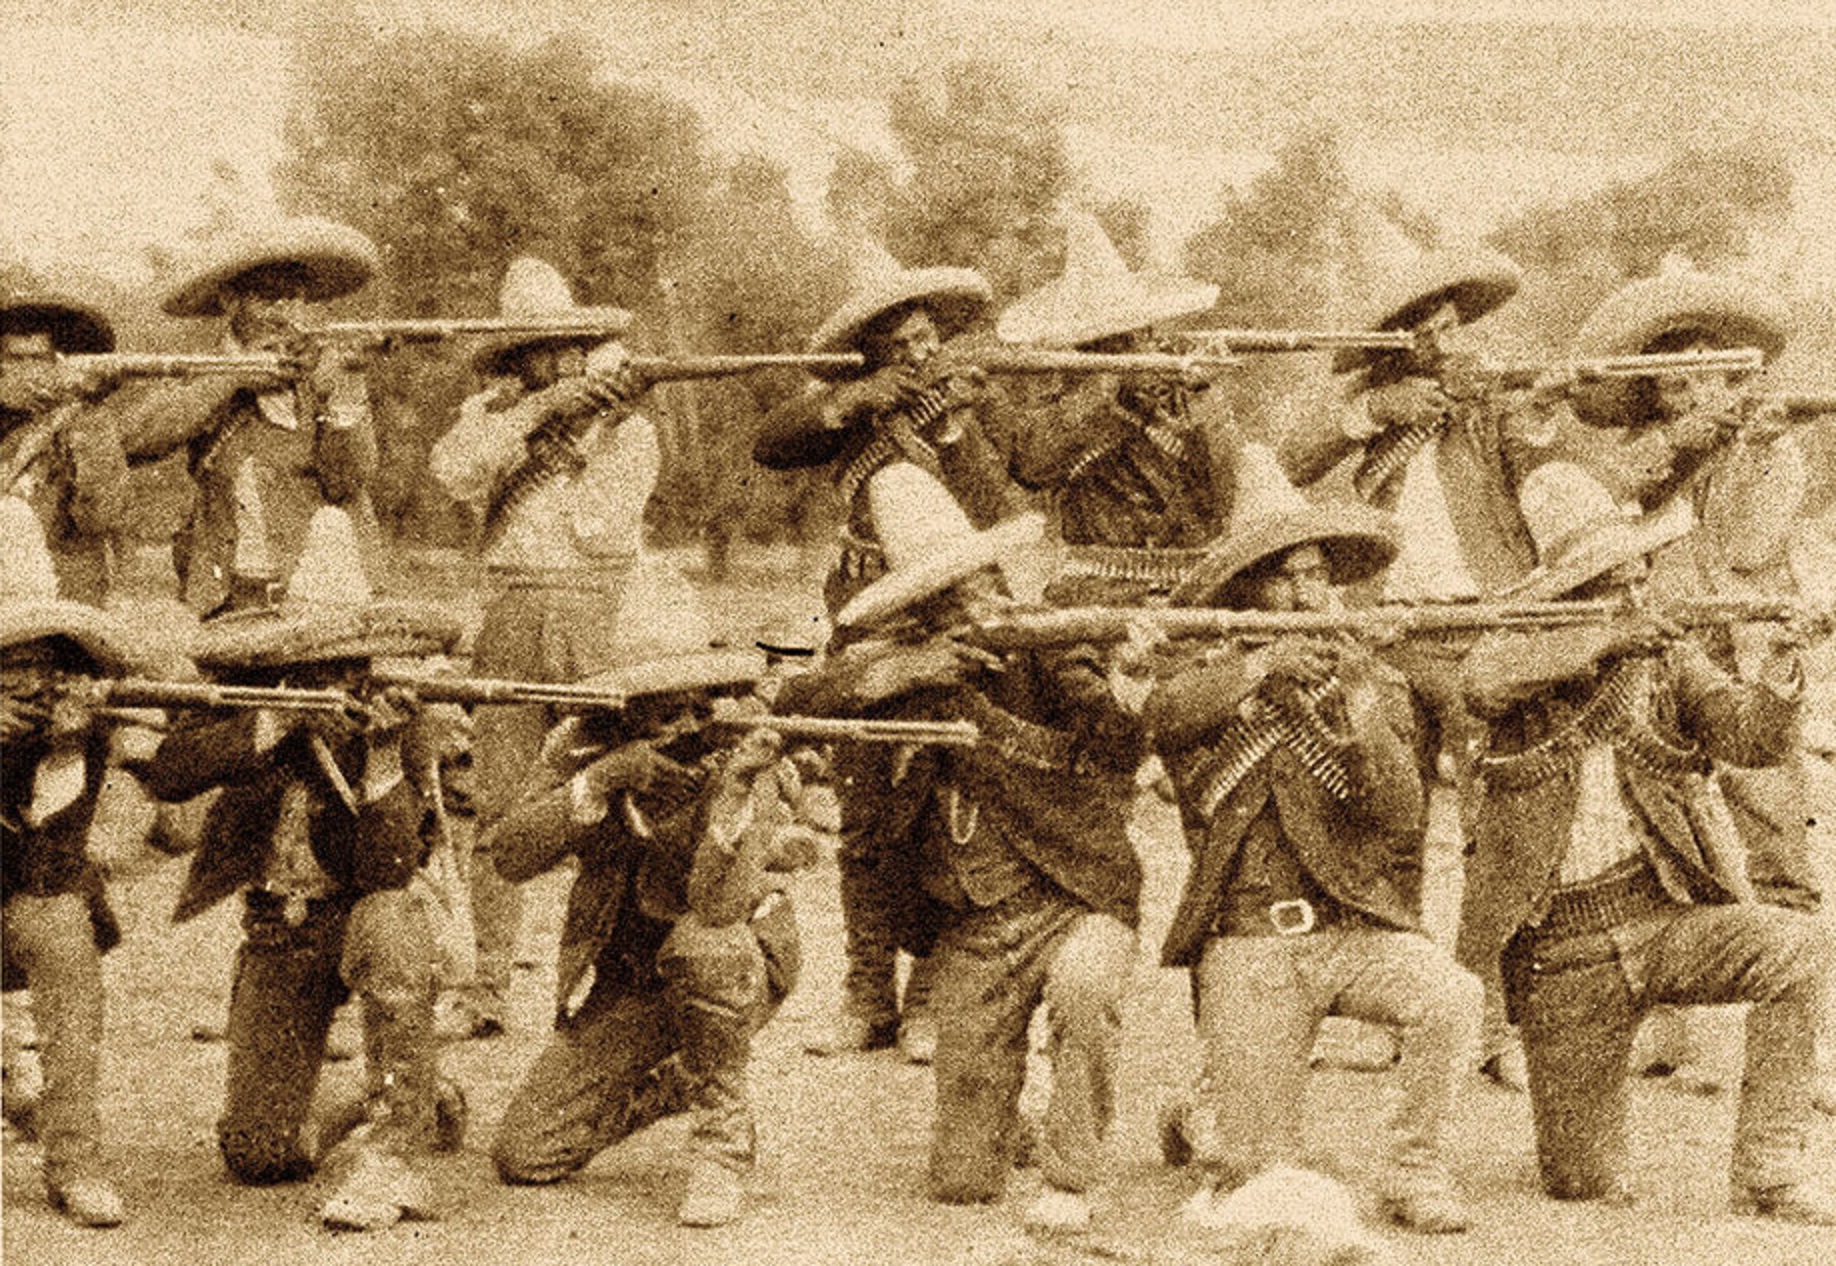
Revolucion! is a computer-assisted system for miniatures wargames of the Mexican Revolution of 1910-1920 at the grand tactical level. While most miniatures wargamers think first of the US interventions into Mexico during this period - the Pershing Expedition and the landing at Vera Cruz - these were relatively minor from the perspective of the fighting itself. The Mexican Revolution - and some other Latin American wars of the period between 1900 and 1940 - featured much larger actions, suitable for gaming out on the tabletop as field battles rather than skirmishes. That is the purpose of this system: to allow players to refight battles like Torreon, Celaya, or Zacatecas with entire armies, rather than skirmish actions with a few dozens on each side.
The armies of the conflict were fairly small - a few thousands on a side is typical - so the units of maneuver are battalions/regiments. Artillery and machineguns have a huge impact, and were deployed in groups determined more by what was available than by any table of organization. There is a huge proportion of cavalry in the armies, and the warfare is often quite mobile as a result. Further, the personalities were often very prominent, with leaders such as Villa leading from the front. Such characters can have a major impact on the results of fighting, inspiring troops who would otherwise fail. Players will each field anywhere from six to twenty units in a typical game, although larger forces can be accomodated. The play is quick and decisive - rather than using the computer to track the details of each unit, it is focused on providing a fast-paced game which is easy to learn, making it ideal for convention play. Our philosophy is that players should be concerned with fighting the battle, rather than being worried about game mechanics, and that is how we have designed the game system.
The game app will run on any computer or device which has a javascript-enabled web browser. Multiple versions of the software can be run at the same time in a single game. As a computer-assisted miniatures game, Revolucion! uses a minimalist design. It does not duplicate any of the information which is represented on the tabletop, but functions strictly as a "wargames calculator," replacing the dice-rolling and chart look-ups of other systems. It requires no pre-game set-up: players must only provide figures, terrain, rulers/tape measures (in inches), and a smart-phone, tablet, or computer which can run the game. Optimized for 15mm/18mm miniatures, other scales can be easily accomodated.
The Mexican Revolution is a fascinating conflict to game, and the field battles are an often-neglected aspect, despite the increasing availability of miniatures in 15mm/18mm as well as in the larger scales. For those who wish to learn more, the books by Joe Lee Janssens (among others) now provide a wealth of information in English. These rules provide a fast-play system which can help to complete the picture, providing enjoyable games set in this colorful and epic struggle.
The basic troop types in this game are infantry, cavalry, machine guns, and artillery. Each of these unit types is described below, as well as the representation of generals/leaders, and vehicles and transport of different types.
Infantry: There are three types of infantry in this game: Irregular Infantry (the followers of Villa, Zappata, Orozco, etc., and also some government troops, notably those of Native American ethnicity), Regular Infantry (uniformed troops with a higher level of supply and training), and Veteran Troops (troops which are superior because of their training and equipment - like the US forces - or because of their morale and experience - like the best Yaqui units, Villa's "Dorados" or the Rurales when serving on foot, etc.). Infantry units are normally represented with 4 - 6 bases, depicting a battalion-sized unit of from 200 to 300 men. Irregulars are assumed to have the poorest equipment and ammunition situation - Veterans are assumed to have the best.
Cavalry: Like the infantry, cavalry are divided into three categories: Irregular, Regular, and Veteran. As for the Infantry, US forces are rated Veteran, Villistas and Zappatistas as Irregular, etc. Cavalry often functioned as mounted infantry, but not always in this conflict: cavalry charges were fairly common, especially among the Irregular forces, and cavalry often carried the sabre. Cavalry units are represented with 4 to 6 bases representing a regiment of 200 to 300 men. They can be depicted on horseback or dismounted with horse holders as preferred, since they are assumed to mount and dismount as required to carry out their orders (they will maneuver mounted, but will dismount when deployed to fire, etc.) Cavalry are assumed to carry a higher proportion of revolvers and carbines than infantry, so will not fire with as much effect, especially at longer ranges.
Machine Guns: Machine guns were often deployed in batteries of 4 or more, rather than being parcelled out to infantry units as support weapons. The best troops were used to man machine guns - often, in the revolutionary forces these were mercenaries from the US. Consequently, it is assumed that machine gun units will be manned by specialists, so only one type is provided. Machine gun units are represented with from 1 -3 bases representing between 4 and 20 guns (figure 4-6 actual machine guns per base).
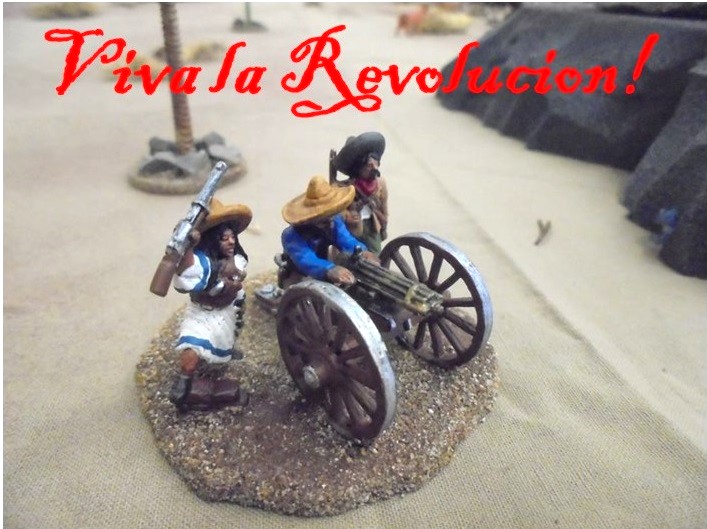
Artillery: This represents the field artillery common to the conflict (typically weapons of between 75mm and 80mm). As for machine guns, artillery was served by specialists and has only a single grade. Artillery is represented with units of 1-3 bases, depicting 4 to 20 actual guns (each base is 4-6 guns), and should also include limbers for when the unit is marching or maneuvering (these function as markers). Artillery was not generally used in an indirect-fire capacity in this conflict, much like the opening days of WWI.
Vehicles/Transport: These units represent everything from mule trains to trucks and steam locomotives. They are divided into two categories: fast and slow (see below). It is assumed that these units include a modicum of guards acting as their defenders, even though they are not capable of offensive action.
Leaders: The significant Leaders of each army will be present - usually between 3 and 5 for any given force. Each Leader figure will represent the general who commands a "column" - typically a brigade-sized formation of between 3 and 6 units. Leaders are represented as single, round bases to make them distinct from other units. They can be killed in combat when attached to units engaged in assaults or receiving ranged fire, but are not themselves targets for game purposes. One Leader may be designatred the "commander in chief", who may or may not themselves command a column. The "commander in chief" may command any unit in their army if the column's normal leader is too far away or has been killed.
Markers: Only two types of markers are needed for this game: disorder markers and demoralization markers. These can take any form - counters, small round bases with one or two casualty figures on them (one for disorder, two for demoralization), etc. Optionally, markers may be used to indicate which units have already gone this turn (not needed for smaller games, but good for keeping track in larger ones).
Game Scales: There is no figure-to-man ratio for these rules - each base represents about 50 combatants or between 4 and 6 crewed weapons. Each inch represents about 75 yards, giving us an 24-inch mile (for rule-of-thumb layout of the tabletop). Each turn represents 20-30 minutes of elapsed time. Consequently, combats tend to be decisive in their effects, even though they do not represent continuous combat in most cases, but a shorter period of intense conflict surrounded by other related activities.
Figure Basing: The number of figures in this game is not important per se - casualties and strengths are tracked by base, not by figure. For 15/18mm figures, each infantry or cavalry base will be 1 inch square, with 2 or 3 figures on it. Machine guns and artillery can be based on similar-sized bases, or be made a little deeper to accomodate models. Leaders are single figures or small groups on a circular base 1.5 inches in diameter. Limbers, vehicles, and other markers can be based as needed to fit the models.
For larger figures - 20mm or 25mm/28mm, it is recommended that base sizes and all other measurements be doubled in size. The computer app assumes "standard" distances for 15mm/18mm, for all reported and resulting distances, so these would also need to be doubled during play. (We often play with singly based 28mm, using two figures as the equivalent of a base - this works well for smaller games, but gets annoying when you have too many units.) For smaller figures, use the 15mm/18mm distances and base sizes but increase the number of models/figures per base.
As is often the case during prolonged civil wars, official tables of organization and equipment are rarely followed. Many of the combatants on both sides were populist militias which had little or no formal high-level organization in a military sense. To accomodate this variation, troops in all forces are organized into "columns" for game purposes, representing the brigade-sized forces which were generally assigned to a single commander. These will typically consist of a leader and between 3 and 6 units, but may be somewhat larger. Columns would generally contain a variety of troop types.
Note that the term "division" is deliberately avoided here, because it can be very confusing. Villa labelled his army the "Division del Norte" even though it was not really a division in any formal sense, being divided into four columns but effectively representing an entire army in relation to the typical forces in the conflict. Terms such as "brigade" and "division" were often used in misleading ways, to describe forces which were much smaller than one might expect: some "brigades" were the strength of battalions, because their constitutent "battalions" had only a few dozen men in them. The term "battery" - when used to describe artillery or machine guns - is generally relaible, however, and usually translates to a single base in game terms.
The game is designed for player forces to consist of between 6 and two dozen units, representing 2000 - 8000 actual combatants. Only the largest battles of the war such as Celaya and Zacatecas will require much larger forces. Even the larger battles can be represented at this scale, although they may require more time to complete.
It is important for the play of the game that each unit be assigned to a column, so that there is one direct commander of that unit. Of the leaders in the army, one may be designated the "commander in chief", allowing them to command units from columns besides their own (if they even have one), in cases where the normal commander is killed or out of command dustance (see below). This simple "chain of command" is important for activating units, as will be described below.
Typically, forces on both sides would feature equal numbers of infantry and cavalry. Government forces would be better-supplied with artillery and machine guns, and it was not unusual for the revolutionaries to lack these latter arms (especially artillery) until they were captured from the enemy. Battle-by-battle and campaign-by-campaign, the forces on opposing sides would be different, especially in light of the rapidly changing political situation. It is strongly recommended that players research the forces for the specific battle they want to fight.
For casual games, a typical government force would have 2 or 3 4-base units of Irregular Infantry, the same number of Regular Infantry, and a force of 4 to 6 Regular Cavalry units of the same size. Add to this a single Veteran unit (either infantry or cavalry), 3 to 6 bases of Machine Guns (organized in one to three units) and two Artillery units of 1 or 2 bases each. This force would be organized into four columns, each with a Leader.
The Revolutionary force to oppose this would look much the same, but would have only a single Artillery unit, fewer Machine Guns, and 6-base units of Irregular Infantry and Cavalry replacing all or most of the Regular and Irregular 4-base units described above for these arms. (Many of the revolutionary armies trained and equipped their better units as regulars as time went on, with the Zapatistas being the major exception.)
You could fight a reasonable battle with fewer units, which is best done by reducing the number of columns (and Leaders) but keeping each one of between 3 and 6 units in size.
Note that some battles featured "government" fores on both sides: when Carranza fought against Huerta's Federal Army in 1913-1914, it was probably more similar in composition to its enemy than it was to its ally, Pancho Villa. "Revolutionary" forces represent the more populist armies of Villa, Zapata, Orozco, etc. (Despite this, the Initiative system in the game always has one side labelled "government" and the other "revolutionary". It's confusing - just like the history!)
The game is played in a series of turns. Each turn, every unit (Infantry, Cavalry, Machine Guns, and Artillery) may make one action. These are organized by initiatives: press the initiative button and it will pop up a box giving the initiative to either the Government or Revolutionary side (player must agree on who is which at the start of play). That side takes an "initiative round": it selects one Column which has not used its action for the turn, and performs legal actions with all the units and the Leader in that column. Once one side performs an initiative round, the other side automatically gets the next one. This process is repeated until all units have performed an action. Players may choose not to use an initiative, but if both sides refuse an initiative in sequence, the turn ends. (This helps stop players from trying to out-wait their opponents.)
Once one side has acted with all of its units and leaders, the other side will act with any remaining units and Leaders in whatever order they choose, until all Leaders and units have made an action during the turn. The ehtire turn sequence is then repeated.
The application interface is shown below. When a unit acts, the types of the unit, the action it is taking, and other relevant fields are filled in, and the "Result" button is clicked. Needed fields for each action are listed below.
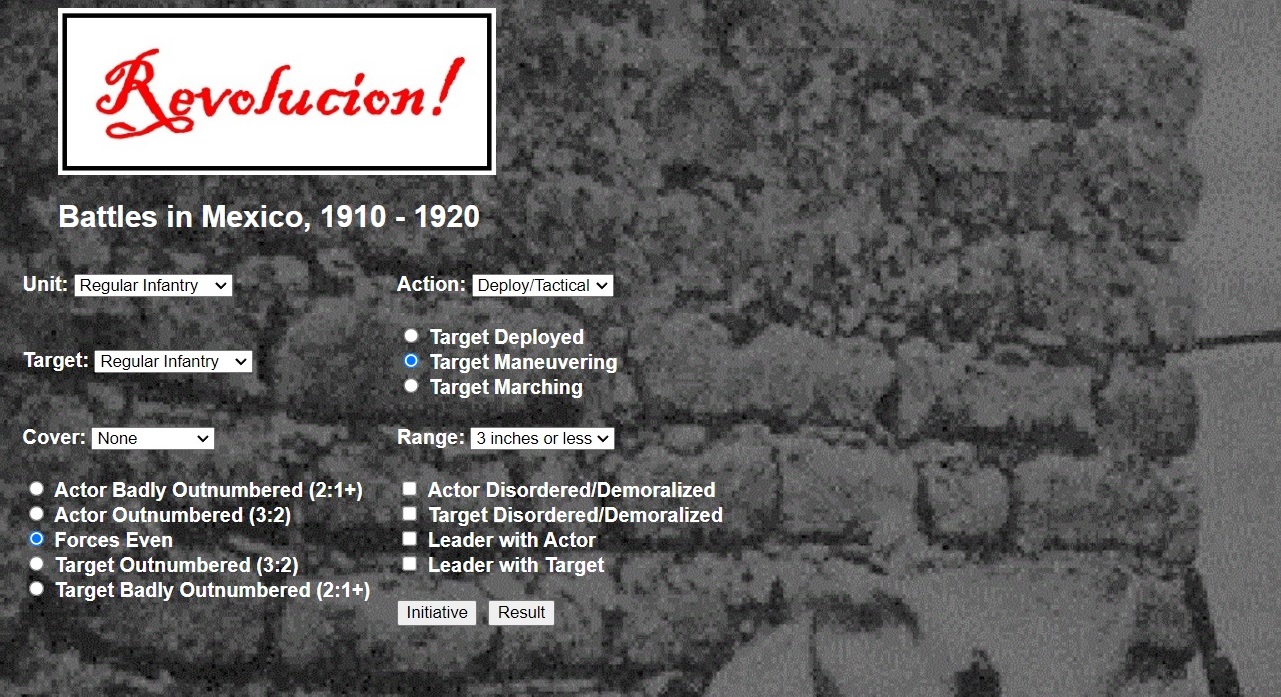
There are several actions available to units, not all of which require the use of the program:
Hold/Rest/Stand: Any unit or Leader may choose to do nothing for a turn as its action. This does not require the use of the program interface.
Move Leader: A Leader may move up to 24 inches base movement, in any direction or combination of directions, subject to normal movement rules (as cavalry). This does not require the use of the program interface. Leaders may only perform two actions: Move Leader and Hold/Rest/Stand.
Deploy/Tactical: This changes a unit into a linear formation, taking advantage of available cover, etc., and prepared to fire. A deployed formation is one base deep, with all bases sharing a facing, side-by-side (they may adjust the front slightly to follow terrain features such as walls). Guns are unlimbered and ready to fire, cavalry are dismounted, etc. When deploying, a unit may shift facing as desired (the center-point of the unit front should not change - see below.) This action also represents tactical movement - the already-deployed unit may move an inch in any direction and alter its facing, taking advantage of cover while doing so. It remains deployed in a single line of bases while doing so. All units may deploy. The program interface must always be used, because there is a chance that transmission of orders may fail or be delayed. Only the Unit and Action fields and the Leader with Actor and Actor Disordered/Demoralized fields need to be used for this action.
Maneuver: This represents the movement of a unit on the battlefield. For Infantry and Cavalry it represents a set of smaller-unit columns, screened by skirmishers. For nachine Guns and Artillery, it is limbered movement (or the equivament) in expectation of imminent action. Fire from a maneuver formation (termed a Moving Fire action) is less than that of a deployed formation (termed a Deployed Fire action). Maneuver formations are represented on the tabletop at least two bases deep, and (except for artillery) at least two bases wide. All bases are placed side-by-side, in edge-to-edge contact, sharing a facing. For artillery, it is a formation only one base wide and two or more bases deep with the bases touching and sharing a facing. When performing a maneuver, facing may be changed as desired (the center-point of the unit front should not change - see below.) All units may maneuver. The program interface must always be used, because there is a chance that transmission of orders may fail or be delayed. Only the Unit and Action fields and the Leader with Actor and Actor Disordered/Demoralized fields need to be used for this action.
Deployed Fire: When a unit is deployed, it may fire. This action cannot be performed by units in a maneuver or march formation. Targets must be within range and arc of fire (see Firing, below). Deployed fire may not involve any facing changes. If the unit performed a Deploy/Tactical action during the turn, it will perform Moving Fire instead of Deployed Fire. The program interface must always be used to calculate the effects of fire. All fields in the app are required for this action.
Moving Fire: Any unit performing a Maneuver action or a Deploy/Tactical action, or already in a maneuver formation may use this action to fire. When combined with other actions, it is always performed by the unit before any movement is done for the turn. Targets must be within range and arc of fire (see Firing, below). Moving fire may involve any facing changes as desired (the center-point of the unit front should not change). The program interface must always be used to calculate the effects of fire. All fields in the app are required for this action.
Assault: This represents a charge into close combat. It may only be performed by Infantry or Cavalry units, and not if they are currently in a March formation. To make an assault, the unit will assume a manuever formation. The target of an assault must be visible to the assaulting unit - facing changes are allowed before an assault is conducted (see Assaults, below). The target of an assault is considered to have used their action for the turn, as well as the acting unit, if close combat ensues (see below). The program interface must always be used to calculate the effects of an assault. All fields in the app except Range are required for this action.
March: This represents the movement of a unit on the march, without the expectation of enemy contact. The unit will assume a march formation, one base wide. For artillery, this also includes a gap between the two bases of a base depth (which can be filled with limber markers). All bases are placed back-to-front, sharing a facing. The formation may be made in any desired facing (the center point should not change - see below). March columns get a benefit from marching on roads (see Movement, below). Fire and assaults from a march formation are not allowed. All units may march. The program interface must always be used, because there is a chance that transmission of orders may fail or be delayed. Only the Unit and Action fields and the Leader with Actor and Actor Disordered/Demoralized fields need to be used for this action.
Route March: This is a march action made in those scenarios where a unit marches onto the tabletop. They are assumed to have already successfully received their march orders. Base moves are: Irregular Infantry - 10 inches; Average Infantry - 12 inches; Veteran Infantry - 14 inches; Irregular Cavalry - 20 inches; Average Cavalry - 24 inches; Veteran Cavalry - 28 inches; Machine Guns - 12 inches; Artillery - 12 inches; Fast Vehicle/Transport - 16 inches; Slow Vehicle/Transport - 8 inches. The route march ends as soon as the unit performs any other action (with the exceptioin of trains - see below). Scenarios should specify where the marching unit is going on the tabletop. This action does not use the program interface.
Regroup: This represents the reorganization and rallying of troops. The regrouping unit must be disordered or demoralized. If successful, it may assume any formation/facing desired (the center-point of the unit front should not change). All units except generals may perform this action. The program interface must always be used, because there is a chance that the regrouping action may fail. Only the Unit and Action fields and the Leader with Actor field need to be used for this action.
In most cases, a unit will perform only a single action in a turn. There are some combinations of actions which are permissible, however. A unit which performs a Deploy/Tactical or Maneuver action may also perform a Moving Fire action in that turn, but must determine range, arc of fire, and line of sight before performing any movement in that turn, including facing changes.
It is possible in some scenarios for units to ride as passengers on trains or other vehicles. (For the Mexican Revolution, this generally involves trains.) Such units may not perform movement actions when acting as passengers, but are still permitted other valid actions in a turn in which the vehicle itself also performs an action. They are considered to be separate units. Note that Machine Guns and Artillery may be deployed on a train, but that other types of units may not - they will generally be considered to be either in a maneuver formation, but may be required by scenario to be in a march formation in cases where they are particularly vulnerable during transit. Artillery and Machine Guns deployed on trains may not perform any movement action other than to exit the vehicle (they are set up in prepared emplacements such as sandbags, etc.).
Units which are riding as passengers on vehicles but are situated such that they can perform fire (basically, troops on trains) will use Moving Fire in any turn during which the vehicle performs any kind of movement. Artillery and Machine Guns deployed on trains or other vehicles will be permitted to perform Deployed Fire if the vehicle does not move during the turn. Infantry and cavalry may only ever perform Moving Fire from vehicles, as they lack room to spread out properly - they are always considered to be in maneuver or march formation when on vehicles (see above).
An action is taken using the program interface by selecting the correct values for the necessary fields and clicking the Result button. One or more pop-ups will appear, some requiring answers to simple yes-or-no questions ("OK" is yes and "Cancel" is no). The results of the action will be provided in a pop-up, and changes should be made on the tabletop as indicated. A unit which has been the target of one or more Assault actions during a turn may have used its action for the turn, whether it has yet to perform another action or not (see Assaults, below).
Note that units which are diordered or demoralized may perform any valid action, but their performance will suffer accordingly.
If a mistake is made in using the program interface (if a needed field is set incorrectly), ignore the results and repeat the action with the correct values. If for any reason the program interface freezes, crashes, or is accidentally closed, simply re-start (re-open) the program interface and continue. No needed information will have been lost.
Multiple copies of the program interface may be used simultaneously during play. So long as players are in agreement about who is adjuticating what on which copy of the program, there will be no problems. Thus, there is no reason to wait for a single game master to adjudicate everything on one instance of the program. For small games this is not important, but it can help to speed play in larger, multi-player battles.
Formations reflect not just the arrangement of troops on the battlefield, but also how vulnerable they are to enemy action. They should not be taken as representing a single line or a deep, close-order column, as that was not the way that troops were trained to fight - or did fight - during the conflict. Each base represents a relatively spread out group of soldiers, and a lot of empty space. Formations also indicate the attitude of troops: are they marching (not a combat formation) or belly-down in the dirt, taking advantage of whatever cover they can? While the Federal troops were trained in fairly modern tactics, reflecting the examples of the Second Boer and Russo-Japanese Wars, many of the other combatants either learned their trade as guerillas or fighting "small wars" against local bandits, tribal natives, or (if they were tribal natives) the government. In every case, the style of warfare was a far cry from what was typical in the 19th Century.
As described above, there are three different formations in this game. All units except for Leaders will always have a formation (Leaders have no formation). The three formations are shown in the diagrams below (arrows indicate facing), with a description of the rules they should follow:
Maneuver fornation is used for maneuver actions and Assault actions. It is always at least two bases deep, but may vary in width (Artillery units are the exception here - they should be two bases wide rather than two bases deep when only one option is possible, because the limber markers make it clear what formation is intended). Bases should be arranged in even ranks to the extent possible (no rank may have more bases than the front rank, nor more than one fewer than any other rank in the formation). When possible, it should be more than one base wide. All bases share a facing. When assuming a maneuver formation, any desired facing may be used (center-point of the unit front does not change - see below). When a Maneuver or Assault action is taken, first the maneuver formation is assumed and then the move itself is performed. During this movement, any number of facing changes is permitted - the unit may freely turn as it maneuvers in any desired combination of directions. The movement will end with the unit still in maneuver formation.
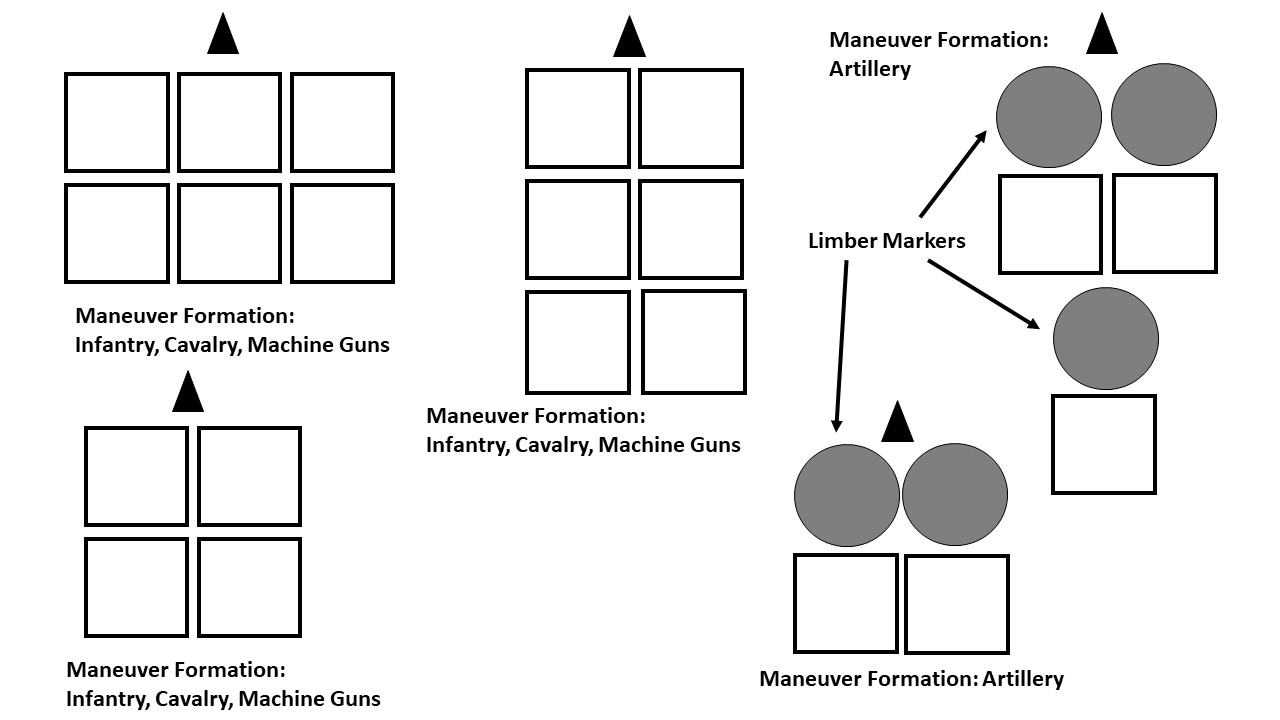
MANEUVER FORMATION - EXAMPLES
The diagram above shows 6-base and 4-base maneuver formations for Infantry, Cavalry, and Machine Guns (although usually you will have fewer bases in Machine Gun units). For artillery, 2-base and 3-base examples are shown. Note that the limber markers are only markers, and do not count as part of the unit for determining range, etc.
All bases sharing a facing, one base deep, arranged side-by-side. The line thus formed is allowed to bend to accomodate terrain features such as a wall, a river bank, a ridge line, etc. Units assume a deployed/tactical formation only by performing a Deploy/Tactical action. Such an action may involve facing changes (the center-point of the unit front does not change - see below). Once deployed, a unit may not move without its formation changing, other than using another Deploy/Tactical action. A unit may not make deployed fire without first assuming a deployed formation.
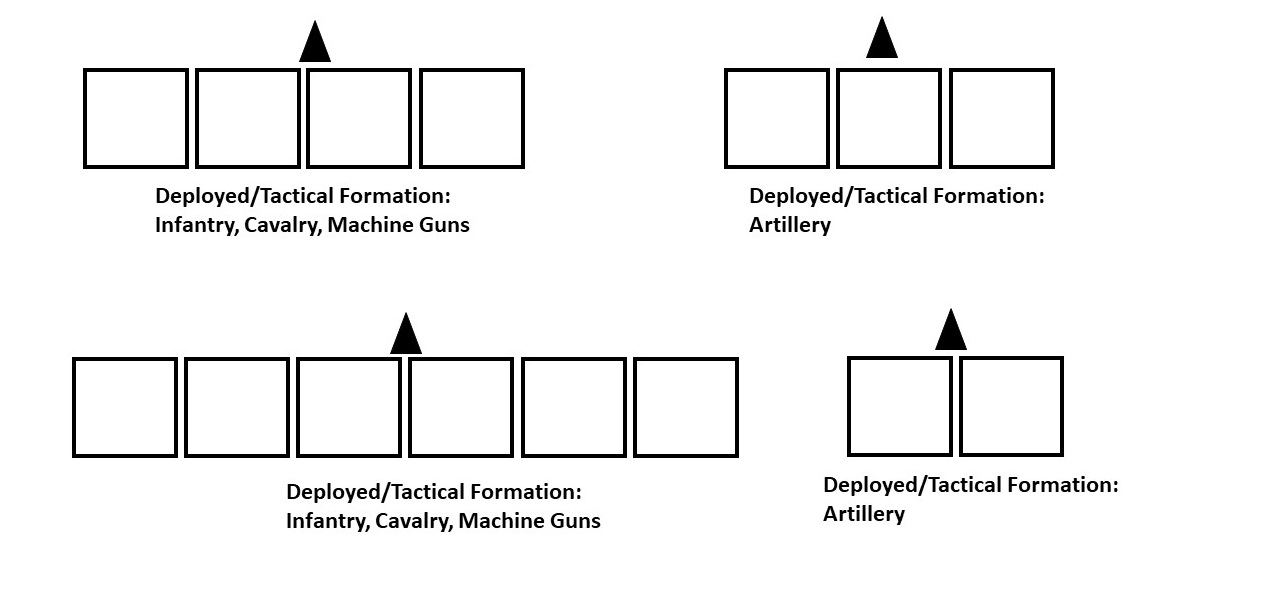
DEPLOYED/TACTICAL FORMATION - EXAMPLES
The examples show the same basic formation for all types - side-by-side in a single rank of bases. Limber markers are not used for artillery.
When a March action is made, the unit will immediately assume the march formation, which is always only one base wide, with the units bases arranged in a front-to-back fashion. The exception is artillery, where gaps are left in the column which equals a single base depth, and filled using limber markers. All bases share a facing. The column may bend ("snake") to follow roads or other terrain features being marched along. When assuming a march formation, any desired facing may be used (center-point of the unit front does not change). When a March action is taken, first the march formation is assumed and then the move itself is performed. During this movement, any number of facing changes is permitted - the unit may freely turn as it marches in any desired combination of directions. The movement will end with the unit still in march formation.
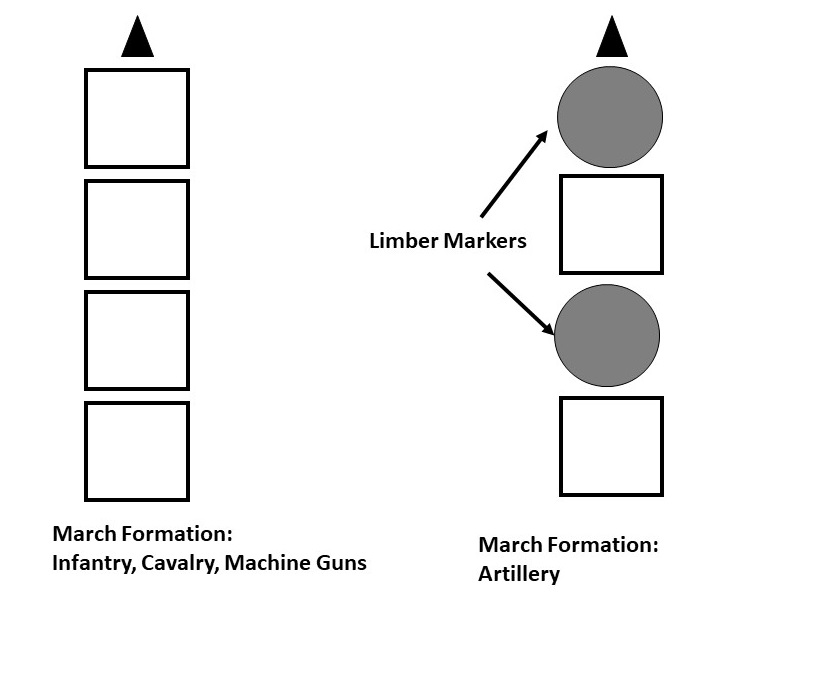
MARCH FORMATION - EXAMPLES
March formation for all types is a single base-width column, closed up, except for artillery which uses limber markers as shown. Note that the limber markers are only markers, and do not count as part of the unit for determining range, etc.
In any case where there are not enough nases in the unit for its formation to be determined by what is seen on the tabletop, a marker or other device should be used to indicate the unit's formation. All units have a formation at all times.
Note that, with the exception of artillery in maneuver or march formation, there is never any gap left between bases.
Note that units which are disordered or demoralized will retain their formation, and simply be marked as disordered or demoralized. Disorder and demoralization do not affect base move distances.
Leaders have neither formation nor facing. Because they are neither targets nor actors in any combat situation, this does not affect game play. When they move, they do so as cavalry with a fixed base movement of 24 inches per turn.
Changing Facing: There are many actions which allow units to change facing. The diagram below shows how this can be done. The center-point of the unit frontage stays in the same place, and the unit pivots around that point to the desired facing. If this would bring any part of the unit closer to an enemy within 6 inches of its new position, the unit will slide away from the enemy until it is no closer than it was before. The center-point of the unit's frontage - th epivot point - must still be somewhere along the frontage of the unit after this slide away from the enemy is complete.

FACING CHANGE - EXAMPLE
A unit in maneuver formation changes facing to the left, by pivoting around the red dot (the center point of its front). If this change of facing would bring any part of the unit closer to the enemy (in this case, off its right flank), and that enemy is within 6 inches after the change of face, then the unit would slide to its left, along its new facing, until it is the same distance away that it was before (the blue dotted line).
Because the models can be quite different for different types of vehicles, it is recommended that scenarios specify how they should be treated, in line with the rules above. Some common cases are covered here.
Trains: Trains obviously cannot re-configure themselves on the tabletop, as they will always move along their tracks. Trains count as if in March formation at all times (they are very easy to hit!). Any passengers on trains may have different formations for targeting purposes, however. Artillery and Machine Guns which have been pre-positioned in the train to be able to fire will count as deployed. Infantry and cavalry will generally count as in maneuver formation, with the exception tha badly over-loaded trains may place them into march formation, according to scenario rules. This reflects the fact that they cannot shoot through loop holes in the car sides or avail themselves of whatever cover is on offer, as they will be crammed in everywhere. Note that train cars are assumed to provide some level of protection already, so cover modifiers should only be assigned if the train is additionally armored, sandbagged, etc.
Trains are required to make a Maneuver action (as fast transport) before they are allowed to make a March action. Once moving at "march" speeds, the train is likelwise required to make a Manuever action before coming to a halt. Embarking and disembarking of passengers is only possible if the train is at a standstill - it cannot be done by any unit in a turn in which a train moves. (See below for more rules about trains and other vehicles.)
Trucks and Automobiles: Trucks and saloon cars were often used for various purposes during the Mexican Revolution. They are classed as fast transport for movement purposes, and should use the same formations as Infantry, Cavalry, and Machine Guns.
Mule Trains: Mule trains and similar forms of slow transport should use the same formations as Infantry, Cavalry, and Machine Guns.
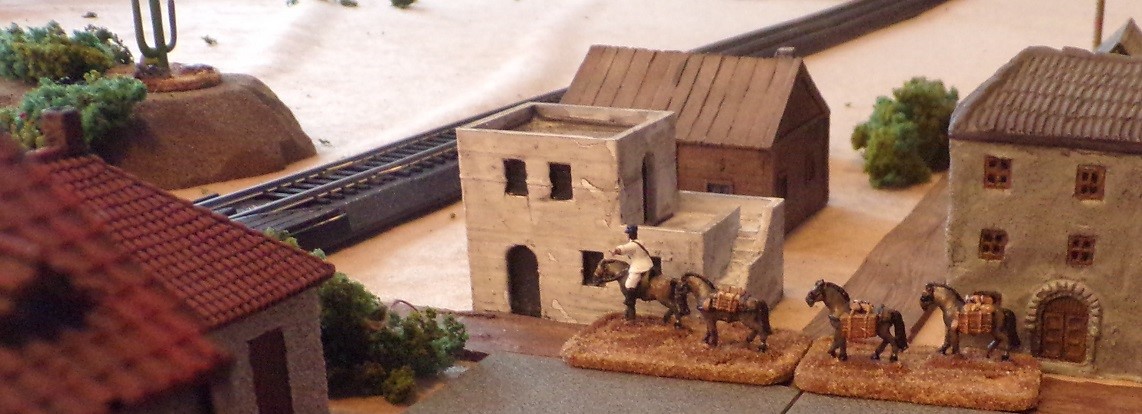
Mule train proceeds through a dusty town - the classic "slow transport"!
Any portion of a unit's base movement may be spent in an action involving movement (or none of it) but the base movment as adjusted for terrain may never be exceeded. Movement is made in a forward direction along a path specified by the moving player, measuring from the starting location of any base in the front of the formation to its ending location, up to the distance determined by a modified base move. Movement sideways or backward may be made at half speed, choosing a starting point on the side of the unit facing the direction of movement.
Any rough terrain or linear obstacle crossed will adjust base movement: the greatest distance the movement path of any base in the formation spends crossing rough terrain costs twice the movement of crossing open terrain (for infantry or artillery) and four times as much (for cavalry). If I maneuver an infantry division across 2 inches of open ground, then through 2 inches of woods (rough terrain) it will cost my full 6 inches of base movement (2 inches for open ground, and twice 2 inches for rough). Linear obstacles (hedges, stone walls, etc.) will cost an additional 1/2 inch of movement to cross. Choke-points (bridges, gates through insurmountable walls, etc.) will cost an additional 1/2 inch of movement to cross, unless the unit is in march formation. A maneuvering infantry unit passing over a bridge in open country will move a total of 5 1/2 inches, if it has a 6-inch base movement. Movement inside towns is considered rough for movement purposes unless a unit is in march formation (when it is considered to be road movement). Units in march formation will move 1.5 inches for each inch of base movement when they move along a road/through a town (a 50% movement bonus).
Movement through friendly units is allowed, so long as no part of the moving unit ends its turn "inside" another unit. Enemy units may not be approached closer than 1 inch (their "zone of control") by any part of a moving unit except as part of an assault action (see below).
Falling Back/Pushed Back: Movement caused by combat results (falling back or pushed back) will abide by all normal movement rules. Such movement must be made away from the source of the combat result (the firing or assaulting unit) in as straight a line as possible and within an arc measured 45 degrees off either side of the edge of the affected (moving) unit opposite the direction of fire. The unit being pushed back/falling back will retain its formation and original facing except as required for its movement to be legal (not within 1 inch of enemy units; not through impassable terrain; not moving so as to end up inside another friendly unit; etc.). Although this often involves backward or sideways movement, it is always done at full speed. The diagram below shows an example:
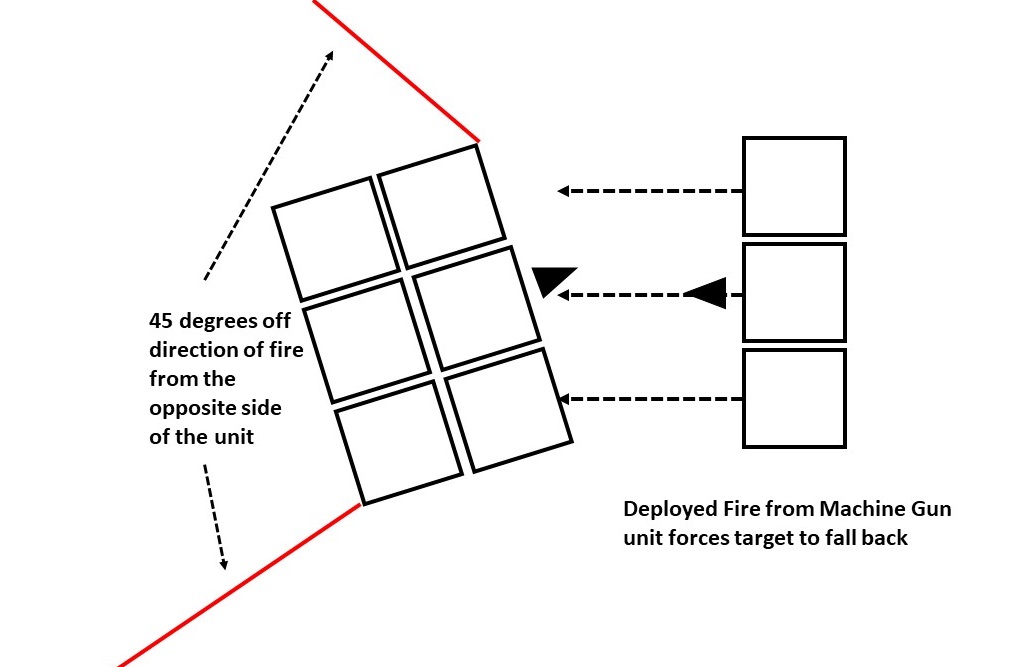
Here, a deployed Machine Gun unit fires on a target, causing it to fall back. The target unit must immediately move to the left within the arc described by the two red lines, a distance of 6 inches, without altering its facing or formation, and would be marked as demoralized, along with suffering any relevant base losses (see below).
When falling back or being pushed back, different types of units will move different distances: Infantry, Machine Guns, and Artillery will move 6 inches; Cavalry will move 12 inches; fast Transport/Vehicles will move 8 inches; and slow Transport/Vehicles will move 4 inches.
Other non-movement-related aspects of combat effects are addressed in the next section.
Other Topics: Making Assault actions also involves movement. This is addressed under Assaults, below.
Note that there is a possibility that actions involving movement (Deploy/tactical, Maneuver, March, and Assault) will be lost or delayed in transmission. Having a Leader attached to (see below) or within 6 inches of the unit receiving the order helps to prevent this from happening (the Leader is 'on hand' to make sure thing go as planned). When orders are lost, it is still possible to make actions which do not involve movement (fire actions, regroup, etc.). Delayed orders will result in a reduced base movement.
Unit Status: There are three unit statuses: OK, Disordered, and Demoralized. All units begin the game with an OK status, and will retain it until combat effects cause the status to change. Disordered and Demoralized units may make all actions permitted to them when they have OK status, but may perform poorly (the the Actor Disordered box must be checked). Regroup actions will allow a unit to recover from Demoralized and Disordered status - you may Regroup whenever you have any status other than OK, but no other actions are permitted in the turn in which you do so. Once fully regrouped, a unit returns to its OK status, as per the app.
Disorder indicates that a unit has suffered some losses, and that it is not responding optimally to command control among and within its units. Demoralization is more severe, indicating further losses and a greater degree of breakdown within the unit.
Disorder makes a unit more vulnerable in combat situations. When firing at or assaulting a disordered unit, the Target Disordered/Demoralized box should always be checked.
Demoralized units behave in the same way, but the higher level of disorganization means that they will not benefit from coherent defensive fire if Assaulted, although they will still fight. (This makes them the ideal candidates for Assaults, especially frontal ones.)
Damage Levels: The damage suffered by a unit is described using "Levels". These are:
Level 1: Unit becomes Disordered
Level 2: Unit becomes Demoralized
Level 3: Unit loses a base and Falls Back
For each additional Level, another base is lost.
Whenever one or more bases are lost, the unit must Fall Back, but only once, regardless of the number of lost bases. (When half the bases in a unit have been removed, it is destroyed and removed from play.)
Levels of damage are additive: if you already Demoralized, and you take an additional level of damage, you lose a base. If you are already Disordered, you become Demoralized. Although you can Regroup to recover from Disorder and Demoralization, Regrouping will never restore lost bases to a unit (once dead you stay dead!). It is possible for a unit to be destroyed as the result of a single enemy combat action. A unit which has already suffered base losses but has subsequently Regrouped will first become Disordered (first Level), then Demoralized (second Level) and only then take additional base losses. When you Regroup, you go back to earlier in the cycle.
In some cases, combat effects will involve involuntary movement (pushed back, thrown back, falling back, etc.). Such movement will be governed by the movement rules described above. In cases where such movement may not be legally completed (ie, the affected unit is surrounded by enemy units, or is backed up against impassable terrain) the unit will surrender to the enemy - it is considered destroyed and is removed from play (and the soldiers are very likely to be executed, given the nature of the conflict...). If a combat effect does not specify movement, then the unit will retain its facing and formation in the position it currently occupies.
Losing Bases: Some combat effects involve the loss of one or more bases. This indicates that the unit has sustained severe losses through combat. Lost bases are immediately removed from the affected unit. If at any time a unit loses half or more of the bases with which it started the game, it is considered destroyed and is immediately removed from play.
For both fire actions and assaults, an acting unit or its target may be considered outnumbered or badly outnumbered. This happens in several cases, and is handled as described in the Fire and Assaults sections below. Loss of bases will impact how these conditions are determined.
Fire actions include Deployed Fire and Moving Fire. Deployed Fire may only be made by units which began the turn in a deployed formation and which are not also making a Deploy/Tactical action in the same turn. Advancing Fire may be made by units in a maneuver formation, or which performed a Deploy/Tactical action during the turn and are in a deployed formation. Deployed Fire is significantly more effective than Moving Fire, because more of the unit is in a position to engage in prolonged fire (in linear formations and/or skirmishing or unlimbered).
Not all units are capable of fire - for Vehicle/Transport units, fire capability is the exception rather than the norm, and they are treated as a special case (see below). Other unit types are capable of fire.
The formation of a target unit is also important for fire actions: when a unit is deployed, it is less vulnerable to fire. When a unit is in maneuver formation, it is more vulnerable to fire. A unit in march formation is the most vulnerable to fire.
The targets of fire actions must be within the range of the firing unit (12 inches for Infantry and Cavalry, 18 inches for Machine Guns, and 24 inches for Artillery). The program interface will inform you if you attempt to fire at a target which is out of range. You are allowed to make a different action in thise case. Note that pre-measurementy is allowed to determine firing range. The range is measured as the closest point between the front of the firing unit (including front corners) and the nearest part of the target unit. (While this does extend the ranges for firing - this extension is historical, reflecting long-range fire and some flexibility in the troops positioning themselves vis-a-vis the target. Note also that artillery ranges are for direct fire. For indirect fire - something not commonly done - see the section on Vehicles and Scenario Specific Rules below.)
Targets of fire must be visible to the firing unit, and they must be within arc of fire. Visibility is determined by a clear line of sight (LOS). Some terrain will block LOS, and some terrain will permit fire over the heads of friendly units under certain conditions (see Terrain, below). Visibility into and through woods (and similar terrain) penetrates only 3 inches, limiting fire within woods and scrub and urban environments to this range. Targets of fire must be at least partly within an arc of fire going forward and outward 45 degrees from each of the front corners of the firing unit, as shown in the diagram below:
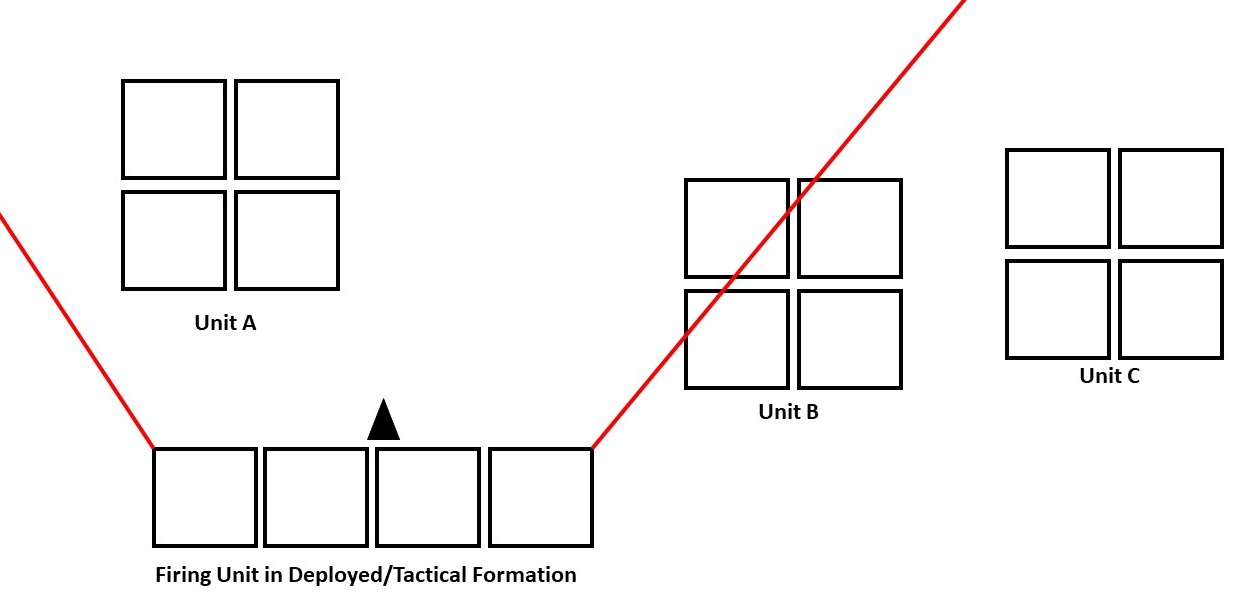
In the diagram, we have a deployed firing unit and can see its firing arc - the area between the red lines. All of the three nearby enemy units (Unit A, Unit B, and Unit C) are within the firing range (although distances are not shown), and there is a clear LOS from the firer to each of them. Unit A is completely inside the firing arc, and is a legal target. Unit B is also a legal target, because it is partially inside the arc of fire. Unit C cannot be fired on, because it is outside of the firing arc.
You are not permitted to fire along a line-of-sight which goes through or closer than half an inch to friendly troops, unless you are firing over their heads (see Terrain, below).
Note that assaults also involve fire combat, but this is computed by the program as part of the assault. It does not require any separate action on the part of players.
Whenever the firing unit has more or fewer bases than the target unit, then the Outnumbered boxes must be used. All bases in both units are counted, regardless of whether they individually have LOS, etc. Check the "Actor Outnumbered" box if there are more bases in the target unit than in the firing unit; if there are twice as many or more, instead check "Actor Badly Outnumbered". Check the "Target Outnumbered" box if there are more bases in the firing unit than in the target unit; if there are twice as many or more, check "Target Badly Outnumbered". If the firer and target are equal in number of bases, leave both boxes unchecked.
The effects of fire are described in the sections above.
Infantry and Cavalry units starting the turn in maneuver or deployed/tactical formation may make Assault actions. This represents the close-range fire and hand-to-hand combat which was a common occurrence during the conflict. The biggest danger to an assaulting unit is the defensive fire which is likely to be made by a defender. This can be mitigated by choosing a target unit which is disordered and by not making a frontal assault (that is, an Assault through the target's arc of fire). Even so, Assaults can be dangerous. Best is to Assault a unit which is demoralized - demoralized units will fight but do not organize coherent defensive fire against a charging opponent. Targets in march formation are also a good choice. Cavalry is excellent at close-quarters fighting in open terrain, although not so good when attacking in rough or against trenches or fortifications.
When making an Assault action, there must be a clear LOS to the target unit and it must be at least partially within the firing arc of the assaulting unit. The target of an Assault must be within 6 inches (base movement) for assaulting Infantry units and 12 inches (base movement) for assaulting Cavalry units. These distances are modified by terrain just as movement is, made along a straight path between the center front of the assaulting unit and the nearest part of the target unit (the "assault path"). The target unit must be at least partially within the modified distance. For Assaults where orders are delayed, the same process is used but the distance is reduced, as indicated by the program interface. A frontal Assault is any Assault which crosses the firing arc of the target unit, as determined by the assault path between the two units.
Assaults may not "go home" - that is, the assaulting unit may be stopped by fire before making contact with the target unit. Any Assault action in which the assaulting unit is forced back to its starting position is a charge which has not "gone home." In this case, the assaulting unit will have used its action for the turn, but the target unit - if it has not already acted for the turn - may still make an action. If a charge goes home - that is, defensive fire does not push it back to its starting position - then both the assaulting and target units have used their actions for the turn (they are occupied by the close combat and its aftermath). In this case, the assaulting unit is moved along the assault path into contact with the target unit of the Assault, before any combat effects take place (which might push the target unit back). Note that in cases where the Assault goes home but is defeated in close combat, the assaulting unit may not actually need to be moved (e.g., it moved forward 6 inches into contact and was pushed back 6 inches). Notionally it still moves, however.
The Outnumbered check boxes are used slightly differently in assaults than they are for fire. In an Assault, the target is outnumbered if the total number of bases of all units which have assaulted the target that turn, at the time they made the assault, are greater than the number of bases in the target unit. To give an example: I have a Regular Infantry unit of four bases which is assaulted by a Irreguar Infantry unit of four bases. Neither actor nor target is outnumbered for this action - both have four bases. If there is another assault during the turn on the same target unit, all four of the bases from the first assault are counted (even if the first assaulting unit lost bases as a combat result) when calculating outnumbering for the second Assault. Thus, a second Assault made by a three-base Prussian Infantry unit would outnumber the four-base French unit, because it adds the number of bases of the first assault (4) to its own number of bases (3) to get 7, which outnumbers the target unit's 4 bases. A third Assault during the same turn would add all 7 of the bases from the preceding assaults to its own total.
Unlike fire, the combat effects of Assault actions may affect either or both of the participants. These effects are described in the preceding sections.
The assault goes in!
Terrain can have a huge effect on play, influencing movement and providing cover. Terrain may also permit or stop potential fire and Assault actions by blocking the line of sight (LOS). Scenarios should specify the characteristics of all tabletop terrain before play begins.
Movement: There are several types of terrain from a movement perspective: open terrain, rough terrain, impassable terrain, roads, linear obstacles, and choke-points. Open terrain is typically fields - ground which does not impede movement. Rough terrain can be woods, swamps/marshland, rocky hills, or similar types of features. It slows movement by half for Infantry, Machine Guns, slow Vehicles/Transport, and Artillery and by three-quarters for fast Vehicles/Transport, Cavalry, and Leaders. Impassable terrain cannot be entered or crossed - it consists of such things as cliffs, deep swamps, and unfordable rivers. Roads are "improved" roads, and not just dirt tracks. They speed the movement of marching units by half. Linear obstacles are walls, hedges, and other obstacles that must sometimes be crossed. They will cost a penalty of a half inch off of base movement for units which cross them (note that, while individual mounted horsemen can easily jump some linear obstacles, entire mounted formations generally cannot!) Choke points are bridges, gates through otherwise impassable walls, and similar points where movement is contstricted. These cost a half inch of base movement to pass, unless the unit is marching. Note that many such choke-points are also roads (bridges, for example). Towns are a special category of terrain. For units marching, they act as roads. For other formations and types of movement, they count as rough. The exception here will be open plazas found in the center of many Mexican towns - these are considered open.
Cover: Terrain can also provide cover for fire and combat purposes. Open terrain does not provide cover, nor does the type of rough terrain (such as swampy ground) where there is not much above ground level to provide protection from prying eyes or bullets. Fords across rivers are an excellent example - they impede movement, but do not conceal or protect those crossing them. Soft cover is that type of cover which serves to conceal troops - the typical example is woods or scrub brush. During this conflict, most fire was aimed fire, and it assumed that the target was visible to those firing. Although later during the Great War area fire with machineguns or artillery fire onto a set of map coordinates became commonplace, this was not typically the case during the Mexican Revolution. Other types of cover also act as soft cover: villages may consist of structures made of softer materials which will not stop bullets (wooden barns/houses/sheds); and many types of hedges and fences will conceal but not provide the degree of cover which will stop a bullet or shell. Hard cover includes stone walls, the solid buildings of stone or brick found in towns, and naturally protective "soft" areas which have been fortified (fortified villages, for example). It also includes prepared trenches. Fortifications include redoubts and fortresses - places where engineers have designed and built military fortifications. These are not common, but you do see such structures play a role in some of the urban fighting during the war.
Line of Sight (LOS): Terrain also acts to obstruct line-of-sight. To determine LOS, a line must be drawn from any point on a base of the spotting unit to any point on a base of the unit being spotted. Ranges for fire in this game are calculated as the shortest clear LOS between the front of the firing unit and its target (round down if they are on a break-point measurement such as 3, 6, or 12 inches). If the potential LOS crosses any terrain, it may be blocked. There are rules for determining what can and cannot be seen.
Woods and scrub, or other tall obstructions can be seen into up to 3 inches. This includes the edges of towns, which in this scale have single buildings representing clusters of actual structures, which may allow some visibility. Aftwer 3 inches, visibility is absolutely blocked.
For this purpose, terrain is classed according to a series of levels: ground level, low obstructions (hedges, walls, wheatfields, etc.), taller obstructions (houses, woods), low hills, taller hills, even taller hills (etc.) - each level of hill is a "terrain level." Terrain in all of these different height categories may be found on the tabletop. The rule for LOS is that if you can see them, they can see you - it works in both directions. Low obstructions may provide soft or hard cover to troops immediately behind them, but do not block LOS. Taller obstructions such as houses and woods will block line of sight across the same terrain level, but may not block LOS from higher levels, according to a more complicated system: at one terrain level up, your LOS will not be blocked if tall obstructions are closer to you than they are to the target. For each terrain level you go up, half of the area blocked from the level below becomes visible. See the following diagram:
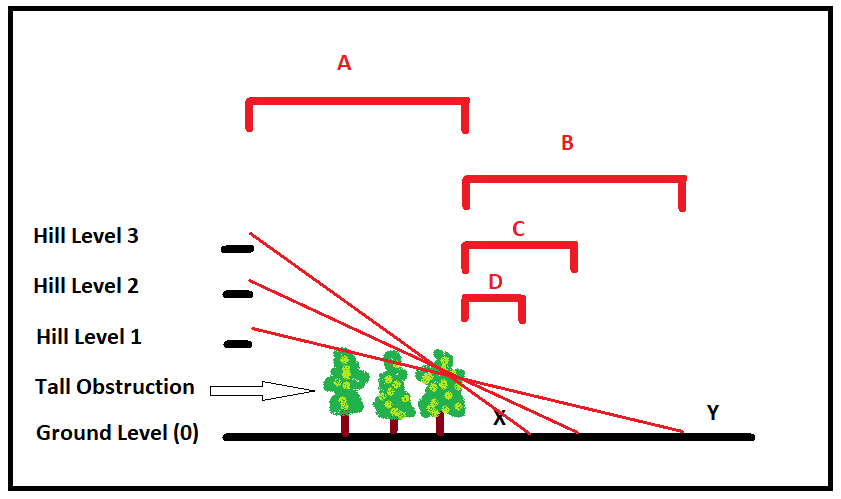
For aesthetic reasons, our figures and terrain pieces are not in agreement with the ground scale. Thus, what we see on the table is not how it really is. This system gives you a way of approximating reality. (Short of going and surveying critical vistas on the battlefield, or having a really good 3-D model, you won't get better than an approximation. There are wargamers who have visited and surveyed important battlefields, but from a practical perspective this is not an option for most of us.) In the diagram, we have hills on the table up to 3 terrain levels tall. We also have a tall obstruction (woods).
If you have more than one tall obstruction between you and the target you want to spot from above, and the obstructions are on the same terrain level below you, always check the one closest to the target. If that one isn't a problem, none of the others will be. Note that model hills for wargames are often stepped, to allow figures to stand on them at different levels. Often, these are meant to represent sloping hills rather than a series of stepped plateaus. The scenario should specify the nature of hills, so they are interpreted correctly during play.
The same system is applied to firing over the heads of friendly units. Treat the friendly units as a tall obstruction: if the target would be visible (according to LOS rules) then you are allowed to fire on it.
This is a little complicated, but it is important to any simulation of the Mexican Revolution, where hills played a significant role in the outcomes of many battles. Once you get used to it, it starts to become obvious.
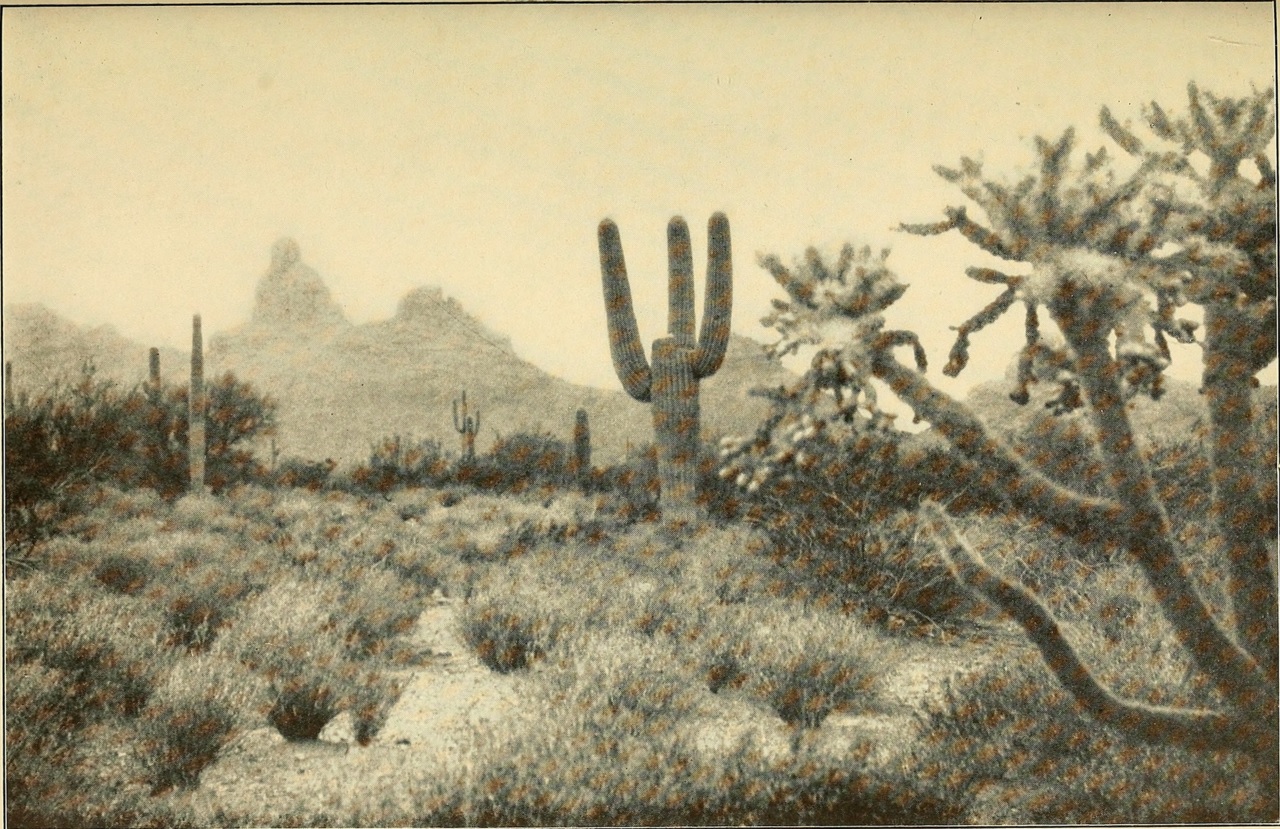
If you have not visited Mexico, it is not always like the mental image one can easily form from watching Westerns (although sometimes it is...). Much of the fighting took place in the north, in the Sonoran Desert. This type of desert is not as empty as one might imagine - the picture below (from 1907) shows how dense the plant life can be (and the only place where the classic saguaro cactus are found - there are also native palm trees, although none in the picture):
For contrast, here is a picture of Torreon in 1906, more typical of Coahuila and Chihuahua, with much less growth in the areas around the city, although the terrain is still pretty rough:
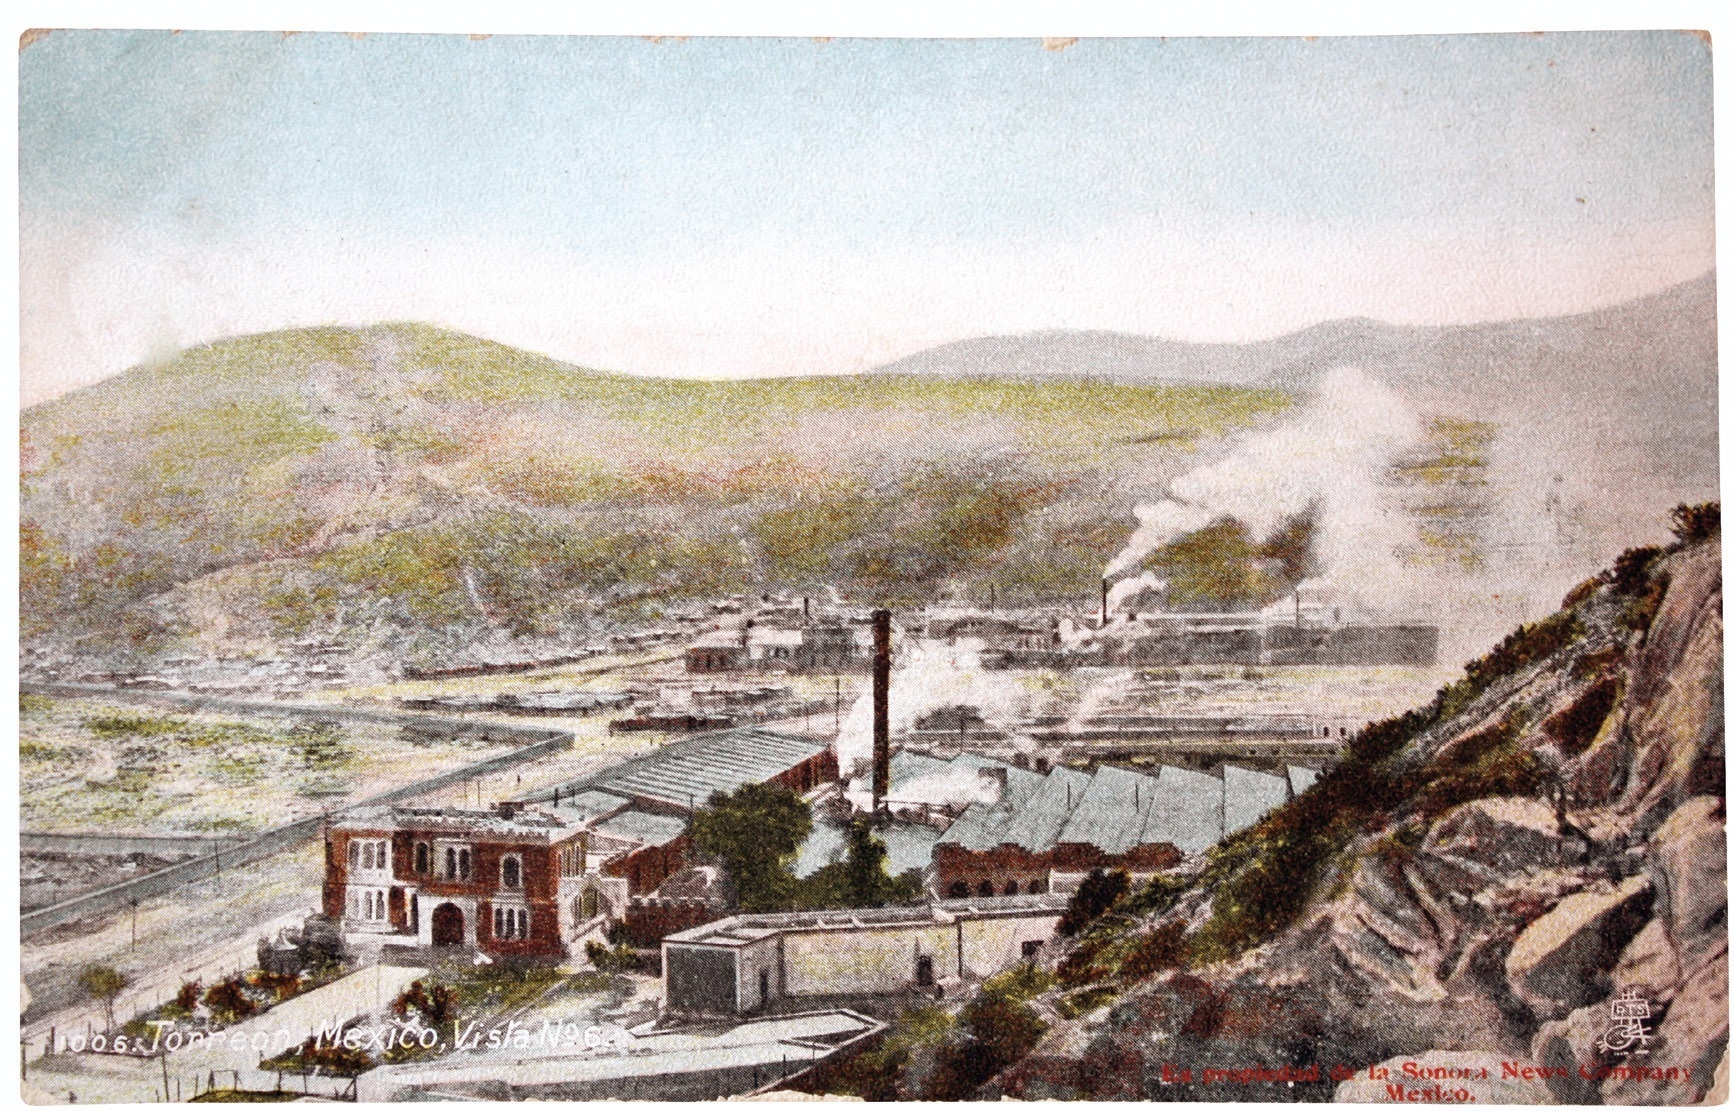
The Sonoran Desert stretches from Nogales west, extending south into the state of Sonora. Further south, and further east along the border, the (Chihuahuan) desert is more empty, but there are also lots of higher-altitude oak and pine forests and also grassland (it was much greener at the time of the Mexican Revolution than it is today, although for this part of the world that term is relative). The landscape in the desert varies by altitude, with trees at higher elevations and desert or semi-arid grassland at lower ones. Further south, and toward the coasts, the terrain changes yet again. The shifts based on altitude can be very abrupt, as can the sudden shift from built-up to empty areas. It is recommended that gamers do a little research before laying out their battlefields - the terrain had a huge impact on the fighting during the Mexican Revolution. Very often, approaches to defended towns were chosen specifically because they did not provide open fields of fire, across which direct assaults were often suicidal.
Leaders have several critical functions in this game, even though they do not perform actions or serve as targets like units do. The first is to help guarantee that orders are received and obeyed without delay. They do this in two ways: by being within 6 inches of the unit being given the order, or by being in contact with the acting unit when the action starts. Fire actions will usually be taken without a problem - troops will fire on the enemy quite readily - but they may benefit from having that fire directed by a Leader when the Leader is present in person - that is, attached
Another function of generals is to help regroup disordered and demoralized units. Again, they do this by being within 6 inches of the unit which is regrouping, or - better yet - by being in contact with it.
Leaders may only influence units which they command, and may only be attached to units which they command. This means that the unit must belong to the column that Leader commands, or the leader must be the "commander in chief" of the army, who is allowed to command any unit in the player force. When a Leader is physically in contact with the bases of the unit under its command, the appropriate box must be checked on the app for any action performed. The only exception to this is an Assault action: the Leader may choose not to lead an Assault in person (they risk getting killed) and so would leave this box unchecked.
Each turn, when activated, the Leader and all of the units within that Leader's command may make an action. Leaders - although not "units" per se, are also allowed to make an action. They are only allowed to move once during the turn independent of a unit to which they are attached (that is, in physical contact with). They may always choose to accompany any unit to which they are attached when it moves, even if they have already moved themselves. The exception here is Assaults - if a leader chooses not to lead an Assault, it will not move with the unit. Leaders attached to units which must fall back must accompany the unit unless simultaneously in contact with another unit in their command.
Generals cannot make any combat actions, nor may they be the target of combat actions. Their only actions are to move and to rest. They influence their troops via their proximity. Note that a leader may be attached to more than a single unit at a time, if this is physically the case on the tabletop and they are allowed to command all of the units in question..
A Leader who would be "run over" by the enemy simply moves out of the way, until 6 inches away from any opponents. This is a free move, which does not impact any other movement they make during the turn.
The Mexican Revolution saw a lot of "firsts" (at least in the Americas) when it came to using mechanical contraptions in combat: trucks were used on a fairly large scale, and airplanes were employed, as were some armored cars. In most cases, however - trucks being the exception - this was not at a scale where they really have a place in a grand-tactical game such as this. Players may wish to include them, however, for what-if purposes, so we provide some guidance about how they can be included.
Trains were a major feature of the conflict, but were mostly not used in combat setttings. There are, however, some exceptions, so we will provide rules for trains, including the use of the infamous máquina loca, a train stuffed with explosives and sent barreling down the track into a town.
Some other aspects of the fighting were atypical, but did occur, and so may be included in specific scenarios. On this list are barbed wire (the US abandoned a large supply of this when they left Vera Cruz), mine fields, and indirect artillery fire. We will suggest some ways to include these in the game.
Scenarios should specify what the carrying capacity of any given vehicle unit is, if any. Passenger units may not embark or debark from vehicles in any turn in which the vehicle moves. Embarking and debarking only require that the passenger unit ends/starts its movement in contact with the carrying vehicle. For trains, we generally allow a unit plus a Leader per train car. For trucks and saloon cars, we use a car model per vehicle base. In both cases, we assume that the vehicles are not being employed to carry cargo or otherwise employed (film crews, etc...).
As noted aboive, trains are always considered to be in march formation when being targeted, as they are easy to hit. Units riding on trains are considered to be separate targets. Each car of a train is considered a base, but bases are not removed from play when destroyed, they are just marked until the entire train is destroyed. If a train is destroyed, all units riding on it will take 1 level of damage and be immediately disembarked. The destroyed train will block the track where it has ended up. (Troops on trains were very alert to the potential dangers of this form of travel, so we assume that they will do whatever they can to minimize the impact of the train's destruction.)
Trains moving from a standstill must make a maneuver action before they are allowed to make a March action. Likewise, they must perform a maneuver action after making a March action before coming to a halt. Trains may not switch direction until they hve come to a halt. At least half of the base movement must be used. The only terrain which will affect train movement is a steep slope, which will slow it by half. Anything which cannot be easily brushed asidde by the train will block the track, and cause the train to stop. If the train is derailed (by destroyed track or explosions set off underneath it) then it is also destroyed,, with effects on passengers as above. The ability to rip up track and blow trains up should be specified by scenario. but it is suggested that these activities require a lot of preparation - they were not typically conducted under fire during battlefield conditions. That said, a group of 50 men could easily rip up a stretch of track in a half hour, sufficient to derail a train, if they were not under fire. You can use a "Rest" action to represent this in game terms, if you want to allow it, with the destroying unit in contact with the track while ripping it up. We recommend not allowing track to be ripped up by units under fire or being Assaulted, or units which are disordered or demoralized.
Trains do not provide any protection from fire in the game, unless they have been armored or sandbagged. If they have this provides hard cover, just like it would elsewhere. Machine Gun and Artillery units deployed on trains (required to be specified at the start of the scenario) will always make Moving Fire if the train on which they are emplaced has moved. Units emplaced on trains or being carried as passengers are assumed to be able to target anything out any side of the train which is not obscured by another car in the train, regardless of the facing of the models. Passenger units on trains which are required to Fall Back will ignore this result, remaining in place. Moving trains cannot be Assaulted except by Cavalry units, and are accorded Soft Cover modifiers to reflect the difficulty of this type of attack. Even this is not permitted if the train is making a March action during the turn. While passenger units may be Asaulted at any point on the train where they are positioned, the locomotive must be Assaulted if the target is the train itself. A unit is not allowed to perform an Assault in a turn during which it detrains.
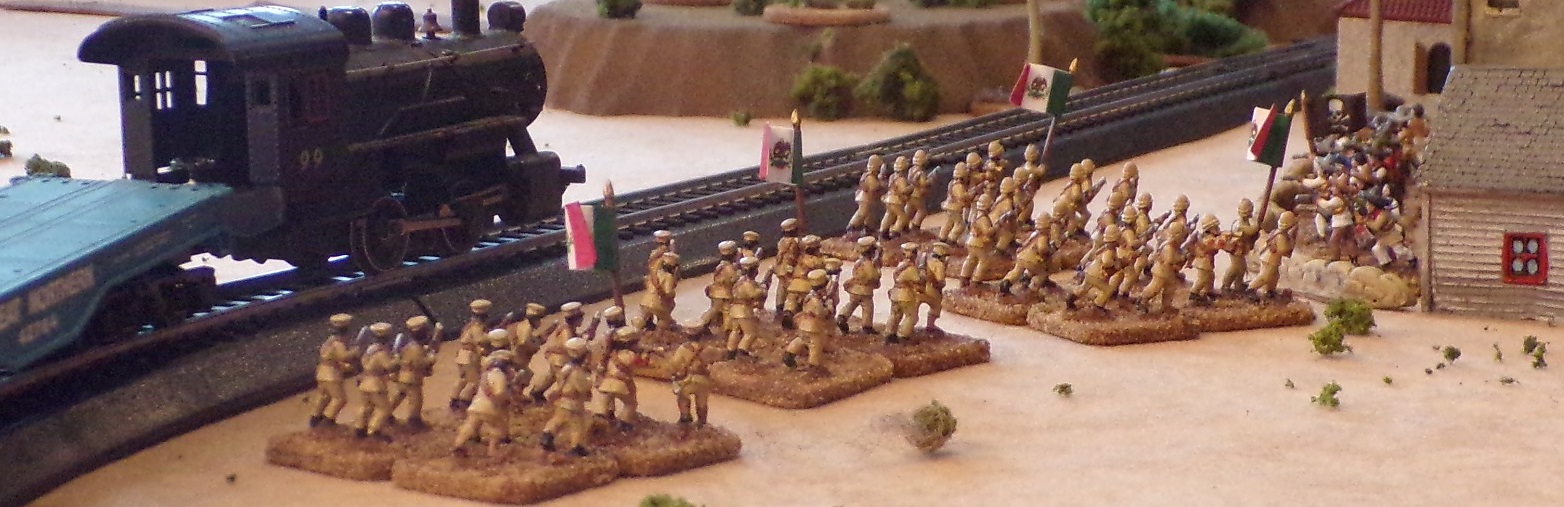
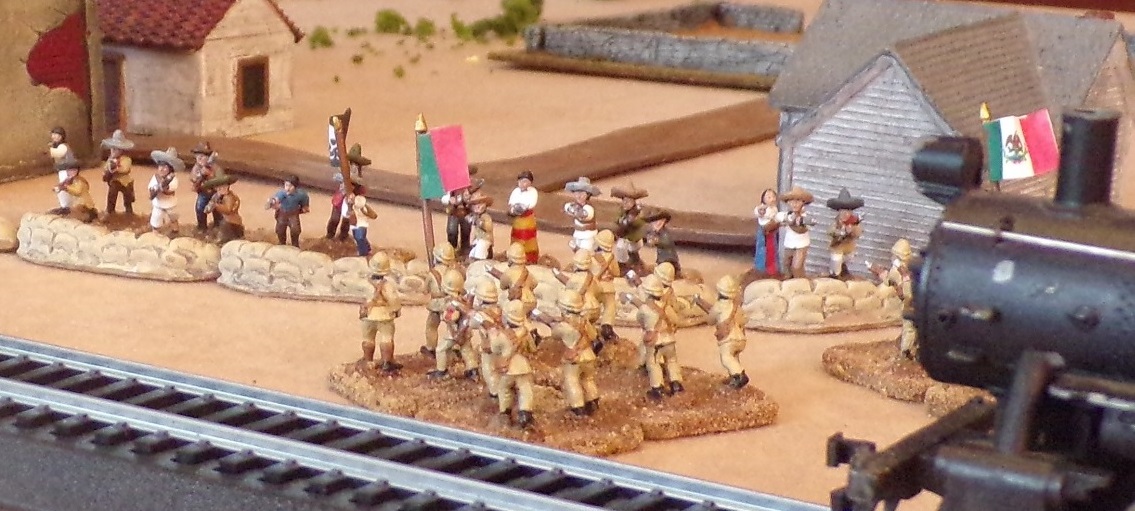
Government troops detrain to combat Villistas defending a town.
Note that trains are very vulnerable, and were almost never used actively on the battlefield during the Mexican Revolution. Player should be cautious about including them as major aspects of scenarios if they are concerned with the historical reality. (It is suggested that train-based scenarios are really skirmish games, rather than grand-tactical ones.)
Máquina Loca Units: These represent trains loaded with explosives, and they were used in several cases during the conflict. (Notably at Tierra Blanca, where the Villistas used one to blow a hole in the lines of the Orozquistas.) These trains were just a locomotive and a coal tender, packed with dynamite and shrapnel, and so are represented with just the single locomotive base. Once launched, they will proceed down the track at March speed (assuming a sufficient run-up - it must make a Manuever first) and explode when they reach their destination (either something blocking the tracks or a pre-determined end-point). Every unit within 6 inches will have to test for damage, as if they have been hit with an equal number of artillery bases making a Deployed Fire - the range is the unit's distance from the blast. Cover shielding the affected unit from the blast is taken into effect. Once used, the máquina loca is removed from play, and the track underneath it is destroyed. If an oncoming máquina loca is destroyed by fire, it immediately explodes, affecting whatever troops are in range and with all normal effects.
Many different types of automobiles were used during the Mexican Revolution, albeit mainly as supply and command vehicles. (We allow also for them to be used as troop transports.) There are two basic types: trucks and saloon cars. Trucks are considered slow transport, and saloon cars are considered fast transport. Like other unit types and unlike trains - these models will represent more then one vehicle per base, unless specified otherwise by scenario. Even so, their carrying capacity is limited. We allow 2 passenger bases to be carried by a truck base, and only 1 passenger base for a saloon car.
When firing at these vehicles, they are assumed always to be in Manuever formation (they are not allowed to deploy, being too bulky and easy to target). As with trains, when a automobile base is destroyed, it passengers are disordered and immediately debarked adjacent to the now-defunt vehicle. The unit of which the passenger bases are part will suffer the disordered status, even though some of it may be in other vehicles. Automobiles provide no cover to passengers, which are also assumed to be in Maneuver formation.
Fire from vehicles is limited: it is always Moving Fire, and artillery fire is not allowed (see exceptions for armored cars, below). We suggest that you make scenario rules regarding the use of Machine Guns from automobiles, as it is not unreasonable to disallow this unless the MGs are specifically mounted for this purpose (We are not aware of anyone doing this in the Mexican Revolution).
Armored Cars and Tankettes: There was some very minor use of armored cars during the Mexican Revolution, and certainly in other Latin American conflicts of the era both armored cars and tankettes were used. If you wish to field these, they are essentially cars (armored cars) or trucks (tankettes) which have an inherent Hard Cover propoerty (they get the Hard Cover modifier even when in the open, and are considered Fortified when hull-down, but only against fire, not Assaults). They cannot carry passengers. When they fire, they will fire as Machine Gun bases. They will react to Assaults also as Machine Gun bases in Hard Cover. Note that because these are formations of a half dozen vehicles, they will have a unit frontage like anything else, even though individual vehicles may have all-around turrets. Note that Villa's "armored car" which ran on train tracks is for our purposes a 1-car armored train, and not an armored car in our sense of the word.)
For practical purposes, aitcraft should not really appear in this game - they simply did not have an impact at this level of play. They were used for reconnaissance, but did not perform significant combat missions. The same cannot be said for other Latin American conflicts prior to WWII, however, so for those who wish to use these rules in those settings, we provide the following.
Planes start off-table. They will move on-table as a Maneuver action, appearing at any point where the player desires. Each turn, they make make a further on-table Maneuver to any point, but if they need to perform a bombing run, they need to be placed immediately adjacent to the target of their attack. Before the bombing attack takes place, any unit capable of anti-aircraft fire (rare, but such units did exist historically, especially around airfields and ports) may perform a Deployed Fire action versus the aircraft (a vehicle/Transport in Maneuver formation), without cover modifications. (This is true even if the AA-equipped unit has already acted for the turn.) If the aircraft is destroyed (e.g., 3 levels of damage) the bombing run does not take place. If it is disordered or demoralized, the appropriate modifiers will be applied to the bombing run. The bombing run itself is conducted as Deployed Fire from an Artillery unit at a range of 3-6 inches. Targets will benefit from cover as appropriate. Once the bombing run is complete, the aircraft is removed from the table - it must spend 3 turns off-table before it can re-appear to conduct another attack (this can be adjusted by scenario). Note that planes are only vulnerable to fire when they are conducting a bombing run (or other ground-related activity as per scenario) when they are flying ar very low altitude. Normal units may not fire on them, not being effectively equipped to do so. There is no provision for interceptors or air-to-air combat.
In cases where aircraft had the ability to strafe ground targets, the bombing run as above would instead be replaced by equivalent fire from Machine Guns. If an aitrcarft is capable of more than one attack, it may stay on table unless disordered or demoralized, in which case it returns to base for repairs. No more than one of each type of attack (bombing, strafing) is allowed for any single air sortie.
Although not as common as in Europe, there was some use of barbed wire and minefields during the Mexican Revolution, most famously at Celaya. Barbed wire should be represented on the tabletop, preferably in segments of a couple of inches which can be removed when they are cut. Units may not cross barbed wire (except for tankettes, if you are using them). To cross barbed wire, a unit must spend a turn in contact with it, performing a Rest action. On the completion of this action, the segment of wire with which the unit is in contact will be removed. Artillery will not cut barbed wire (shrapnel air-bursts) - it must be done manually. It has the effect of making an advancing enemy tarry in the kill zone longer, which was it basic function.
Mine fields were not common in this period, but they were not unknown. They require that hidden deployment be used, opreferably with a game master and a good map. When a unit enters a mine field, it immediately stops and takes one level of damage. The mine field is then placed on the tabletop. Each turn spent moving through a mine field will incur a single level of damage. If extensive mine fields are deployed, they should be arranged in 2-inch squares, which would be revealed only one at a time as encountered.
For large-scale explosive mines triggered on command (as opposed to land mines) these can also be plotted as single points on the tabletop. When triggered, they will explode like a Deployed Fire from an Artillery unit on every unit within 6 inches, similar to a máquina loca exploding. Less-powerful 3-inch mines may also be deployed. Such things were used during the Mexican Revolution, but not very often.
Artillery units during the Mexican Revolution seemed generally to conduct only direct fire, in part because the batteries rarely had any howitzers, and the level of expertise on the part of artillerists was often low. There were some excpetions, however. If you wish to include indirect fire, you can use the following: it is only permitted to be performed by deployed Artillery units. The targets for such fire must be known to the firer (you can specify spotting rules by scenario, but it was generally the case that emplaced artillery had good communications with their high command, so we allow any friendly unit to spot for their artillery).
Indirect fire ignores normal LOS rules, although significant barriers such as hills more than a single terrain level tall will block it. Instead of making a Deployed Fire action, indirect fire is always done with a Moving Fire action. Any range of more than 12 inches is divided in half, allowing guns to fire out to 48 inches.
It is fun to provide for hidden deployment in games which include indirect artillery fire: once a unit moves or fires it can be seen and targeted, but not before. In some of the battles during 1914 and later, this type of concealed deployment was a significant factor.
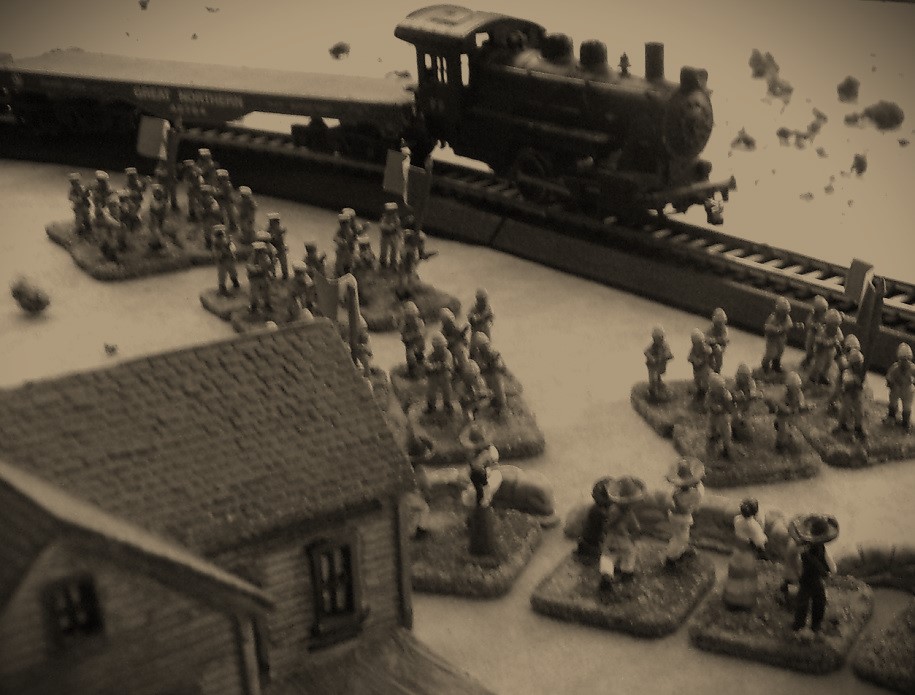
If you get the Peter Pig film crew set, you can have them take murky, period movie stills like this one!
Army morale determines when an army has been beaten, and will stop fighting, conceding the battle. Scenario victory conditions may choose to ignore army morale, but should provide alternate victory conditions if they do so. In a normal game, breaking your opponent's army by destroying its army morale is the normal way to win.
At the start of play, a break point is calculated for each army. This is done by counting up the number of combat units (not including Leaders or Vehicle/Transport units which are incapable of offensive action, and not including máquina loca units), and taking a percentage of this total based on the quality of the army. Army quality should be set by scenario. For unmotivated armies, the percentage is 30 (multiply by .3 and round up). For average armies, the percenatge is 40 (multiply by .4 and round up). Fior motivated or desperate armies, the percentage is 50 (multiply by .5 and round up). In every case, the result should be rounded up to the next highest whole number. This is the army break point.
During play, for each unit destroyed, or for each leader killed, subtract 1 from the army break point. Leaders and units such as Vehicles/Transports which did not count towards the army break point still subtract from this total, with the exception of máquina loca units (which are expected to be destroyed as a normal partr of their function). Scenarios may also assign a supply dump, camp, or other valuable resource which will subtract 1 from the army break point if destroyed by the enemy.
When an army's btreakpoint is reduced to 0, the game immediately ends - their army panics and runs from the field, and any who surrender will be shot (unless they are artillerists, in which case they will be recruited!)
Scenarios should take into account the breakpoints of the two armies when establishing the opposing forces, as giving one army a lower rating means that it is relatively weaker than its opponent. If the force balance is off, this is a good way to correct it. Some armies historically bad very poor morale, such as the Federal forces under Huerta in 1913 and 1914. (That said, the Colorados who fought for him were much more motivated, s o an army cosisting mainly of these troops would be rated average.) For many armies - the Villistas are a good example - the morale of the army went up and down over time, and would be different in different battles. This should be researched when designing scenarios for historical battles.
For pick-up games and fictional scenarios, army quality can be used to determine the length of games. Determined armies will generally fight longer, producing games which can easily run for 3 or 4 hours. Unmotivated forces will break much sooner.(Of course, the size of the armies and the speed of play will also be large factors here.) Average armies played at normal speed should produce a game of around 3 hours.
The Mexican Revolution is a great period for grand-tactical miniatures wargames: it has all of the firepower of WWI games, but with a much higher degree of mobility. It is a period which features a huge number of battles, most of which seem to never appear on wargames tables. This is a shame! Armies sustained horrendous casualties, and did so in a way that is full of the kind of character and flavor which miniatures enthusiasts love. While skirmish-level games can be played using typical Colonials rules, grand-tactical rules suitable for doing full battles generally fail to capture the nature of the conflict. It may be the fact that the US was only a very minor participant, but there seems to be little awareness of the scale of the conflict, especially in 1914 and 1915. This was a major war in the Americas, and yet it seems to take a back seat to much smaller conflicts (such as the Mexican-American War) from a miniatures wargaming perspective.
It is hoped that Revolucion! can change this, by providing gamers with a good alternative to game these larger battles using a dedicated rule set. While skirmish-level games are best played with 25mm/28mm figures, these are too large to capture the sweep of highly mobile battles involving entire armies. For this, the figures available (as of this writing) in 15mm/18mm are perfect. Peter Pig makes an excellent line in 15mm, available from Brookhurst Hobbies in the US, and Old Glory has an 18mm line (marketed under the Blue Moon label) called "Uprising in Mexico". It is hoped that 10mm and 6mm offerings may become available, but for now gamers will need to do a lot of conversions from other periods (although this isn't too difficult, given the availability of ACW, Colonial, and early WWI figures).
As a computer-assisted game, Revolucion! is a departure from popular systems like Carnage & Glory in that it does not require pre-programming of units into the computer, and does not track them on an individual basis during play. While this does limit what the device can do for the game, it allows for play to move faster - rather than slower - than other systems. Our experience of these games, run by a dedictaed GM, is that they play faster than comparable paper-and-dice systems such as Fire & Fury. The game app functions primarily as an easy way for all calculations and dice-rolling to be handled efficiently, allowing gamers to focus on the battle rather than on the game mechanics.
There is now a respectable amount of detailed history available to the miniatures wargamer regarding the Mexican Revolution. While the Osprey book on the subject is really excellent, it does not give details on the battles themselves. Joe Lee Janssens' Revolution Publishing has made a huge difference here. I strongly recommend that English-speaking readers who are not too familiar with the conflict get a copy of Strategy and Tactics of the Mexican Revolution, 1910 - 1915 to start, as it provides an excellent feel for the overall conflict and the range of battles. (The 5-book series is more detailed, but may be a bit much for some gamers, who also need to buy all the figures!) Another useful book - although harder to find - is VIVA LA REVOLUTION, VIVA MEXICO: A Wargamer's Guide to Refighting the Mexican Revolution 1910-1920. This is from the Partisan Press "Mexico" series, and as usual it is well-suited to wargamers, even though the focus is largely (but not only) on skirmish-level actions. In the US, it is available from On Military Matters.
This game system was developed for use at our local club, and is not intended to be a highly detailed simulation. We do not have a huge wealth of information regarding the specific training and tactics of the conflict, and the weaponry tended to be pretty variable - the combatants used what they could get their hands on. Consequently, a lot of assumptions are made as to the capabilities of different troop types. In general terms, they will act like their historical counterparts - from a design point of view, this is perhaps the most reasonable approach. While we could invent lots of detail, based on specific accounts, it could not be done with much confidence, and would come at the cost of playability. What we have aimed for is a highly playable game with a reasonable degree of historical accuracy, suited to convention and club games. We hope you find that this is the right balance, and that Revolucion! gives you a reason to put these fabulous-looking armies on your own table.
Viva la Revolucion!