In Freedom's Cause
American Civil War Regimental Combat in Miniature
By Arofan Gregory and Dave Valentine. Copyright (c) 2020 Bloody Scotsmen LLC. All Rights Reserved.
By Arofan Gregory and Dave Valentine. Copyright (c) 2020 Bloody Scotsmen LLC. All Rights Reserved.
Hail Columbia, happy land!
Hail, ye heroes, heaven-born band,
Who fought and bled in freedom's cause...
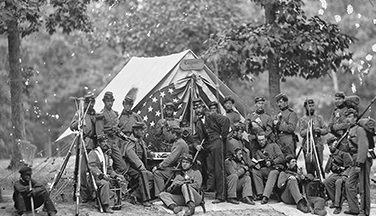
Hail Columbia! was the de facto national anthem of the US during the American Civil War (The Star Spangled Banner wasn't officially adopted until 1931.) While some game designers like to name their rules after people our ancestors - Union men, many of whom fought for the North, and one of whom was in Berdan's Sharpshooters (how cool is that?) - considered both traitors (for seceding) and morally bankrupt (for supporting slavery), we prefer to honor those who risked and often gave everything in a greater cause: that of Freedom. It is one that connects every American, throughout the country's history, and one that we can all believe in.
III. Troop Types, Units, Scales, and Organization
VIII. Morale and Combat Results
X. Generals, Orders, and Command Control
The American Civil War is a fascinating period to wargame, and many rules sets for it have been written and played over the years. In Freedom's Cause brings something new to the period, however, through a combination of computerized devices and traditional dice-driven mechanisms. It is distinct from more typical "computer-assisted" wargaming systems in that the device, while used during play, does not track units or perform randomization: it is used mainly to speed play by generating the tables against which players roll dice, and by performing the calculations which are normally (and often erratically) performed by the wargamers themselves. (And - in coop/solo mode - to provide the enemy forces' location and details.)
There are few ACW battles which are small enough to play in their entirety using battalions and regiments as maneuver units: it is often seen as a war of brigades, with several divisions and corps on each side. This may be true, but these same large battles offer a host of excellent subjects for more focused tabletop games, where a brigade or two is faced with a challenging situation at some specific, decisive point. Brigades offer a suitable number of units (four or five infantry regiments, an attached battery or section) for each player to command in a game at this level. While In Freedom's Cause can be used with miniatures of any scale, it lends itself well to the showier 25mm/28mm miniatures, which grand-tactical systems do not.
This document provides the rules and background for playing In Freedom's Cause, and is required in order to play the game. The computerized aspect of play is a required part of the system, but these rules, as for any other tabletop wargame, are also needed. You will find that, because so many of the mechanics use the device to perform look-ups and calculations, however, that the game is easier to learn and faster-playing than systems which rely solely on paper-and-dice to achieve a similar degree of realism and detail.
As with any miniatures game, figures are needed to represent the combatants. Infantry units (regiments/battalions) are made up of 12 to 24 figures. This works well on a standard wargames table with 25/28mm figures, or on a small one using reduced measurements (divide all base sizes and distances by half, or substitute centimeters for inches) for 15mm or smaller. If you have a collection of smaller-scale miniatures based for Fire & Fury, then a base can be substituted for each figure in the rules as written, producing units with more and smaller figures, which may appeal to gamers who want a birds'-eye-view look to the tabletop.
Typical brigades during the ACW had from 4 to as many as 7 or 8 regiments/battalions in them. (In these rules, a "battalion" is a smaller unit that functions as a regiment, but has less than the full complement of companies.) To this could be attached one or more sections of 2 guns, represented here as a single base with an artillery piece and four gunners. Brigadiers and higher-level generals will have their own figures as well. Cavalry units tend to be smaller (12 figures), and can be represented with both mounted and dismounted figures, or can use a single set of figures with a marker to indicate whether they are on horseback or not.
Figures may be mounted on bases with several figures or individually. Base sizes are given for 25mm figures here. Each infantry or cavalry figure should notionally be 3/4-1" wide, with 3/4-1" of depth for infantry and twice that for cavalry. Gun sections have a 2-3" wide base which is 3-4" deep. Generals are mounted on bases containing one or more figures (2" round bases work well). Sharpshooters are assumed to be based individually. So long as a 2-figure deep line can be represented, as well as deeper formations, the exact size of bases or number of figures is unimportant: consistency between the various armies is more important. Any reasonable figure basing should work.
For a typical brigade, 75-125 figures are needed. Games with a single brigade on each side work well, taking about 2 hours to play to completion. Games of twice that size are typical, and work well on an ordinary wargames table. Bigger games of twice this size can be reasonably accomodated, but games with more than 3 or 4 brigades on each side are very large, requiring considerably more time and table space.
Terrain requirements are the same as for any ACW game. You don't generally need a lot of model buildings, but you will need lots of roads, fences, rivers, and (especially) trees. Rifle pits became extremely common during the war, and will require tabletop representation. Some tips for making inexpensive terrain are given in the Appendix.
The game uses some typical markers: casualty figures or counters are used to mark disordered units; chits, or puffs of cotton wool or similar are used to mark units which have already acted during a turn. Limbers are markers in this game, and can be represented with counters or with models, as desired. Players may wish to employ tags for indicating the names of units, either affixed to command bases or written on counters which are carried along with the units during play, although these are not required.
As with many tabletop miniatures game, rulers and/or tape measures are needed (marked in inches, unless centimeters are substituted). Dice are used in pairs, and are all normal 6-sided dice. (We have been told that average dice are a pernicious and deeply un-patriotic British invention for people who lack sufficient bravery to face the sharp ends of probability curves. We couldn't possibly comment.)
A computerized device, with a web browser capable of running Javascript, is required. Tablets, normal laptops/PCs, and smartphones will all work. In Freedom's Cause is played using a Web app, so most devices will run it regardless of their operating system.
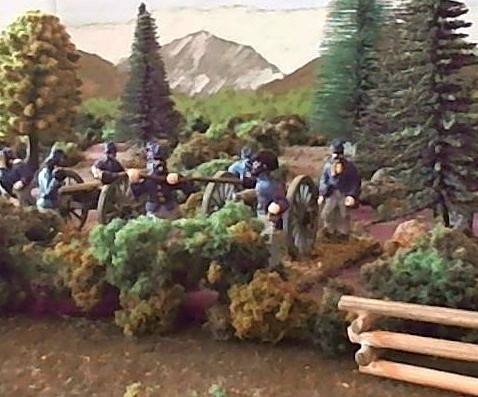
A Union battery fires from cover.
Game scales are variable, within narrow bounds, to allow players to better reflect the relative strengths of specific units for historical purposes. A single figure (infantry or cavalry) represents between 15 and 30 actual combatants. Artillery crew work to a slightly different scale, because each crew figure represents horses as well as artillerists: each figure is a quarter of the sections' complement of men and horses. These units should be deployed according to the historical number of guns present, rather than by crew strengths. Generals represent a general and his staff. All units in a game should use the same representation scale, adjusted to allow for average-size units of 12-18 figures, large ones of 24, and smaller ones of between 6 and 12 figures.
An inch represents approximately 20 yards. Each turn is approximately 10 minutes of real time. (Note that the game does not slavishly adhere to a strict application of these scales - both are adjusted in minor ways to accomodate game effects.)
Basing of figures is notionally that each foot figure (infantry or dismounted cavalry) occupies 1 inch square, and each mounted cavalry figure occupies 1 inch of frontage by 2 inches of depth. Artillery bases should be 3 inches wide and 4 inches deep. These measurements may be adjusted to reflect different basing systems, and are those used for 25mm figures (base depths especially may be reduced without altering play significantly). Figures may be based singly or on multi-figure bases.
For smaller scales, distances can either be halved (for basing, fire, movement, etc.) or units can be made up of a larger number of smaller bases without altering distances. For collections using the popular Fire & Fury basing, the latter approach gives an attractive birds-eye view over the battle, with lots of figures in the units, operating at a scale which is a little closer to actual ground scale.(Use 1 infantry or cavalry base = 1 figure, and two artillery bases and limbers = one artillery base.) The two sides should be based using the same system.
There is a limited number of troop types in this game: infantry, light infantry, cavalry, and light, heavy, and siege artillery. Generals - while not like other units - are also represented on the tabletop. Each of these is described below.
Infantry: The standard foot-soldiers of the war, infantrymen were trained to skirmish, but mostly operated in closer-order formations. It is assumed that a skirmishing company is deployed as appropriate, but this is not explicitly represented in the game. Most units will be regiments (notionally of 10 companies) but this category also includes smaller units of fewer companies, typically termed "battalions." The size of infantry formations varied wildly over the course of the war, and is indicated by the number of figures in the unit.
Light Infantry: These are sharpshooters and other infantry formations expected to function primarily as skirmishers. They are capable of everything that normal infantry is, but will often deploy in smaller units (two to four companies) and are capable of operating entirely in open order/skirmish.
Cavalry: Organized in a fashion similar to the infantry, cavalry units were often tasked with performing screening and reconnaisance roles which involved operating in skirmish order. They were also capable of forming up, so both are allowed for all cavalry. They may be mounted or dismounted during play.
Light Artillery: This category includes 6# smoothbore guns, 10# Parrot rifles, the 12# James rifle, 12# howitzer, and the 3-inch ordnance rifle (and similar artillery pieces of around 800-900 pounds in weight). The classification refers to the weight (and thus mobility) of the piece, rather than its fire effects, which are determined by how the weapon is classified for firing purposes (see below). Each model gun represents a section of two artillery pieces, along with attendant caissons, limbers, etc. In this game sections can operate independently, or can be grouped into batteries of two or three sections.
Heavy Artillery: This category includes the ubiquitous 12# Napoleon smoothbore, the 20# Parrot rifle, the 12# Whitworth rifle, the lighter "Austrian" 24# howitzer, and other non-siege guns of more than 1000 pounds in weight. As for light artillery, each model is a section.
Siege Artillery: This category includes 24# and 32# howitzers, mortars, and other guns found primarily in fortifications and siege works. Each model represents a section of the heavier guns (howitzers, and 8- to 13-inch mortars) or a larger number of smaller mortars. As these are not often found on the gaming table, they are depicted in a more abstracted fashion than field pieces.
The forces on each side should be organized into brigades. A brigade will contain between 3 and 8 infantry or cavalry units, along with any attached artillery (usually 1 to 3 sections). Note that it was standard practice for the Confederate batteries to consist of 2 sections (4 guns) and for Union batteries to consist of 3 sections (6 guns), but there were exceptions. It was common to deploy sections of artillery as independent units, and these should be established at the start of play, and such designations will remain in force throughout the game. For each historical gun, there should be two crew figures present. Normal (full-strength) sections will have a gun model and four crew. Single-gun sections will have a gun model and two crew. The Confederate batteries in all theatres and Union batteries in the Western theatre sometimes deployed as "mixed" batteries containing both smoothbores and rifles.
Each brigade will have a single general who acts as its commander. Higher-level generals (divisional commanders) may also be represented. These function as generals which are able to command units from any brigade under their command. (This system does not focus on the chain of command, but expects players to fill the roles of brigade commanders. Because of this, divisional and corps commanders are de-emphasized, and function largely as "extra" generals.)
Each unit has the following characteristics:
Name: The unique designation of the unit, used for making any needed notes about the unit, if desired. Players may wish to attach tags to the command figures in a unit, or use counters or another system so that it is easy to distinguish units during play. None of this is required, however.
Size: The number of figures in the unit at the start of play, used for calculating combat effectiveness and losses for morale purposes.
Quality: The training and fighting spirit of the troops, with the following descriptors used (from worst to best): "Raw," "Green," "Average," "Veteran," "Crack/Elite". Note that the "Raw" and "Crack/Elite" designations should be used very sparingly.
Armament: The type of rifle or artillery piece which equips the unit. (See the Fire section, below, for a list of possible weapon types.)
Type: The troop type of the unit, dictating its movement capabilities and permitted formations.
Sharpshooter: A very limited number of units were equipped and trained as sharpshooters (typically light infantry formations). This characteristic is a simple "yes" or "no".
Status: Units are either Ordered or Disordered. This status exists in addition to the unit's formation - units always have both formation and status.
In Freedom's Cause is played in a sequence of turns, like most miniatures wargames. Each unit (including generals) may make a single action during the course of each turn, with initiative being used for voluntary actions (as opposed to those made in response to an enemy action). The turn sequence is simple: when a unit is given an initiative (which can be determined by the game app, or diced-for in competitive play), one unit from one of the opposing sides makes an action. When all units have acted, the turn is complete, and a new one begins.
The winner of an initiative must use it to make an action with a unit or general, even if that action is only to indicate that a unit will stand and perform no other action for the turn.
It is possible for players who prefer an I-go-you-go style of play to use the system in that way. You may choose to have one side perform all actions before the other goes if you desire, or you may dice for it on a turn-by-turn basis. These rules are unusual in one respect: out-of-sequence reactions are permitted not only to charges, by the charged units, but also by any units which are fired upon by an enemy within range, or those which are able to fire on an enemy charging a nearby friendly unit. While this will use their action for the turn, it will happen at a natural point in time, instead of forcing such units to wait until the enemy has finished doing everything.
The system has two modes: a traditional competitive mode, in which players take one of two sides, and fight against each other, and a cooperative/solo mode, where the players are all on one side, and the game app indicates where and when enemy units appear (they are subsequently played by the game master). The only limitation when using the rules in cooperative/solo mode is that the I-go-you-go style of play is not permitted: each action taken by a unit requires that the app has granted them an initiative (although reactions are performed in the same way in both modes).
The main rules apply to both modes of play: the specifics of using the system in coop/solo mode are discussed in their own section, below.
Cooperative and solo play lends itself well to the current day, where miniatures games must be conducted remotely. (Hopefully, this will not be the case for long!) Cooperative play is useful even when there are a sufficient number of players to fight a normal competitive game, as the set-up of cameras and so on for viewing the tabletop is considerably simplified: a single camera with a wide-angle view of the table may be sufficient, and can be easily screen-shared with online conferencing systems. It is also an enjoyable way for two gamers to have a small, remote battle: if one player can see the physical table, and the other cannot, this is a bit unfair. Sometimes, it is easier to have a game where the game master runs the table, and a single player runs the player forces, seen through the camera, in coop/solo mode.
Starting the Game App: When the game app is loaded, the following screen will be displayed:
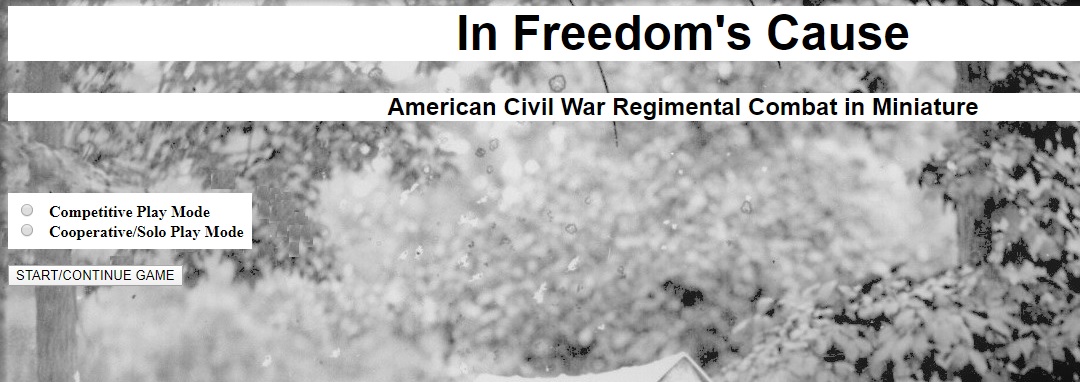
Using the checks, select either "Competitive Play Mode" or "Cooperative/Solo Play Mode" and click the START/CONTINUE GAME button. Competitive play pits two sides against each other, and functions like a typical miniatures game. Competitive/solo play assumes that all players are either Confederate or Union, and the game app (assisted by a game master, who might also be the player in a solo situation) plays the enemy. The game app will indicate when and where they appear and in what force (see below).
If Competitive/Solo Play Mode is selected, you will be asked if this is an ongoing game or a new one, and if new will have to tell the game app how many units you are using (see below for details). The game can be set to be more or less challenging, as players prefer.
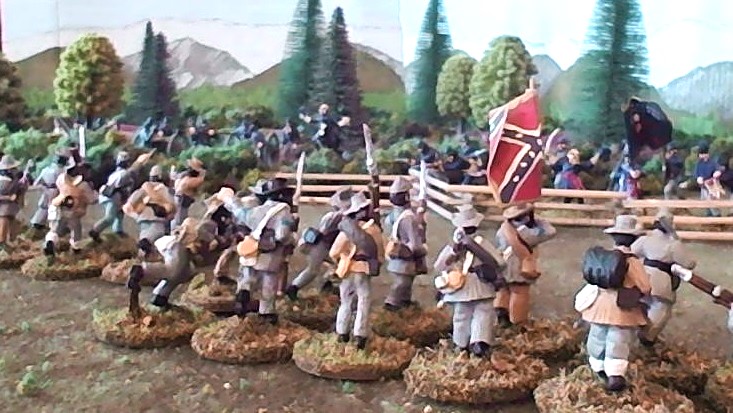
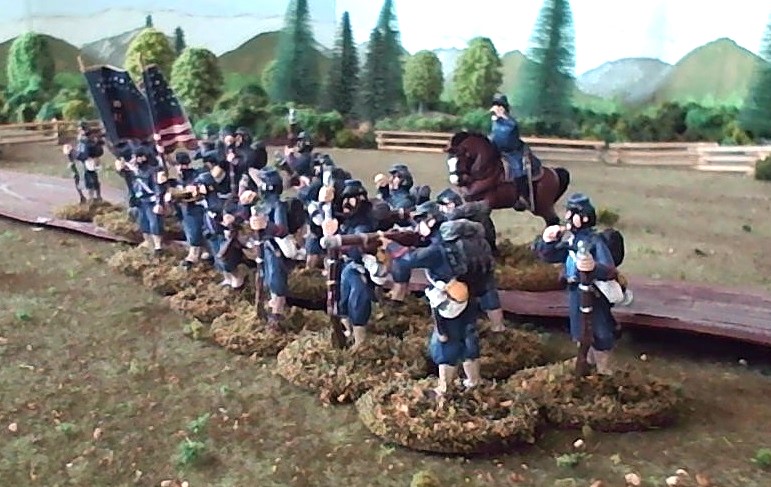
Rebels charge the Union line.
There are a limited number of valid formations in this game, and they are dependent on troop type. These are described for each troop type, below. Every unit in the game always has a formation, with the exception of Generals. A disordered unit is disordered in the formation it is currently in (although when re-formed it may assume a different one).
Units will at all times have a facing, although in special cases a single unit may decide to face in more than one direction (as in the case of a refused flank or the forming of a square, or for skirmishers). In all cases the facings of such a unit must form a continuous "bent" line: a refused flank or a square may be permitted - simultaneously facing to front and rear, without also facing to the flanks, is not.
Within a formation, figures should be arranged in even ranks and files to the greatest possible extent, with each figure/base touching its neighbors (skirmish formation is the exception). Each row should contain the same number of figures, with the odd figure being taken from the rear of the unit. As losses are suffered, they will come from the rear and flanks of a unit.
Infantry units (including Light Infantry) may form line, column, march column, and square. (Although squares were not common in the American Civil War, they were used, and drilled troops were trained to form them.) Light Infantry may also use full-unit skirmish. Each of these formations is described below.
Line: An infantry line represents the most common combat formation - a two-deep line with skirmishers deployed to the front as appropriate, and with some companies held back in reserve. (Skirmishers and reserves are the purview of the regimental commander, and are abstracted here as being below the notice of players, who take the part of brigade commanders.) In game terms, this formation is represented with a broad formation of no more than two figures in depth, and always wider than it is deep in terms of the number of figures. Figures/bases should be placed adjacent to each other, presenting a continuous front. Lines maximize firepower (all figures are counted as firing) but move more slowly than most other formations. Lines are permitted to charge.
Column: A column formation represents the company columns (one company wide) or column by division which was often used as a formation for maneuver and sometimes assaults on the battlefield. This is a formation which is - like a line - assumed to include deployed skirmishers as appropriate. It must be at least three figures deep, and at least two figures wide. If a unit contains too few figures to abide by these restrictions, the player must make it clear that the unit is in a column formation. Columns are capable of fire, but they are not optimal for fire combat, as only the two front ranks of figures may fire. They make be used to conduct charges. Columns permit faster battlefield movement than lines.
March Column: March columns are long columns of route with a narrow frontage. They are assumed to be screened by skirmishers as appropriate, but are not used as battlefield formations in most cases. In game terms, they are represented as columns deeper than they are wide, with a frontage of no more than two figures. They move very quickly as compared to lines and (field) columns. Columns are not allowed to fire or charge.
Square: A square formation is one in which troops assume a rectangular or square formation with ranks of soldiers only along the sides, facing outward from the center. Squares were uncommon in the ACW but not completely unknown, and the troops were trained to form them when necessary. They were designed to provide all-around defense against charging cavalry, but had largely lost their relevance due to the increased effectiveness of firearms and the lack of massed cavalry on the battlefield. In game terms, a square is a regular square or rectangle of soldiers facing outward to all sides ("regular" meaning that opposite sides of the formation have the same number of figures). Each face of the formation is a single rank of figures deep. Figures may all fire to their front. A square by definition has no flanks. Squares are not allowed to move or charge. (While theoretically possible, and even performed by some other armies historically, this was not within the capabilities of the troops in the ACW.)
Skirmish: A skirmish formation is one in which all troops are spread out over a wide area, operating in small groups. This formation was used to screen and for the purposes of deploying sharpshooters. In the game, only Light Infantry are allowed to use this formation. Each figure should be based individually, and must be no more than 2 inches from another figure in the unit. (Alternately, larger gaps may be left between multi-figure bases.) Skirmishers move very rapidly, and may fire (the two outside ranks of figures, seen from the direction of the target, regardless of the skirmish unit's facing, are allowed to fire). Skirmishers operate in clouds, and be definition have no facing for game purposes (they could rapidly turn to face any threat, and would do so.) Units in skirmish may charge, but doing so may be suicidal (and was not historically common).
Cavalry units may form line, column, and march column, and may go into skirmish formation. In all cases, the troops are either mounted or dismounted, and this must be indicated on the tabletop (it significantly affects fire, melee, and movement). Each of these formations is described below.
Line: A line represents the most common combat formation. Optimized for the use of saber and revolver, some companies were often held back to support charges with carbine fire (this is abstracted in the game, as below the notice of a brigade commander). In game terms, this formation is represented with a broad formation of no more than two figure in depth, and always wider than it is deep in terms of the number of figures. Figures/bases should be placed adjacent to each other, presenting a continuous front. Lines maximize firepower (all figures are counted as firing) but move more slowly than most other formations. Lines are permitted to charge.
Column: A column formation represents the company/squadron columns (one company/squadron wide) or column by division which was often used as a formation for maneuver and sometimes assaults on the battlefield. This is a formation which is - like a line - assumed to include deployed skirmishers as appropriate. It must be at least three figures deep, and at least two figures wide. If a unit contains too few figures to abide by these restrictions, the player must make it clear that the unit is in a column formation. Columns are capable of fire, but they are not optimal for fire combat, as only the two front ranks of figures may fire. They make be used to conduct charges. Columns permit faster battlefield movement than lines.
March Column: March columns are long columns of route with a narrow frontage. They are assumed to be screened by skirmishers as appropriate, but are not used as battlefield formations in most cases. In game terms, they are represented as columns deeper than they are wide, with a frontage of no more than two figures. They move very quickly as compared to lines and (field) columns. Columns are not allowed to fire or charge.
Square: Squares are not permitted for cavalry units, even when dismounted. While they often operated dismounted, this was not the way in which they were trained to fight against enemy cavalry. Squares would not be seen as a necessary part of their battlefield function.
Skirmish: A skirmish formation is one in which all troops are spread out over a wide area, operating in small groups. This formation was used for the purposes of scouting and screening and for the purposes of deploying sharpshooters. All cavalry units are permitted to skirmish, as this was a normal part of their usual battlefield behavior. Each figure should be based individually, and must be no more than 2 inches from another figure in the unit, or gaps should be left between multiply-mounted figures. Skirmishers move very rapidly, and may fire (the two outside ranks of figures, seen from the direction of the target, regardless of the skirmish unit's facing, are allowed to fire). Skirmishers operate in clouds, and be definition have no facing for game purposes (they could rapidly turn to face any threat, and would do so.) Units in skirmish may charge, but doing so may be suicidal against formed targets.
Artillery have only two formations: limbered and unlimbered. Limbered artillery may not fire. Please note that limber models act as markers in this game - they do not indicate the actual position of the unit, and thus cannot be fired on or targeted (the gun model base must be used for that). By agreement, players may adopt rules about the limber being the primary base when the unit is limbered, and the gun base otherwise, assuming these are of similar size, but many gamers do not use limber bases, so the rules are written to allow play without them.
Limbered artillery moves much faster than unlimbered artillery, which must be "prolonged" (manhandled) to change position. With guns weighing hundreds of pounds, this is a slow way to move. (The speed with which a limbered gun could be brought into play during the ACW is impressive, however, some officers of the period giving time frames measured in seconds rather than minutes.)
Base movement rates are the movement rates for each troop type, according to their formation, in open terrain without obstructions. Terrain features and other factors will modify these rates, giving the actual distances units move on the tabletop. Note that dismounted cavalry move at the speed of infantry.
| Troop Type/Formation | Base Movement (Inches) |
| Infantry/Line | 8 |
| Infantry/Column | 10 |
| Infantry/March Column or Skirmish | 12 |
| Infantry/Square | 0 |
| Mounted Cavalry/Line | 12 |
| Mounted Cavalry/Column | 18 |
| Mounted Cavalry/March Column or Skirmish | 20 |
| Light Artillery/Limbered | 10 |
| Light Artillery/Unlimbered | 4 |
| Heavy Artillery/Limbered | 8 |
| Heavy Artillery/Unlimbered | 2 |
| Siege Artillery | 0 - Facing change up to 90 degrees |
| Generals | 20 |
When charging, infantry units will add 2 inches to their base movement, and cavalry units will add 4.
Generals are always considered to be mounted for movement purposes.
Movement may be made directly forward, or at an angle of up to 45 degrees to either side of facing in a forward direction without changing the facing of the unit (moving in echelon). Forward wheels may be made by pivoting off either of the front corners of the unit, paying for the movement of the opposite corner. Sideways and retrograde movement may be performed at full speed, including wheels (turning to flank or rear before marching was something which took almost no time at all, and was second nature to the troops drilled according to the prevalent systems in use).
Units may freely intepenetrate other units so long as they are undisordered, and may always interpenetrate units in skirmish and artillery, whether limered or unlimbered. Units may not end their move occupying the same space as another unit, however. (Note that interpenetration caused by combat results may force units to check for being "routed through" (see below).
Formation changes include the following activities:
Deploying (Column or March Column to Line)
Ploying (Line to Column or March Column)
Break into Skirmish (from any other formation)
Form up from Skirmish (into any other formation)
Form Square (from any other formation)
About face (in any formation)
Reform to flank (in Line or Column)
Refuse flank (from Line)
Mount/Dismount (cavalry only)
Limber (if Unlimbered)
Unlimber (if Limbered)
Each formation change will cost half of a unit's base movement, and may be performed at any point during the move. Change of facing is always permitted in combination with any other formation change. The center-point of the unit should remain the same when formation changes are performed, with the caveat that movements of up to 3 inches may be involved to accomodate terrain and other friendly units (but not for other reasons). Formation changes may be combined with other movement and fire (moving fire) but may not be combined with charges.
The 23rd Pennsylvania prepare to face the enemy.
Terrain can vary a lot in its effects, and scenario designers should feel free to specify the exact effects of terrain on play. What is provided here is a baseline for most types of wargame terrain. The basic assumption is that - in both the Eastern and Western Theatres - woods tended to be very dense, with lots of undergrowth. Despite this, the various units of the Civil War (including cavalry and artillery) managed to operate in them quite effectively, which had decided impact on how the various maneuvers learned through parade-ground drill were actually practiced in the field. These facts tend to cancel each other out, but provide a bassic idea of the assumptions behind what is given as default rules regarding terrain.
Open: Open ground would include fields and pastures with trampled or mown (or out-of-season) growth which provides to impediment to movement or vision.
Cornfields, wheatfields, and similar: These provide little impediment to moving troops, but will block LOS if tall enough. Once moved-through by anything other than skirmishers, however, they are considered trampled flat and will simply become open.
Woods: Woods impede both movement (by half) and line of sight. Maximum visibility through (inside of) woods is 6 inches. Fire into or out of woods is limited to 1 inch (the edges of woods have much denser undergrowth).
Hills: Smooth hills may block LOS without impeding movement or providing cover. Steeper hills, and ones which are rocky and/or overgrown, will impede movement by half and provide soft cover. Especially rocky areas may provide hard cover.
Creeks and streams: If fordable, these are treated as rough ground, which will impede movement by half when crossing or mobing through. If banks are steep enough to provide a benefit to a unit defending them, this should be indicated by scenario. When a units is charged by a unit which is forced to be in the creek or strean when contact is made, the combat will count as occuring in the rough, providing soft cover to troops, by default.
Linear obstacles: Stone walls, hedges, and other types of linear obstacles will generally deduct an extra inch of movement from units crossing them. (Split-rail fences could be the exception, as these could be incredibly easy to kick down, but might also be founded on low stone, or reenforced with posts at the corners, making them more durable. Players should specify anything other than the default linear obstacle for these.) Hedges and split rail fences will provide soft cover; stone walls, if sufficiently robust to form a good bulwark, will count as hard cover. Rifle pits will provide hard cover, but will not count as linear obstacles (they are too shallow to really impede movement). More solid entrenchments and works will count as fortifications, and also as linear obstacles.
Roads: Roads will give a 50% movement bonus to units in March Column and Limbered artillery for movement along them. They will further negate terrain effects for woods and other rough terrain for such units. Note that units in protective terrain on a road will generally still get the benefit of cover, roads not being at all accurate to the groundscale at this level of tabletop representation.
Swamps: Some rough terrain will slow movement but will not provide any form of cover. A swamp which is primarily low and muddy would be such a feature. Other swamps might even slow movement to a quarter of normal rates - this should be specified by scenario. Swamps may provide soft cover as a result of having bushes and trees in them - again, the nature of such terrain should be established by scenario, before play starts.
Built-Up areas: In truth, not a lot of the fighting during the Civil War took place inside of towns, but that isn't to say that it won't happen on the wargames table. It is easiest to treat built-up areas as a combination of rough and roads: March Columns and Limbered artillery will benefit from the roads which run through them, as for any other road. (Roads can, of course, be intentionally blocked.) Other formations will suffer the penalty for moving in rough: it will slow them by half. Primarily wooden structures of a flimsy nature might only provide soft cover, but most towns with brick and stone houses, walls, and other such constructions will provide hard cover. The boundaries of a town should be clearly marked - at game scales, a single building will represent a larger area containing several structures, and a few of these will represent a larger settlement. Knowing where the terrain starts and ends is useful (it can be marked with a stone wall, or the footprint can be indicated with a piece of felt, etc.)
Fire is an action which can be performed by almost any unit in the game (generals cannot fire), and may be comined with movement. Artillery must be unlimbered to fire, but cavalry can fire mounted if desired (it comes at a penalty). There are some basics rules regarding fire which will be true for all units.
Fire is permitted at units which have a clear line of sight (LOS) to an enemy unit, within their firing range (see LOS, below). For artillery at this scale of play, ranges are very long. Artillery fire over the heads of friendly troops is permitted, but only if the friendly troops are at least one terrain level below the firing artillery. For Minie rifles, range is limited to 18 inches. For carbines and smoothbore muskets, it is limited to 12 inches. Small arms may not fire over friendly troops. The game app will inform you when fire is not allowed due to range - fire at extreme ranges is often completely ineffective, even if theoretically possible.
Fire is permitted up to 45 degrees to either side of front of the firing unit, measuring outward. Splitting fire is permitted - fire is conducted by giving the app the number of firing figures (or, for artillery, crew) and units may split fire into separate rolls on as many legal targets as they wish. The major restriction to this is that figures - aside from artillery - must fire at the nearest legal enemy target, again with the exception that skirmishers and artillery need not be targeted, even when closest). Note that combining the fire from figures of different units is never permitted.
Disordered units may not fire: they are required to reform from disorder first (involuntary fire might occur, but it will not be effective and so is not allowed.) Only figures in the two front ranks of any formation may fire (with the front for skirmishing units deemed to be any edge of the unit which can trace a clear LOS to the target of fire.)
Most fire is conducted as a voluntary action: a unit is given an initiative, and fires, or splits fire with a half-movement or formation change (which is considered moving fire). Often, however, fire is permitted by (or required of) a unit when it is not acting under an initiative. Whenever a non-artillery unit is fired on by a unit which itself is a valid target of fire, it will immediately return a full, non-moving fire if it has not already used its action in the current turn. This will use that unit's action for the turn, so no further action will be permitted. If a unit wishes to avoid returning fire, it must pass a Morale Check, using the "Unit Fired On (Return Fire)" setting. If such a test is passed, the unit will not return fire until it receives an initiative and chooses to do so. If it fails this test, it will return "Involuntary Fire," which is much less effective than voluntary fire. This mechanism allows players to stop enemy units from making actions voluntarily, using initiative, and forcing them instead to engage in fire-fights.
Another case where a unit which is not acting under an initiative may fire is when an enemy unit charges across its arc of fire at a different friendly unit. This is not mandatory, but a player may choose to fire on such a charging unit at the same point in the charge sequence when the target of the charge is performing reactions (see below). This is termed "pass-through" fire, and it will use the firing unit's action for the turn.
The picture below shows the Fire tab in the game app:

To fire, the Action field should be chosen according to the weapon the firer is armed with. The quality and number of firing figures (from the first two ranks) should be selected, and the correct range bracket for those figures chosen. (Players may choose to enter a longer range bracket for a larger number of figures, some of which are actually at closer range, if they desire. This is useful when the number of figures firing at a closer range is small, and would be ineffective.) The situation of the target (in the open, or in soft or hard cover) should be selected. (If not chosen, the target is counted as in the open). Any applicable modifiers should be checked.
Fire may not pass through a gap between friendly units of less than 1 inch in width. If fire is conducted largely (that is, more than half) through sft cover which intervenes between the firer and the target, but which is bot deep enough to block LOS (more than 1 inch), then the target gets the benefit of Soft Cover.
Flanking fire and fire on vulnerable formations is performed by using the "Deep Target" check box, which should be checked if the target presents more than two ranks to the firer - that is, the fire would pass through three or more ranks of troops. (If players desire, this box may always be used for fire on the rear of a target, to reflect the psychological effects of being fired on from behind. If this is done, players should agree before play starts.)
The "FIRE" button is then clicked, and a table is generated on which the firer makes a roll with two dice, as shown here:

The target unit will suffer the indicated number of casualties, and must make a Morale test (see Morale, below).
This process will be used for each firing conducted by any given unit when it fires - you may need to generate as many as two or three different tables when fire is split, or when firing figures are at different ranges from the target. Note, however, that no single firing will ever be conducted by more than 24 figures - if more figures than this are firing, two firings of equal size should be made.
When more than one firing is conducted by a single unit on a single target, the total casualties made by that unit on the target are added up before the target unit makes its morale check. Fire from one unit on a target never causes more than a single morale check from casualties.
Note that if any setting has been incorrectly made before the table is regenerated, simply dismiss the table (click OK) and then fix the settings and generate a new one. The table generated for any given combintion of settings is always the same - only the dice roll is random.
Charges: When a player wishes to make a charge, this can trigger a set of different actions on the part of different units. Only undisordered infantry and cavalry are allowed to declare charges, and they must be within command range (18 inches) of a general when they do so. The target of the charge must be within reach, based on the unit's terrain-modified movement, adjusted for charges (adding 2 inches for troops on foot and 4 for mounted cavalry to base movement). Charges may only be declared against a target unit to the front of the charging unit (up to 45 degrees to either side of facing, measured outward from the sides of the unit, as for firing arc.) The target of a charge must be within LOS when it is declared.
The sequence of actions made when a charge is declared are as follows (note that the charging unit has not yet been moved on the tabletop, but the path of the charge indicated, and the furthest point of potential movement along that path determined in case of a breakthrough):
Check Morale for Ordered to Charge: The charging unit must make an "Ordered to Charge" morale check. If this is failed, then the charge does not happen, and the unit may choose to make another action, as dictated by the game app. If passed, the charge continues.
Check Morale for Receiving Charge: The target of the charge must make a "Receiving Charge" morale check. This will dictate whether or not reactions are possible, and whether the target of the charge stands or panics and runs (the game app will dictate what kind of panic occurs.)
Reactions to the Charge are Made: Reactions are possible on the part of the target unit if the results of the preceding step allow the, so long as they have not already acted for the turn. If other units friendly to the target unit are able to fire on the charging unit as it moves along the indicated path of charge, and have not yet acted for the turn, then they may conduct pass-through fire (see below). The target unit has a wider potential range of reactions (see below).
Attacker Checks Morale if Required: If pass-through fire or target reactions caused the charging unit any casualties, they must make a "Fired on during Charge" morale check. This will determine what happens next: the charging unit might close with the enemy, it might stop and return fire, it might pull back, etc. This is dictated by the game app.
Melee: If the charging unit has closed with its target, the unit is moved, and a round of melee is conducted, with the "Attacker is Charging" box checked (see below).
Loser of Melee Chacks Morale: Whichever side has taken more casualties in the melee (not including casualties taken from reactions and pass-through fire) must now check morale, using the "Unit Lost Melee" setting. If they stand, and the winner of the melee has taken casualties, they must make a "Taking Casualties from Fire/Melee" morale test. If there is no winner (both sides have taken equal casualtuies from melee, not including casualties inclifted by fire during the charge process), then both sides must make a "Taking Casualties from Fire/Melee" morale test, and abide by the results.
Breakthrough: If the charging units has forced the target unit out of position, such that it can continue its charge, then it may continue along the path of the charge, fighting additional actions with any unit encountered. These breakthrough charges do not allow for any target reactions or pass-through fire, nor do they require morale checks on the part of the charging or target units. They start with a round of melee with the "Attacker is Charging" box checked.
Occupying the Position: Even in cases where a breakthrough charge is not possible, the winner of a melee may always occupy the initial position held by its opponent if that opponent has surrendered the ground (as with continuing melees - see below).
Note that both the charging unit and the target unit of a charge are considered to have acted for the turn if they started to charge, took any fire action, made a reaction, or participated in a melee. If the target of a charge has not at least made a reaction, it is considered not to have yet acted during the turn.
Reactions:Units which are the target of a charge may - if they have not already acted during the course of the turn - perform a reaction, but only if their morale test to "Receive Charge" allows them to do so. If able, reactions may include movement away from the charging unit or fire at it. The range at which fire is made depends on whether the target unit wishes to hold fire until the last minute: voluntary fire may always be made at the full charge distance (the distance between the charging unit's starting position and the position of the firing unit.) If the unit wishes to hold fire, then a morale test for "Unit Fired On (Return Fire)" must be taken. If past, fire may be conducted at half the full charge distance. If failed, involuntary fire will be taken at the full charge distance. All fire against charging units is conducted normally, and may force the charging unit to make a "Fired on during Charge" morale test if casualties are inflicted.
Pass-Through Fire: Whenever a charge will be conducted through the arc of fire of a non-target enemy unit, itself able to fire and not yet having acted for the turn, then pass-through fire may be taken at the charging unit. This fire is entirely voluntary, and will be taken at a range mearured from the firer to the position of the charging unit at either the starting position of the unit, or halfway along its path toward the target, at the discretion of the firing player. Such fire will be conducted as normal, and will use the firing unit's action for the turn. The charging unit may be forced to take a "Fired on during Charge" morale test if casualties are inflicted.
Melee: When a melee occurs, both sides will roll simultaneously for casualties. All of the figures in both attacking and defending units are counted as involved in melee. The Melee tab in the game app looks like this:
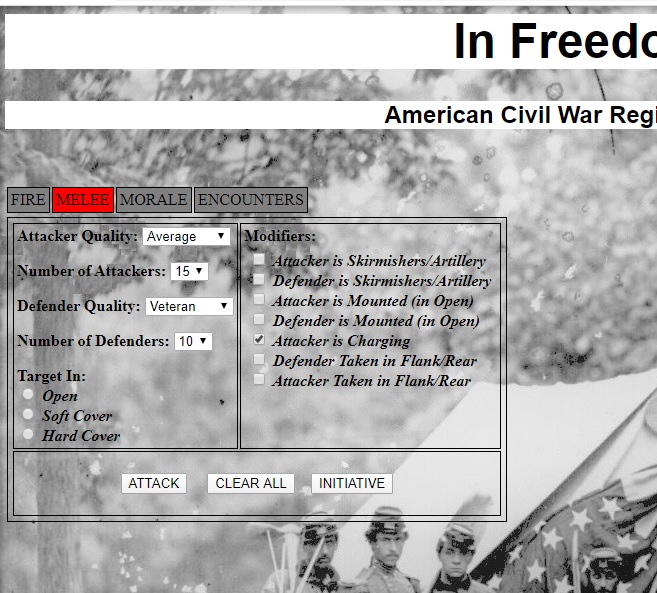
The Attacker is the player who is charging, or using their initiative to resolve the combat (in the case of continuing combats - see below). Attacker and Defender quality must be indicated, as must the number of figures involved on each side of the combat. The terrain occupied by the Defender - the terrain in which the combat will take place - must be indicated (the default is "Open"). All relevant modifiers on the right-hand side of the tab should be checked. Note that mounted cavalry will not get the benefit of charging when they are fighting with infantry in square, even if this would otherwise be the case (do not check the "Attacker is Charging" box).
In cases where more than one unit is involved on a side, the quality of the majority of the units involved on that side should be used, and the total number of figures indicated. Casualties will be shared evenly by involved units. Other modifiers will apply if they describe any of the units involved in the combat.
When all applicable fields have been filled out, the "FIGHT" button is clicked, showing the message below (two views are needed to see the whole message, as it requires scrolling down):
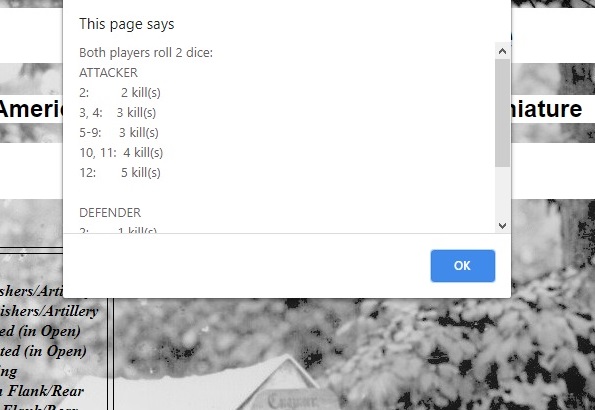
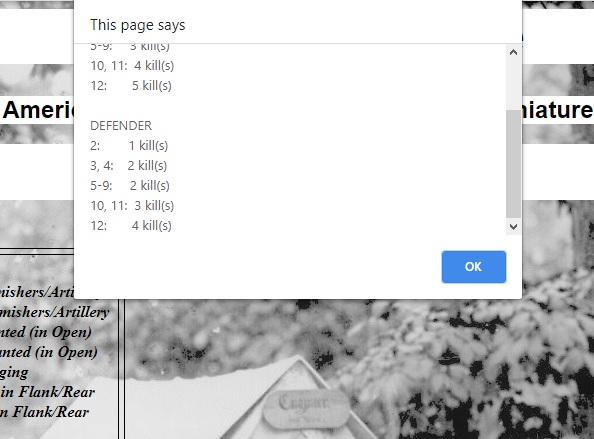
Each of the players will roll two dice to determine the number of casualties inflicted on their opponent (the Attacker rolls on the table labelled "ATTACKER" to determine kills on the defender, and vice-versa). The winner of the combat is the side which has inflicted the larger number of casualties on their opponent. The loser of the melee must perform a "Unit Lost Melee" morale check (if more than one unit, each must check morale separately). If passed by at least one unit, then the melee will continue. If both sides take equal casualties, then all involved units must make a morale check using the "Unit Taking Casualties from Fire/Melee" action. If they are still in contact, then there is an ongoing melee.
On-going combats are resolved when any unit on either side is given the initiative, or when a new unit charges into the melee. All units involved in the melee will then participate in its resolution. Whenever a unit participates in a melee, its action has been taken for the turn.
The winner of a melee always has the option to occupy the position held by its opponent if that opponent has moved away from that position. If only one side is left in place where a melee is tied, then that unit may also make this type of occupying move.
Break-Through Charges: When a charging units wins a melee, it has the option to continue forward to the maximum extent of its charge movement. If this brings the unit in contact with another enemy, an immediate round of melee is fought without prior morale checks, responses, or pass-through fire. The charging unit is still considered to be charging for the purposes of the combat.
There are many points during the game where units must check morale. Normal morale checks (that is, not brigade- or army morale checks) are always made by individual units, even if the events which caused them (e.g., melee) involve more than one unit on a side. The results always concern the unit making the check. Morale checks never use a unit's action for the turn except as described below for "Reform from Disorder", although sometimes the results do (see the description of each type of check further down in this section).
The process for performing morale checks is the same for every type of check. The picture below shows the Morale tab of the game app:
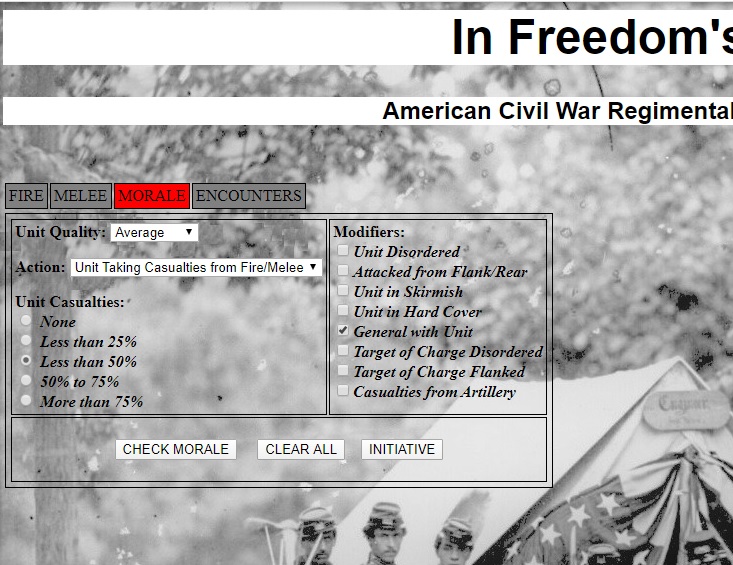
Unit Quality is set to the quality rating of the unit making the check. The Action field indicates the type of morale check which is being taken. The number of casualties suffered by the unit must be indicated, calculated as a percentage of the figures still in the unit, as compared to the total strength in figures of the unit at the start of play. Thus, a 7-figure unit will not have taken 25% casualties until two figures are removed, and a 15-figure unit has not suffered 50% casualties until 8 have been removed, etc. The highest valid casualty percentage must be used (a unit which has lost 50% casualties has also lost 25% casualties somewhere along the line, but the higher figure is the one we care about!) All modifiers which apply must be checked: the "General with Unit" modifier is only checked if a general is attached to the unit (see below).
The results of morale checks will be presented as a (usually simple) table, against which the player rolls two dice, as shown below:
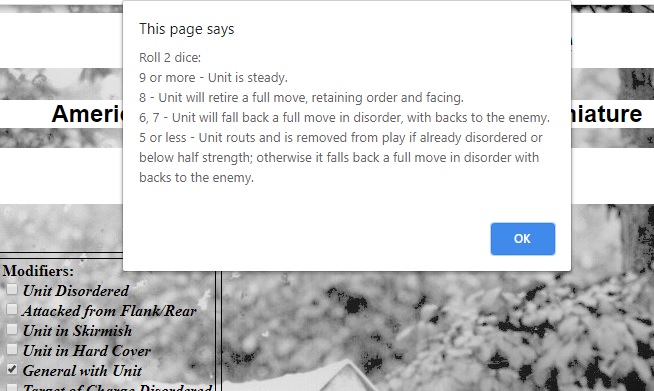
If a unit is "steady" it has passed the morale check and continues to function normally. A unit which falls back facing the enemy, undisordered, will be considered to have used its action for turn (typically not the case - units falling back in disorder will not have used their action for the turn unless it has been used already, as this movement is involuntary). Units which fall back in disorder and those making controlled retrograde movements facing the enemy will move at normal speeds for their formation and type, away from the enemy, in an arc which is determined by measuring 45 degrees outward from the sides of the unit toward its rear, judged from the position it occupied when it made the morale check. Unnecessary maneuvers (wheels, etc.) are not permitted - the path must be as straight a line as possible given the terrain and surrounding troops, etc.
If a unit is disordered, and cannot make the full movement as specified, or if the move would take it off the table, then it is removed from play. Units which fall back undisordered will simply move as far as they are legally able.
Artillery units which fall back will limber in order to do so. Other units will retain their current formation, unless forced to flee through a gap which would require them to assume a formation with a narrower frontage ( a field column or march column, whichever represents the least change from the current formation in terms of unit frontage).
Units which rout will perform a fall back move, and any unit which they pass through will then need to make a morale check for "Unit Routed Through" (the routing unit itself is removed from play.
Some morale results will indicate that actions or reactions are allowed or not allowed, depending on the type of morale check being made.
Once disordered, a unit is allowed to re-order (using the "Reform from Disorder" morale check) as a complete action for the turn, or may choose to stand and do nothing, or may perform movement in order to avoid perceived danger. Formation changes are not permitted. Such movement may not be toward the enemy. Disordered units will remain disordered until they form up.
Each of the different types of morale checks are described here, specifying the situations which call for them to be performed.
Unit Taking Casualties from Fire/Melee: Whenever a unit takes casualties from fire, they must make this check. The exception is when they are fired on during a charge as a reaction by the target of the charge, or as pass-through fire. This check is also used when there is no clear winner in melee - both sides must then take this check.
Reform from Disorder: When a unit is disordered, it may use this check as an action to recover from disorder.
Unit Fired On (Return Fire): When a unit which has not yet acted during the turn is fired on by enemy infantry or cavalry, and the firing unit is a valid target of fire for that unit, the unit may choose to "hold fire," retaining its action for the turn, by using this check. If it fails this check, it will perform involuntary fire on its attacker. This check is also used for units which are performing reaction fire on charging units, and wish to hold fire to reduce the range on their attacker (see above).
Ordered to Charge: This check must be poassed for a unit to make a charge.
Receiving Charge: This check must be passed by a unit against which a charge has been declared, and for which the charging unit has passed its "Ordered to Charge" check.
Fired on during Charge: This check is used by charging units instead of the "Unit Taking Casualties from Fire/Melee" when they take losses from reaction or pass-through fire while charging.
Unit Lost Melee: If a unit loses a melee, it will take this check (instead of a "Unit Taking Casualties from Fire/Melee" check).
Unit Routed Through: If a unit is in the path of a routing unit, it must make this check to see if it is disordered or suffers other effects.
To determine LOS, a line must be drawn from any point on a base of the spotting unit to any point on a base of the unit being spotted. Ranges for fire in this game are calculated as the shortest clear LOS between the firing unit and its target (round down if they are on a break-point measurement). If the potential LOS crosses any terrain, it may be blocked. There are rules for determining what can and cannot be seen.
For this purpose, terrain is classed according to a series of levels: ground level, low obstructions (hedges, walls, wheatfields, etc.), taller obstructions (houses, woods), low hills, taller hills, even taller hills (etc.) - each level of hill is a "terrain level." Terrain in all of these different height categories may be found on the tabletop. The rule for LOS is that if you can see them, they can see you - it works in both directions. Low obstructions may provide soft or hard cover to troops immediately behind them, but do not block LOS. Taller obstructions such as houses and woods will block line of sight across the same terrain level, but may not block LOS from higher levels, according to a more complicated system: at one terrain level up, your LOS will not be blocked if tall obstructions are closer to you than they are to the target. For each terrain level you go up, half of the area blocked from the level below becomes visible.
Consider the following diagram:
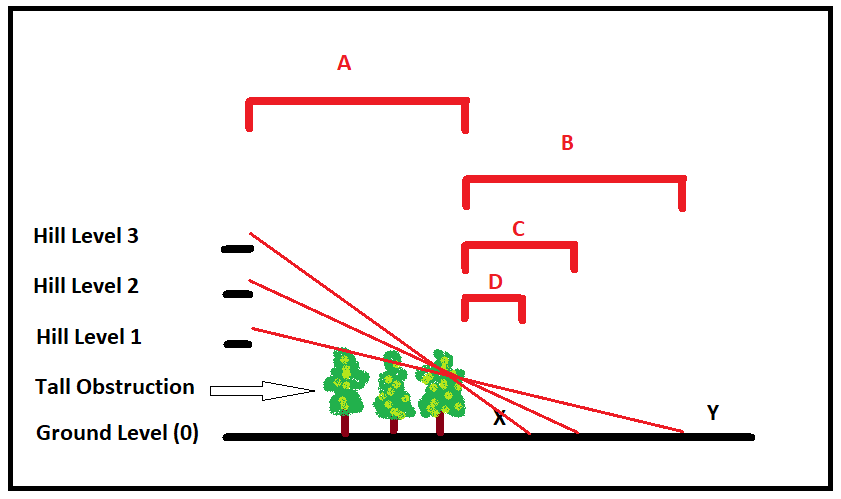
For aesthetic reasons, our figures and terrain pieces are not in agreement with the ground scale. Thus, what we see on the table is not how it really is. This system gives you a way of approximating reality. (Short of going and surveying critical vistas on the battlefield, or having a really good 3-D model, you won't get better than an approximation. There are wargamers who have visited and surveyed important battlefields, but from a practical perspective this is not an option for most of us.) In the diagram, we have hills on the table up to 3 terrain levels tall. We also have a tall obstruction (woods).
If you have more than one tall obstruction between you and the target you want to spot from above, and the obstructions are on the same terrain level below you, always check the one closest to the target. If that one isn't a problem, none of the others will be. Note that model hills for wargames are often stepped, to allow figures to stand on them at different levels. Often, these are meant to represent sloping hills rather than a series of stepped plateaus. The scenario should specify the nature of hills, so they are interpreted correctly during play.
Terrain levels for hills function in the same way as tall obstructions. Note that tall obstructions and hill levels are additive: a tall obstruction on top of a one-level hill is two terrain levels tall. (The figures are not allowed to climb trees, either!)
The same system is applied to firing over the heads of friendly units with artillery. Treat the friendly units as a tall obstruction: if the target would be visible (according to LOS rules) then you are allowed to fire on it.
This system for determining LOS is only an approximation, but it is important to any simulation at this scale: the table as modelled is simply not a realistic to-scale representation of geography, which is itself a major factor in any battle. It may seem complicated at first, but once you get used to it, it starts to become obvious. The high ground is important for a reason, and our games should reflect this reality.
Because this game primarily depicts the actions at the brigade level (that is, a player's command is a brigade), there is not a lot of emphasis placed on the chain of command. Generals do, however, exert a morale effect on their troops, and there are aspects of command control which cannot be ignored. Players may choose to represent higher-level commanders (divisional commanders) in any game which has more than a single brigade on a side. This is always optional, however.
Generals require an initiative to act on their own, unless they are currently attached to a unit. Attaching to a unit requires an action on the part of the general, in which he moves into contact with the unit to be attached to, and declares that he is attached. From this point forward, the general will function as part of that unit, sharing their initiative (and acting when they do) until a separate initiative is spent to detach him, prior to him taking an action while still attached to the unit during any given turn.
Generals may not be the targets of fire or charges, and cannot be meleed: if they are "run over" by enemy troops they will get a free escape move toward the closest friendly unit (they may attach if desired, but are not required to do so). If they are attached and enemy action causes casualties to the unit they are attached to, then they will be made casualty on a separate roll of two dice scoring equal to or lower than the number of casualties inflicted on the unit by that enemy action. If they become casualties, they are not replaced. This can have the effect of restricting some offensive actions (as described below) but primarily has a negative impact on brigade and army morale. When attached, generals will count as "with the unit" for the purposes of all morale checks, conferring a benefit to them.
There are only two standing orders in this game: Attack and Defend. If given Defend orders, a unit may not charge the enemy unless the enemy is equal or less in strength and currently disordered, or the charging unit and other friendly units within 12 inches outnumber enemy units within the same distance by a ratio of at least 2 to 1. Further, units with Defend orders will not advance toward the enemy beyond whatever position they have been assigned to defend, whether it is a terrain feature such as a trench line, a road, or whatever their orders state. Defend orders will generally be assigned at the start of the game by scenario (which may give the choice to players, or may assign the roles of attacker and defender to the two sides).
Any unit within 18 inches of its commanding general may have its orders changed (from Defend to Attack or vide versa) at any time. In games which place divisional generals on the table, the brigade commander issuing the orders must be within 18 inches of his divisional general, or the change in orders must be issued directly by the divisional general to a unit within 18 inches of him.
While these minor restrictions tend to have little impact on competitive play, they are in place largely to inform the actions of units run by the game master in solo/cooperative play mode. If desired, standing orders may simply be ignored altogether by agreement between competitive players, until invoked by brigade or army morale (see below).
Army morale exists to set default conditions at which a force will accept defeat and capitulate (typically by withdrawing). These rules may be modified by scenario to reflect the specific conditions of any historical or envisioned situation.
Army morale functions at two levels: at the level of each brigade, and at the level of the entire player force (divisional level). When half or more of the units in a brigade have been destroyed or otherwise removed from play, then the unit must immediately test brigade morale. For the purposes of this calculation, the general commanding the brigade is considered to be a unit.
Brigade morale is based on the quality rating of the majority of units in the force, and in case of equal number of units with different rating, the higher one is used. Testing brigade morale involves rolling two dice, and scoring equal to or more than the scores given below:
Crack Troops: 5
Veteran Troops: 6
Average Troops: 7
Green Troops: 8
Raw Troops: 9
If passed, the brigade continues to function as normal. If failed, all surviving units will have their orders automatically and permanently switched to Defend, based on the positions they currently occupy. For each unit subsequently removed from play in the brigade, another morale test must be immediately made, with a cumulative modifier of -2 to the score rolled on the dice.
Army morale functions in exactly the same way as brigade morale, but is based on the brigades in the command, as opposed to the units in the brigade. When half of the brigades in a command have failed their morale (been "broken") then the entire army will be broken, and will need to make a morale check. If failed, the army will abandon the field. If the check is passed, all units in the army are instead subjected to the same strictures as for a failed brigade-morale check: all units will be issued permanent Defend orders based on their current location. For each unit subsequently removed from play in any brigade, the army morale must also be checked, with a similar cumulative -2 modifier. Divisional generals count as brigades for the purposes of army morale, but do not themselves belong to any specific brigade. (It is best not to let your divisional generals get killed in hand-to-hand combat or shot out of the saddle!)
With forces of two brigades, if one is broken the battle is effectively over. With larger forces, this is less true. Although ACW armies were willing to sustain almost unbelievable levels of casualties by modern standards, they did not fight to the last man, and this system is in place to reflect that.
When the game app is started, the mode of play can be selected, as shown below:
Setting the play mode is as simple as selecting the one you want (in this case, the app would be set to Cooperative/Solo Play Mode). Aside from the game app specifying what enemy appears, and where and when (to be played subsequently by the game master), the main difference between these two modes is that in Cooperative/Solo Play Mode, the use of the INITIATIVE button is required, used for each action taken. This allows the game app to understand how quickly the game is progressing, and to indicate when enemy units have been encountered.
In setting a game up to play in Coop/Solo mode, the appropriate box is checked and the START/CONTINUE GAME button is clicked. The game app will ask if it is a new game or a continuing one. If it is a continuing game, then the same device used for any earlier sessions must also be used to continue play. (The games are not saved like files in a word processor or similar application, but the game app remembers what you were doing earlier - it is really to help with recovering a game if the app is mistakenly closed for any reason during play, for a lunch break, etc.)
If it is a new game, the app will ask how many units are in the player force. This is determined by counting the number of infantry/cavalry regiments and artillery sections are included in the player force(s). Generals are not counted as units for this purpose. If a less-challenging game is desired, subtract a unit or two before entering the number in the app. For a more challenging game, add 1 or 2 to the total. (As you gain experience with this type of play, you will learn how easy/hard the different settings are. In every case, the range of potential encounters ranges widely, however, so playing a few times using the standard setting is recommended.)
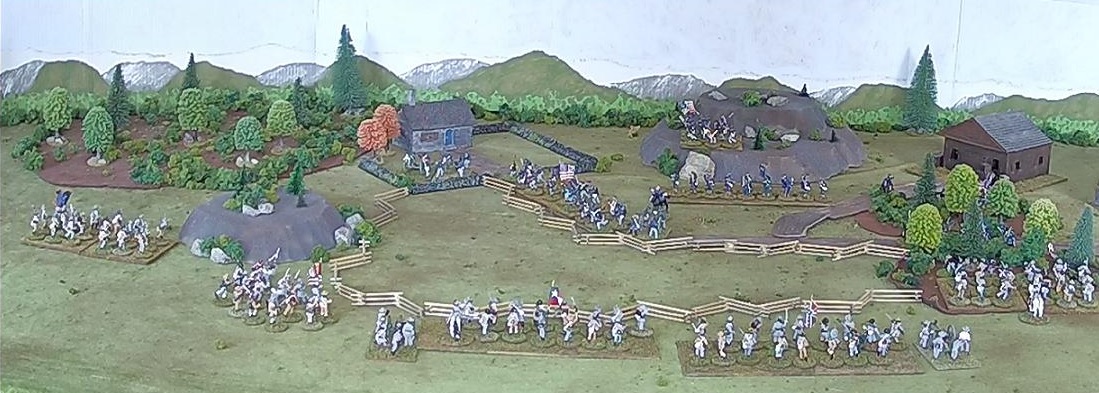
A view of the tabletop through a remote video camera during coop play. The Rebels didn't win this one, but it was close!
Before Play Starts: The first thing you must do is identify what the relative sizes of different units will be. The game refers to units not by number of figures, but by size: "small", "normal-size", and "large". This is done to accomodate different sizes of player units. We recommend that player units be either normal-size or large, but this is left up to the scenario designer. It is best if there are a few more enemy units available than player units, as the game app may decide to make things hard for the players!
A "small" infantry unit is typically either 12 figures (normal scale) or 9 figures (reduced scale). A "normal-size" infantry unit is either 18 figures (normal scale) or 12 figures (reduced scale). A "large" infantry unit is typically 24 figures (normal scale) or 18 figures (reduced scale). Cavalry units are the same size, or can be reduced from the numbers given (6/9/12 instead of 9/12/18 in reduced scale, 9/12/18 instead of 12/18/24 for normal scale). Artillery is always either a section (one base representing 2 guns) or a battery (2 bases for Confederates, 3 for the Union). Numbers of artillery bases may be adjusted by the game master during play, as this can have a large effect on game balance. Six-gun Confederate batteries were certainly not unknown, and 4-gun Union ones were sometimes seen. (If desired, batteries as large as 8 guns - 4 bases - were historically deployed by both sides, but were not common).
Once decided, the size of units will be used whenever the game app calls for the appearance of enemy troops. Note that the armament of different troop types should also be specified before play starts, including whether infantry carry Minie rifles (or something else), and what type of firearm cavalry are carrying (by default, single-shot breechloading carbines). These things changed as the war progressed (and even by theatre), so the game app does not dictate them. Artillery types can be dictated by the scenario designer, or can be rolled-for:
| Union: | 1-3, smoothbore 4-6, rifled |
| Confederate: | 1-2, smoothbore 3-4, mixed 5-6, rifled |
These factors are left up to the scenario designer because players will be limited to the figures in their collection, and may not wish to field units they do not actually have the figures for (or at least something close).
The type and quality of units is always specified by the game app.
Deploying Player Forces: Scenario designers should feel free to create whatever types of initial set-up will produce an enjoyable game. The Coop/Solo Play Mode does, however, make some assumptions about the overall situation, which are these:
Given these assumptions, it is typical to deploy player forces at one of the wide edges of the table, in the center of it, and have them advance across it (obviously, the front can be oriented however scenario designers wish). We generally set player forces up to 12 inches from their starting edge, and have them push forward across the remaining 5 feet of the table (we use a 6 x 8-foot table). The more battlefield the players have to take, the longer will be the time during which enemy reenforcements may appear. Reenforcements are generally not as serious as the main enemy force, which will - once encountered - typically represent the bulk of enemy forces, but they can sometimes be a significant factor during play.
It is possible that player forces, although ordered to advance, will run into an enemy advance in force, which will alter what they can expect to achieve. The game app will inform players when this is the case, and they will at that point be conducting an encounter battle, or even fighting for survival, depending on the strength of the enemy encountered. Scenario designers should be aware that this can happen, although it is far from the normal case. The game app will not give any information other than to let players know that the enemy forces are themselves attacking - changes to objectives and victory conditions are left up to the scenario designer, and may be adjusted on-the-fly.
The intent of the coop/solo mode is not to provide a video-game-like experience, but to set up a tactical situation for normal play - one which is not known in advance. Game masters and players should be flexible in how they evaluate their own performance. A strong Veteran player force encountering a weaker enemy should be able to triumph easily; a weaker player force which runs into an entrenched or counter-attacking enemy of superior strength cannot expect to fare as well!
Deploying Enemy Forces: As the game progresses, the INITIATIVE button will typically give an action to either the Confederate or Union side, allowing them to make an action with a single unit (if there are no units able to use it, they are ignored.) The player forces begin moving even if no enemy units have yet been encountered. Sometimes, however, clicking the INITIATIVE button will produce a message like these:
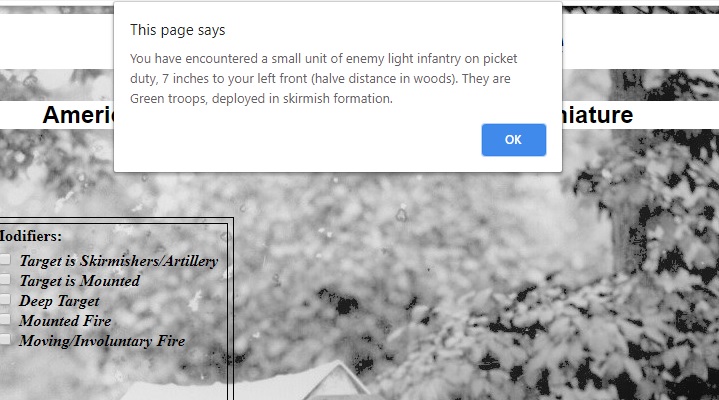
Enemy pickets have been encountered.
The main enemy force has been encountered (usually several actions later).
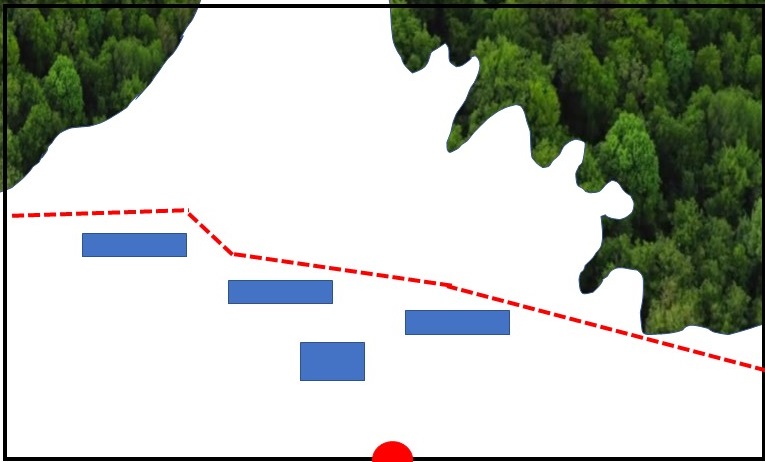
When enemy pickets are encountered, the distance from player forces, and the direction, will be indicated. Such units (always either light infantry or cavalry) are enemy patrols. The process for placing them is to trace a line across the front of the player forces, describing their notional front at the time the message appears. The direction is based on the right-left center point of the player position, along the friendly table edge. The diagram below shows where the enemy pickets mentioned above ("7 inches to your left front") would be placed:
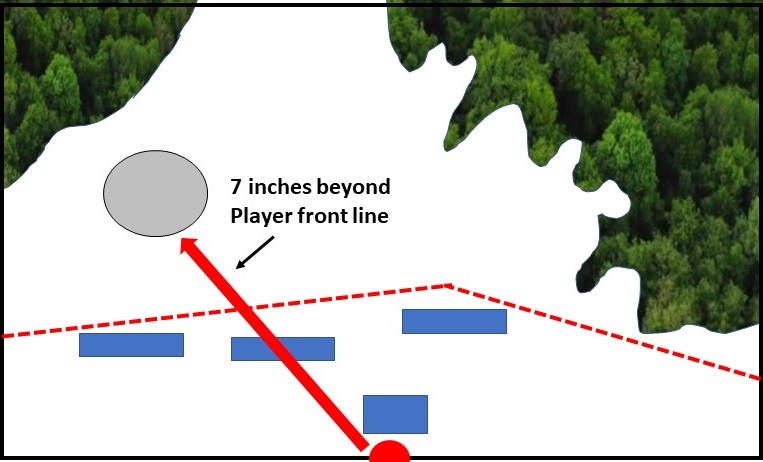
In this diagram, the dotted red line is the notional player "front line" - the blue boxes are player units, and the gray circle is where the enemy pickets would deploy, in skirmish (as per the message text). The direction is determined by finding the center point of the friendly table edge (the red half-circle) and tracing a line in the indicated direction (left-front). Once you have crossed the player front line, the specified distance tells you how far away the pickets are when you spot them. Each inch of woods (or similar obscuring terrain) counts double when this distance is measured, as enemy forces could get closer in concealing terrain before being spotted.
When the pickets deploy, they have not yet acted for the turn (this is true for all deployed enemy units, except as noted below). It is perfectly possible that the first time you become aware of them is when they open fire! Pickets will be assumed to have "Attack" orders - they can act aggressively if that makes sense. They will not commit suicide, but will pick off exposed batteries which are advancing limbered, or hit an inviting enemy flank, etc. Their orders give them permission to do so if it makes sense to the game master running them. Note that a general will never deploy with enemy pickets, but they are assumed to be in command radius of one for game purposes (they are self-commanding, being scouts).
Before describing the deployment of the enemy main force, it is worth noting that a record of all encounters during the game is stored inside the game app for reference by players (this is useful when you want to know the details of the enemy you have encountered). Any text which appears in a message, indicating an encounter with the enemy, will be stored in the ENCOUNTERS tab:
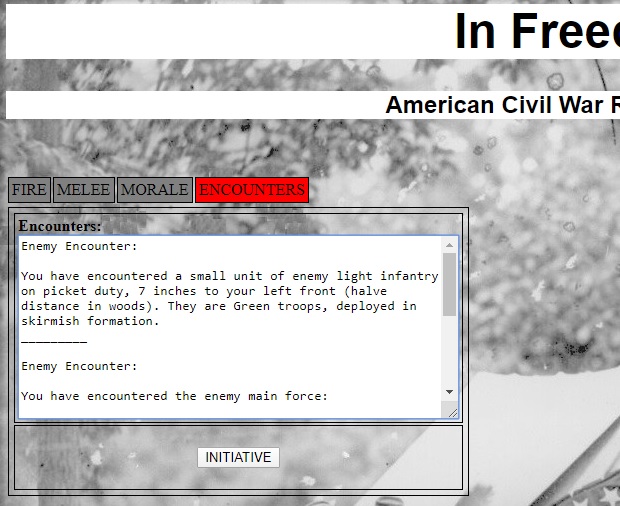
The most recent encounter will always be at the bottom of the box, so you may need to scroll down to read it.
It should be noted that an initial encounter may or may not be made with enemy pickets or patrols - sometimes you may walk directly into contact with the enemy main force, and if they are especially lax about things, you may surprise them when they do not expect an enemy at all!
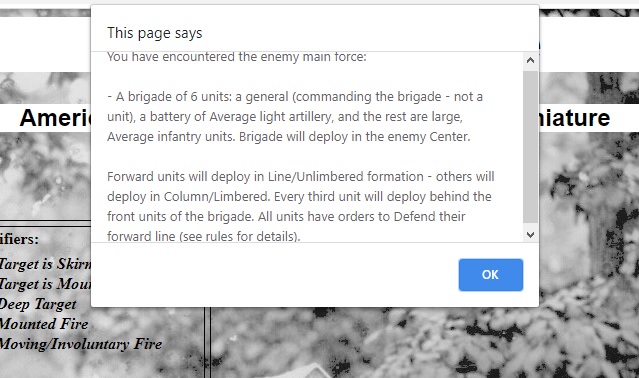
Once the enemy main force is encountered, it will appear all at once: this represents the reports of player scouts coming in, and depicts what players know of the enemy they face (it is assumed that this would be a tolerably complete picture - further enemy units will be referred to as "reenforcements").
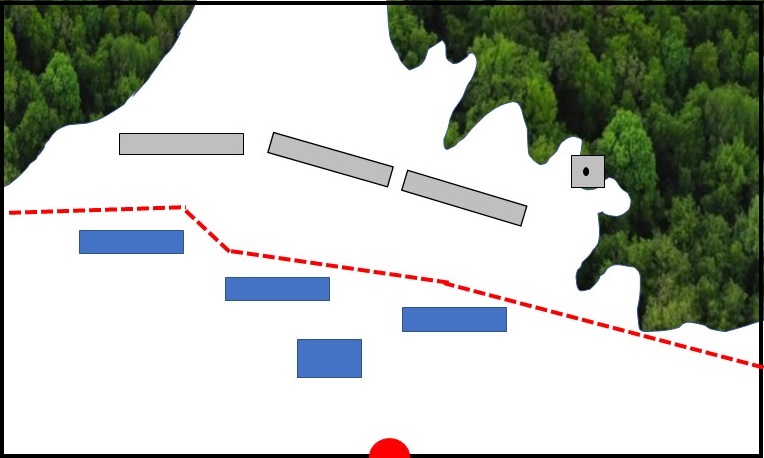
The enemy main force will be deployed in relationship to the player front line at the time it is encountered. The front line is again drawn as shown above for an encounter with pickets. Thus, assuming that our player has used the intervening actions to attack and disperse the enemy pickets, the player front line on the table would look something like this:
The enemy has only a single brigade (and a good thing, too - the player in this case only has 4 units, and the enemy has 6 plus the pickets which have been destroyed.) It consists of a general and 6 units, one of which is a battery of artillery (that is, not just a section, but at least 2 bases). The enemy brigade will deploy with the first two of every three units on their front line, a distance of 12 inches from the player front line, with their entire position centered as described by the message given by the game app (left, center, or right - determined by thirds of the enemy table edge). No enemy main force unit will deploy closer than 12 inches to the player, making the same adjustments for terrain that we used for pickets (woods and other concealing terrain count double).
In this case, we have a total of 6 units, which means four of them (the first 2 of every 3) will deploy in the front line. This is shown below:
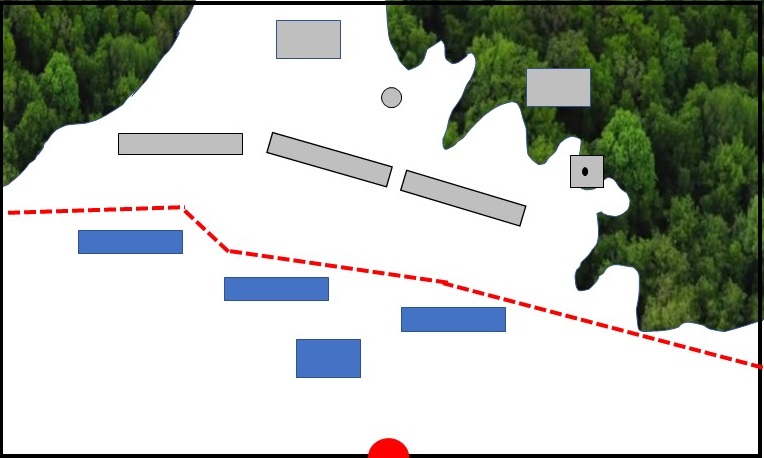
All of the enemy units will be in line (for infantry) or unlimbered (for the artillery) as per the instructions given by the game app. All are at least 12 inches from player forces (the gun has been positioned further back, a decision made by the game master, to benefit from the cover provided by the woods). Note that not all are in the center of the enemy side of the table, but that the overall position is centered on the enemy center (otherwise, there would be no room to deploy large forces).
Two enemy units remain to be deployed - they are described as being "behind" the enemy front line units, in maneuver column. "Behind" means at least 12 inches (again, adjusted for obscuring terrain) back from the front-line units. The general is positioned so that he can keep the troops in his brigade all within his command radius. The table, when the enemy main deployment is complete, will look like this:
There are no hills on the table in this example, but any distance which is out of LOS of player units behind a hill also counts as double for measuring enemy deployment distances (8 inches beyond a hill will become 4, leaving the enemy that much closer, etc.).
None of the enemy units will have acted when they are deployed, and they will all appear immediately when the game app says they have been encountered. The player units may already have made actions for the turn, but play resumes immediately, and does not suddenly cause a new turn to begin. The player may need to reclaim the initiative in the face of a fair amount of enemy activity!
There are situations where an enemy unit cannot deploy onto the table because of where player units are located - there may not be 24 inches between the nearest friendly unit and the table edge for the second rank of enemy units to appear in, or even the enemy front line may not have the needed 12 inches. In these cases, the unit - if only a second-line unit - will appear on the table edge, but will be considered to have spent its action for the turn moving forward to get there. If both front-line and second-line units are in this category, the front-line units will use their action to appear on the table edge, and the second-line units will not do so until the following turn, when their action is taken during the normal course of play.
In the example above, the enemy units have taken advantage of available cover (two of them are positioned in the woods) but none are entrenched. Taking advantage of existing cover is always allowed, even when such cover is hard cover like stone walls, buildings, etc. It is not unreasonable for enemy units to deploy a little further from player forces if it gives them benefit of cover, at least if they are on the defensive. If the enemy are entrenched, then this will be indicated by the game app. Trenches in such cases will cover only the front edge of the front-line units.
The enemy front line should be noted - this is the line they are ordered to hold. In this case, the game app has specified that they are under "Defend" orders. As per the section above, enemy units will act in accordance with these orders, and will not make charges or advances toward the enemy which are not sanctioned.
As the game progresses, enemy reenforcements may arrive. The message will look like this:
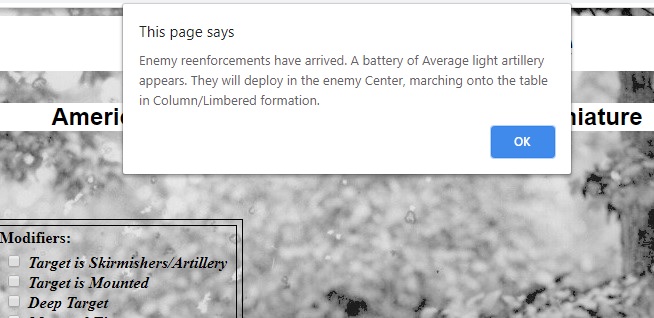
When this happens, the reenforcments as described will use an enemy action during the normal course of play to move onto the table in the area described (in this case, anywhere in the center third of the table). If there is only one enemy brigade, and it is less than 8 units strong, then the new unit will become part of that brigade. If there is more than one enemy brigade, and any one of them is less than 8 units strong, then it will join that brigade. If there is no enemy brigade with fewer than 8 units, then the reenforcements will be accompanied by a brigadier general, who will then assume command of all new arrivals until his brigade, too, has reached the maximum of 8 units.
While this may seem to be a mere detail, it makes enemy reenforcements sometimes prone to defeat in detail before they have arrived in any numbers - once an arriving brigade has been broken, the units which compose it may find that they cannot move onto the table at all! In this case, they will "stack up" off-table until a new brigade is sent to reenforce the enemy. (Note that this would only ever happen in very large games, or those where the game app really, really doesn't like the players!)
Running Enemy Forces: The game app will describe the orders and formation of enemy units when they appear, and for the enemy main force and any reenforcements, these orders will remain the same for the entire game. If given Attack orders, the enemy will play aggressively and attempt to break through the player positions and drive them from the field. With Defend orders - the more typical case - they will attempt to hold their original front line.
It is the case that there is a degree of interpretation required on the part of the game master in interpreting orders. In general, they should attempt to play as realistically as possible, assuming they are a general of average intelligence. The game master should try to do the obvious thing, as opposed to making brilliant and decisive maneuvers which they might attempt if they were instead a player(!). Game masters should remember that they are not in competition with players, but are trying to present them with an interesting and challenging game. This fact should influence how well the enemy troops are played in cases where different courses of action are possible. (Game masters can also simply roll for it.)
General Notes on Solo/Coop Play: There will sometimes be cases where the rules as written cannot be easily followed (or, indeed, followed at all). This occurs when the game app calls for a unit that does not exist in the collection available to players, or when situations arise which are simply not described. On occasion, the game will simply become uneven: players may be having too easy a time of it, or may be getting massacred.
In the first case, the game master should feel free to substitute available units for those indicated by the game app. When there simply are not enough figures, some units may be held "in reserve" until enough on-table figures have been killed to form a new unit.
It may be the case that the game master needs to moderate events indicated by the game app, by ignoring the arrival of reenforcements, or by altering the strength, type, or quality of those which appear. Sometimes, it may be desireable to add enemy units to a scenario simply because the players are getting bored by too little opposition.
We would caution game masters to develop a good feel for how the game app works before making such decisions, but there will be cases where they are called for. The game app has no actual knowledge of what occurs on the tabletop, and cannot account for it. The goal of the exercise is to have a situation present itself to players as the game progresses, and to make it a challenging one. The game master should always act in the interests of this goal, rather than taking the game app as the final arbiter of all things. It is a resource for helping conduct an enjoyable game, no more.
In many ways, In Freedom's Cause is similar to other popular miniatures wargaming systems - it does not attempt to revolutionize any aspect of tabletop play as regards rules mechanics. It uses techniques which for the most part are widely accepted and work well. By introducing the use of a device, it does reduce the need for the arithmetic associated with the modifiers found in other rules, and calculates them more precisely: because only the roll is made with dice, and the modifier calculations are made using a percentage system under the covers, the resulting probabilities are more realistic (or at least closer to what the game designers intended). The device is used to facilitate (and speed) a fairly normal style of miniatures wargame, not to introduce a radical new type of play.
Perhaps the biggest difference between this system and other games is the way in which actions are sequenced. Very often, troops in the Civil War would spontaneously respond to enemy fire by returning it, without waiting for the command to do so. This took them out of the immediate control of their tactical officers, who generally discouraged such behavior. By allowing (and often requiring) return fire, In Freedom's Cause reproduces this phenomenon, and indeed the way in which initiative is designed to work relies on this to some extent: by tying the enemy up in indecisive fire-fights, they can be robbed in a realistic way of the initiative.
The Cooperative/Solo Play mode was developed in response to the advent of the COVID-19 pandemic: a rules system which we had been using purely for competitive play seemed well-suited to solo and remote play, and so this feature was added. The "AI" behind enemy deployments is a simple one: you are likely to encounter enemy pickets before anything else, and if you do the enemy becomes aware of your presence, and cannot be surprised. Occasionally, you will directly encounter the main enemy force (the generals of the period were very sloppy about posting sentinels by our standards) and if you are very unlucky, you will encounter an attacking enemy force of relatively large size, and be pushed back on the defence. There is also a small chance that the enemy will be unaware of your presence, and will be in laager when you encounter them, giving you the advantage of surprise. Once the main enemy force has been encountered, the battle is basically set, with only minor enemy forces dribbling in to reenforce the enemy during play, keeping players on their toes. The location of enemy forces is unknown at the start of play, which also serves to make players think in ways that most traditional miniatures systems do not.
In playing remote games over online conferencing systems, we quickly learned that having an app which could be screen-shared with players (alongside the camera view of the table) was very convenient. The main advantage, however, stems from the simplicity of the set-up required for a coop game: the players are on the same side, and can share a single camera-angle view of the tabletop. While one can get very sophisticated with such things, we have found that simplicity is much to be desired - if a single camera-angle suffices, it is often better than having to use several different ones during the course of a game. (Moving cameras takes time and can be disorienting to remote players, as can forcing them to deal with multiple simultaneous camera angles on a single screen.) In addition, it avoids giving an unfair advantage to the player who happens to be in the same place as the physical tabletop - the players all see the same thing, and suffer the same disadvantages.
It is difficult to write an AI for a miniatures game, because - at least in a system like this one - the app itself has virtually no idea of what is happening on the tabletop. The intent of this design is to introduce an element of unpredictability into solo/coop games, rather than to turn a game which should be focused on the tabletop and miniatures into one instead focused on a computer screen. This is not a video game, and should not be expected to do what a video game (or "virtual tabletop" game) does. After many years of designing computer-assisted games, and speaking with other developers of such systems, we have learned that the software component should be as minimal as possible: the game should focus on the tabletop and the figures and terrain, and the software should be merely an adjunct. In Freedom's Cause is developed in line with this philosophy, and players should set their expectations accordingly.
As with our other games, we have designed a system which does what we, as wargamers, wanted it to do. Tastes will, of course, vary, but we do feel that In Freedom's Cause strikes a good balance between being a fast-playing game, and one which has a reasonable level of realism. We hope you enjoy the game as much as we do!
If you find bugs, or have other questions or comments, please contact us.
There are many good articles and "how-to" videos out there for making terrain, a lot of which is suitable for use in the ACW. In many cases, however, it becomes something of a production. This brief appendix gives some simple tips we have used in making inexpensive terrain from easy-to-find materials which is useful for ACW games.
It should be noted that, while many miniatures wargamers seem to view the ACW as a war primarily of open field battles, the historical record seems to suggest the opposite, and most rules sets and scenario books recognize this. Fortifications of various types were quite common, and served as a focus for much of the fighting. A lot of this section addresses how to build such things cheaply, as the models can be expensive, and sometimes many are needed.
Split-Rail Fences: Nothing is as quintessentially American as a split-rail fence, and these were very common during the mid-19th century in America, especially in areas where there were a lot of trees, and the landscape was rocky or rough. They were used as a form of cover by soldiers, and an ACW battlefield looks naked without them. They are known by various names: "snake fences," "zig-zag fences," and "worm fences" are all common terms. They are extremely easy to make from materials which can be purchased at grocery stores and similar places, using tools you already own.
For 25mm terrain, use the bamboo skewers which are sold at the grocery store in bags. For 15mm or 10mm, use round toothpicks. Cut these into 3-inch (25mm) or 1.5-inch (15mm) lengths with a pair of sharp scissors. Then cut some filler pieces with a length about three times the width of the skewer/toothpick. Using superglue, lay out a log and then glue another to it at an angle, to make the bottom of the fence. The second section goes on top, and slants down toward the tabletop. Take a third section and do the same thing. (You can make these of any number of sections, but 3 sections long seems to be the most versatile). Glue a filler section at 90 degrees to the end logs, near to the end. Take 3 more long sections and glue these directly on above the three long sections already in place. Repeat this until the fence section is three logs tall. The resulting fence will look like this:
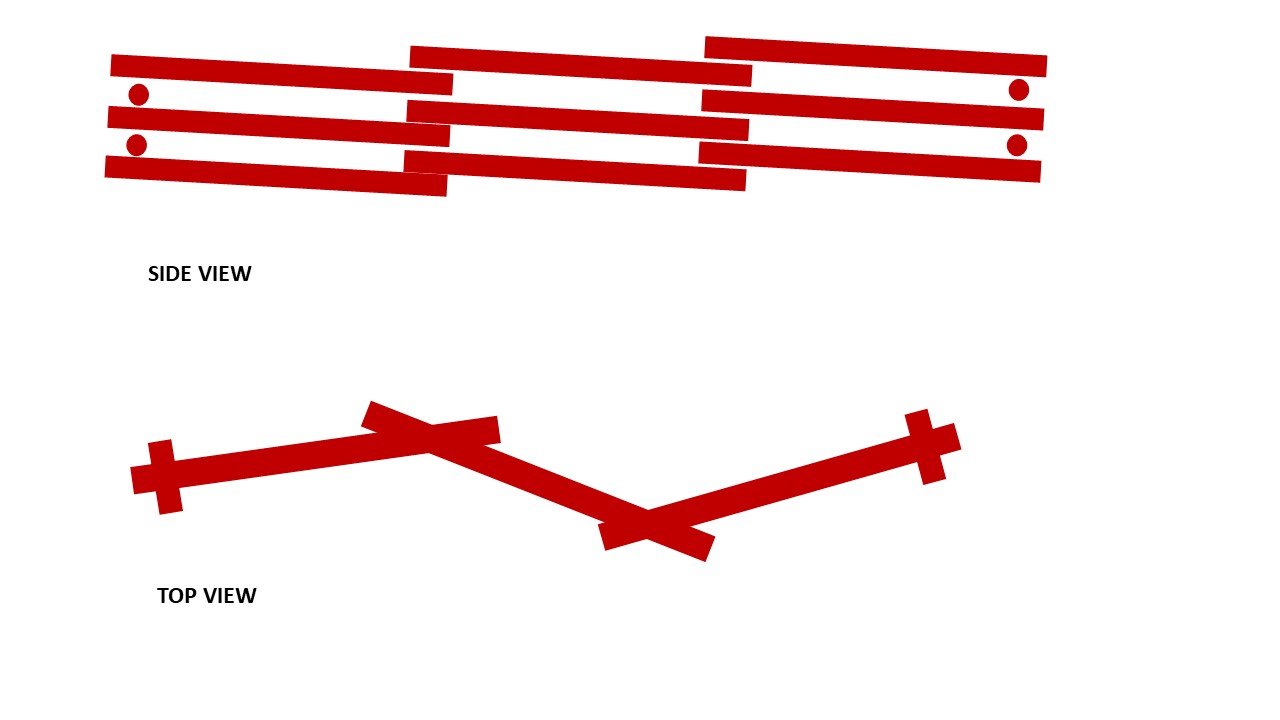
Make a thin watery mixture of brown and black paint, and wash the entire fence with it. The paint will soak into the wood, darkening it and bringing out the grain. There is no need to put this on a base or spray it with sealer, and it will work equally well right-side-up or upside-down. This is important, since it means you don't have to worry too much about having all of your fence sections zigging and zagging in the same direction. It won't necessarily lay completely flat, but will be close enough so that it doesn't matter. Make 4 to 6 feet of such fencing, and you are probably set for a long, long time. And these things are so easy and quick to make that if you jumble them up in a box and they get destroyed, you can just make some more!
Rifle Pits/Trenches: Infantrymen and artillerymen in the ACW quickly learned that you needed to dig in whenever you had to hold a position of any kind. Trenches could become very elaborate works, as happened at some of the places where troops were stationed for any length of time, but in most cases what the troops termed "rifle pits" were shallow trenches which took advantage of whatever materials were ready to hand. Very often, this included rails from split-rail fences, as such fences didn't use any type of nails and were very easy to pull down. Rocks, trees, and anything else which came to hand would be put into service. The different materials would be piled up on top of whatever dirt was dug up while creating the trench. Such positions - despite the name - tended to be linear, rather than a series of "fox-hole"-type pits, although pickets and those on skirmish duty would create smaller posts as well (see pictures below).
The needed materials for making such works include some pebbles (for boulders), some twigs (for tree trunks), some coffee stirrers (the flat, thin wooden kind, for half-buried rails), and some pieces of foam, of the soft kind used for mattresses and seat cushions. Most of these materials are readily available for free, although you may want to order coffee stirrers from amazon or buy them at the hobby store (the good folks at Starbuck's might get pissed if they catch you stealing them). For 15mm, match sticks could be used in place of coffee stirrers. The needed foam can be purchased at hobby stores and fabric stores, and it comes in various thicknesses (for 25mm terrain, I buy 1.5" or 2" thick foam - for 15mm, half- or three-quarter inch).
Using a pair of scissors, cut some quarter-round strips of foam, so that there is a sloping irregular front, a flat bottom, and a flat back. The foam is easy to sculpt with scissors, and is meant to look like piled-up earth. Arrange some pebbles and twigs along with the strips of foam, so that it looks like an earthwork has been rapidly assembled. Boulders would be embedded in the earth between the sections of foam, and logs typically piled on top. The whole trench should be about three-quarters the height of the figures, so that they really look like they are down behind it on the tabletop. Using white glue or superglue, attach these to bases.
Cut some of the coffee stirrers into various-length "planks" and super-glue these to the back of the trenches, wherever they are not already covered by logs or boulders. Let the whole thing dry.
You will need to put a heavy coat of cheap black acrylic paint over the whole thing - foam soaks up the paint like a sponge, but you need to fill in all the tiny cells so it doesn't show through. Let it dry overnight - the foam dries slowly, too. Using various colors of tan, black, grey, and brown, dry-brush the various components so they look realistic. I prefer to do the boulders with a couple of shades of grey to set them off from the dirt (I use brown with some black in it) and the planks (tan/brown). Trees can be grey or various shades of brown. The base - if it is showing - gets painted dirt-colours on the back and flocked green to the front (these would be trenches dug directly into the field or wherever, so flocking should match your normal ground-cloth.) Spray with matte finish to keep the paint from flaking.
It may take a little experimentation before these look presentable, but they are much cheaper than anything you can buy commercially - a single cushion's-worth of foam goes a long way (and has other uses - see below). More permanent types of trenches can also be constructed in a similar fashion - see the images at the end of this section to see what these looked like.
Abbatis and Cheveaux-de-Frise: Both abbatis and cheveaux-de-frise were used during the ACW. Both are easy to make. Abbatis are essentially trees with the branches still on them, laid out with their tops toward the enemy's expected route of advance so that the branches are an obstacle. These were often supplemented with sharpened trunks pointing outward (see the pictures below). In entrenched positions - even ones which had not been occupied for very long - abbatis were commonly built in front to keep attackers in the zone of fire longer.
As you may imagine, such a structure can be made out of dried sticks and twigs, with the "branches" still on them. This may involve finding a bunch of suitable twigs and then cutting them and letting them dry (shrubs such as lilac bushes are one place to look). For 25mm figures, an abbatis would be 2-3" deep, and for 15mm half that. Sharpened logs can easily be created with a pocket knife or pencil sharpener once the sticks to be sharpened are dry. Generally speaking, abbatis would be built in combination with mounds of earth or ditches, so using a bit of the foam described above for rifle pits, carved to look like an embankment, and them embedding stakes and tree trunks in it, is an option. Abbatis constructed this way should be built on small bases which are flocked or painted the color of dirt. Bark should be left in place, and the whole sprayed with clear-coat so it doesn't flake off. Foam embankment would need to be primed black and then painted, of course.
Cheveaux-de-frise seem to only have been used in places where more serious, permanent entrenchments were constructed. These can be fabricated using toothpicks cut to the right size (about an inch for 25mm, or half that for 15mm) and then glued together. The easiest thing to do is to take a very thin dowel and use it as a horizontal spine, with the teeth of the cheveaux-de-frise superglued along it at alternating 90-degree angles. If the pointy ends of the toothpicks are left on top, this produces the desired effect. The spine should be on the under-side of the teeth, as shown in the diagram below. (In truth, the teeth were sunk into the central spine, but doing this with toothpicks would take forever!) Once complete, the toothpicks can be washed with a thin watery mix of brown and black paint. Unless based - an optional measure - no spray coat is needed.
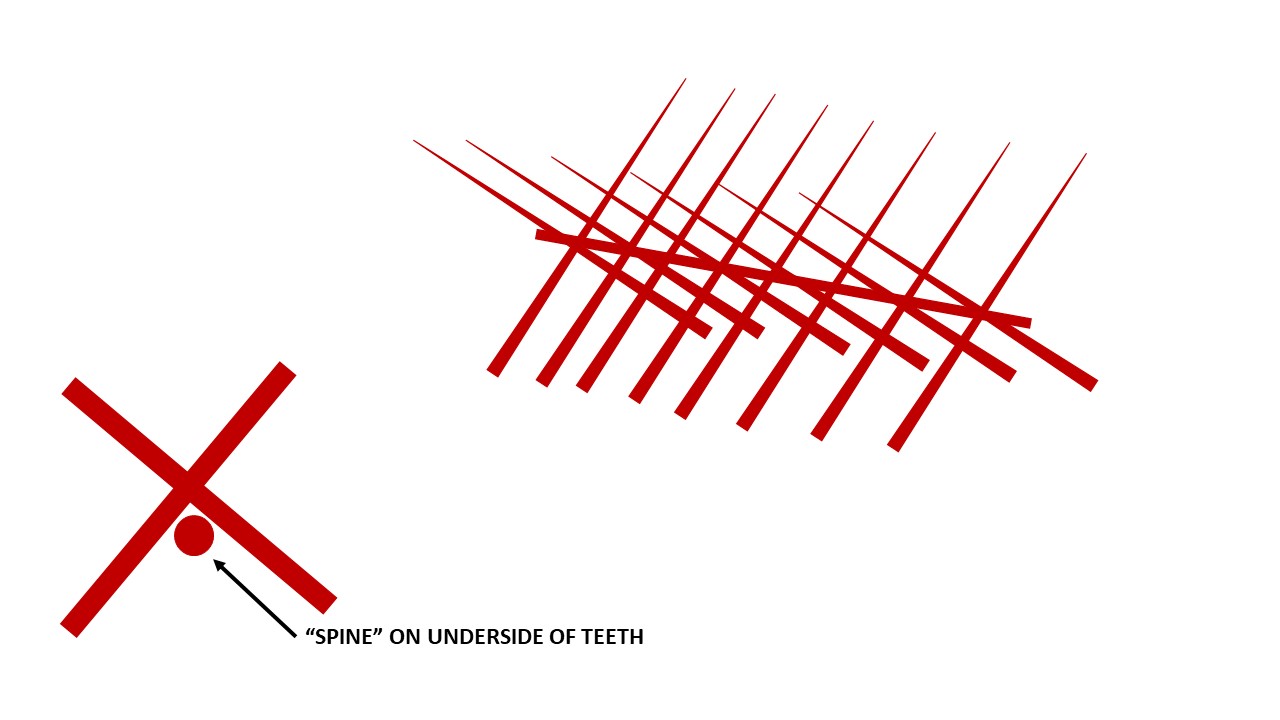
Period Pictures of Fortifications: Below are some period images of fortifications as they were photographed or rendered, relevant to the discussion of rifle pits, trenches, and related construction.
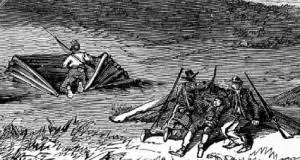 Small rifle-pits made of fence rails for soldiers on picket duty. |
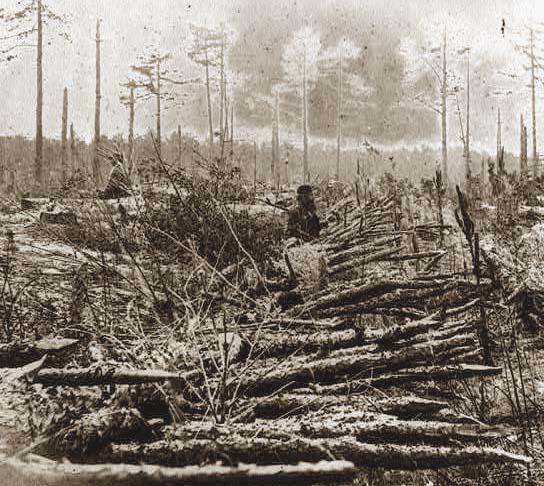 An abbatis of sharpened stakes embedded in the embankment of a ditch. |
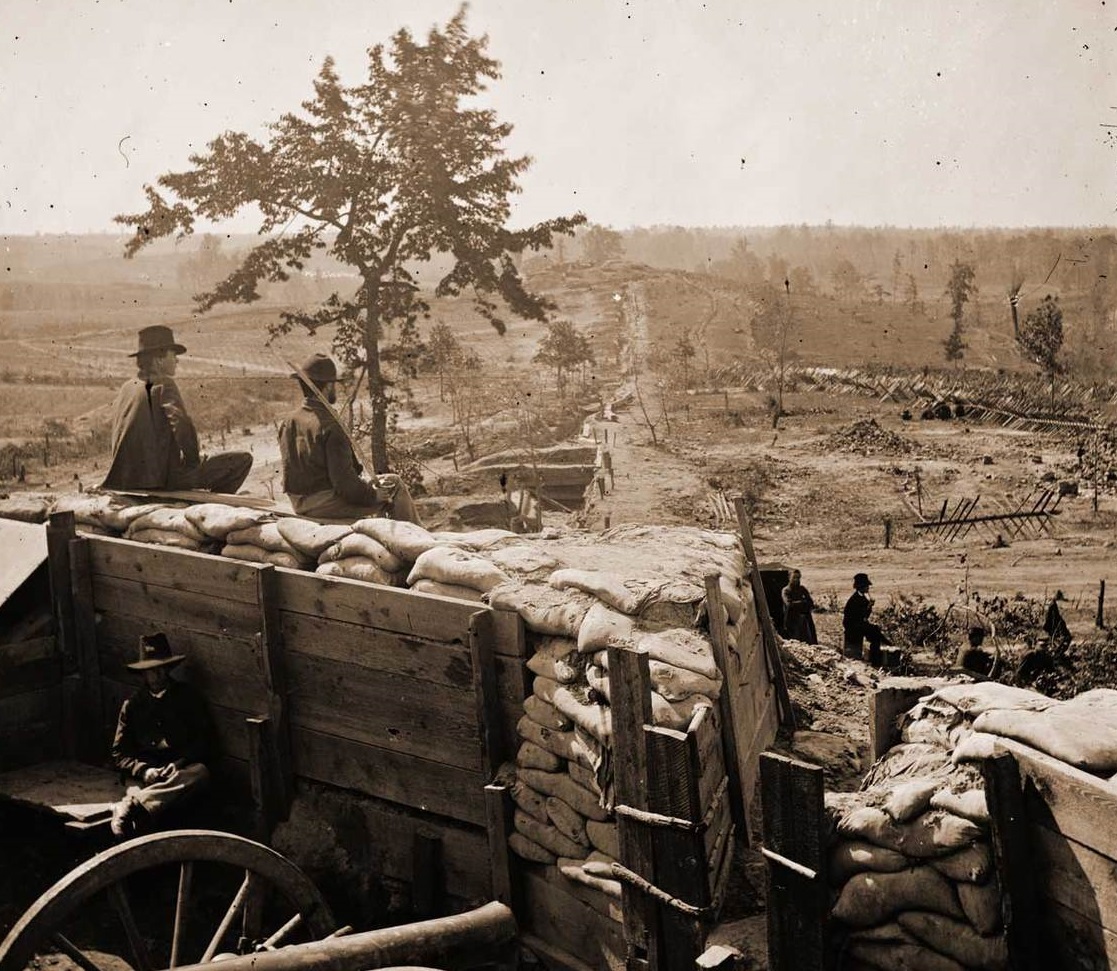 A heavily fortified position, showing planks shoring up a trench of earth and sand-bags. Note the cheveaux-de-frise in front of the position. |
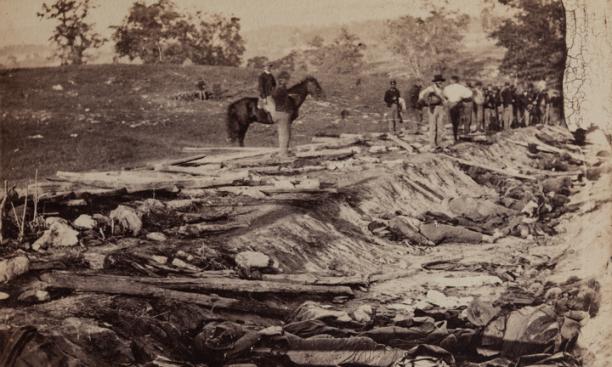 A rifle-pit, seen after the action has ended. Note the piles of rocks and rails to the front. |
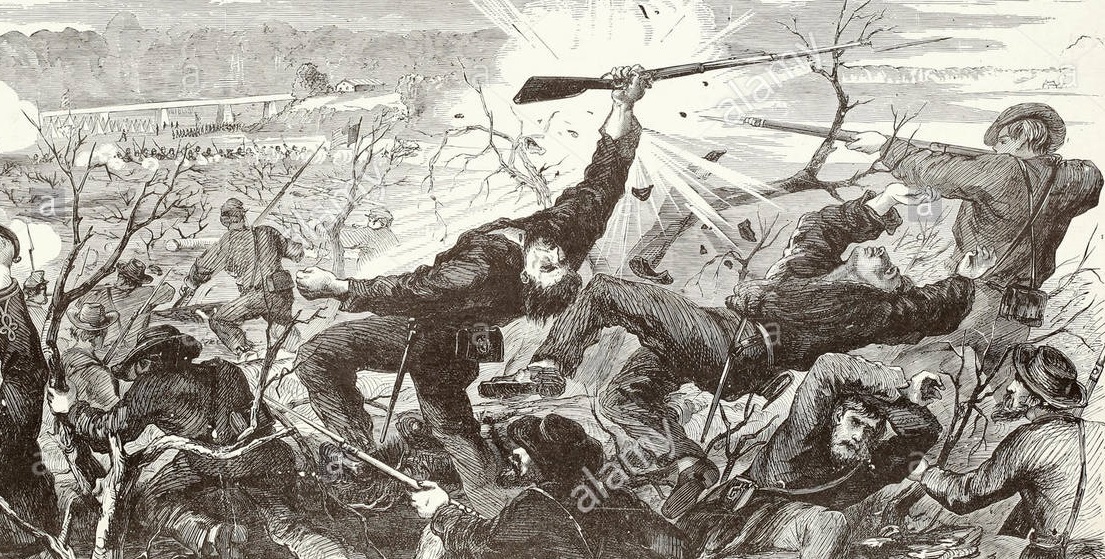 Soldiers fighting their way through an abbatis made of felled trees. |
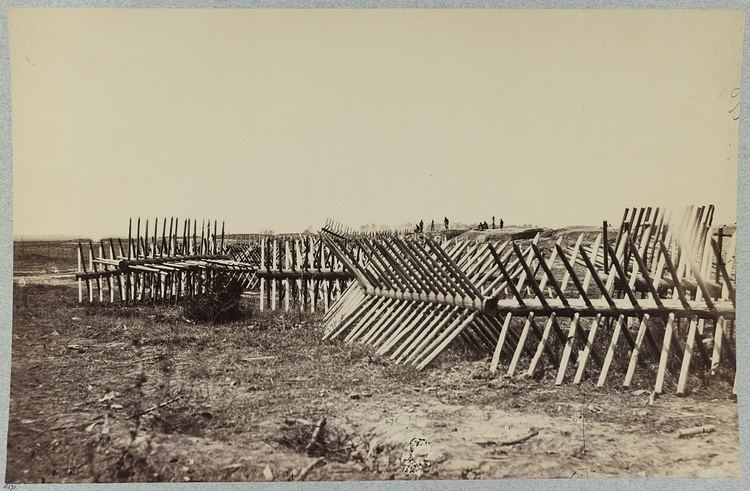 Cheveaux-de-frise. |
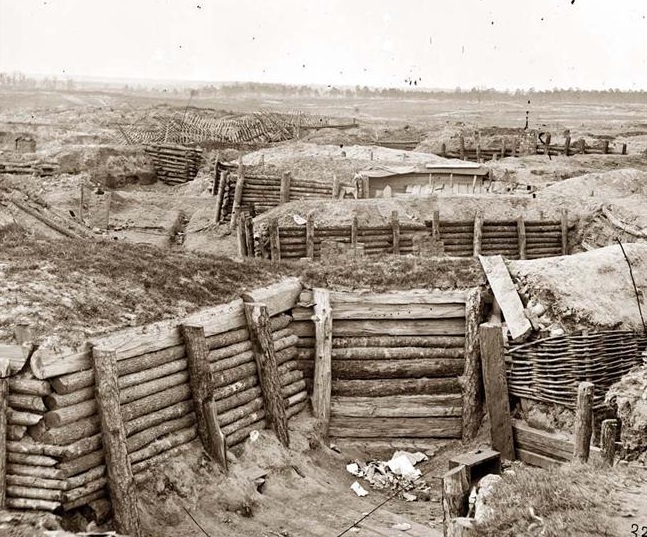 Well-established trenches, showing logs used to shore up the walls. |
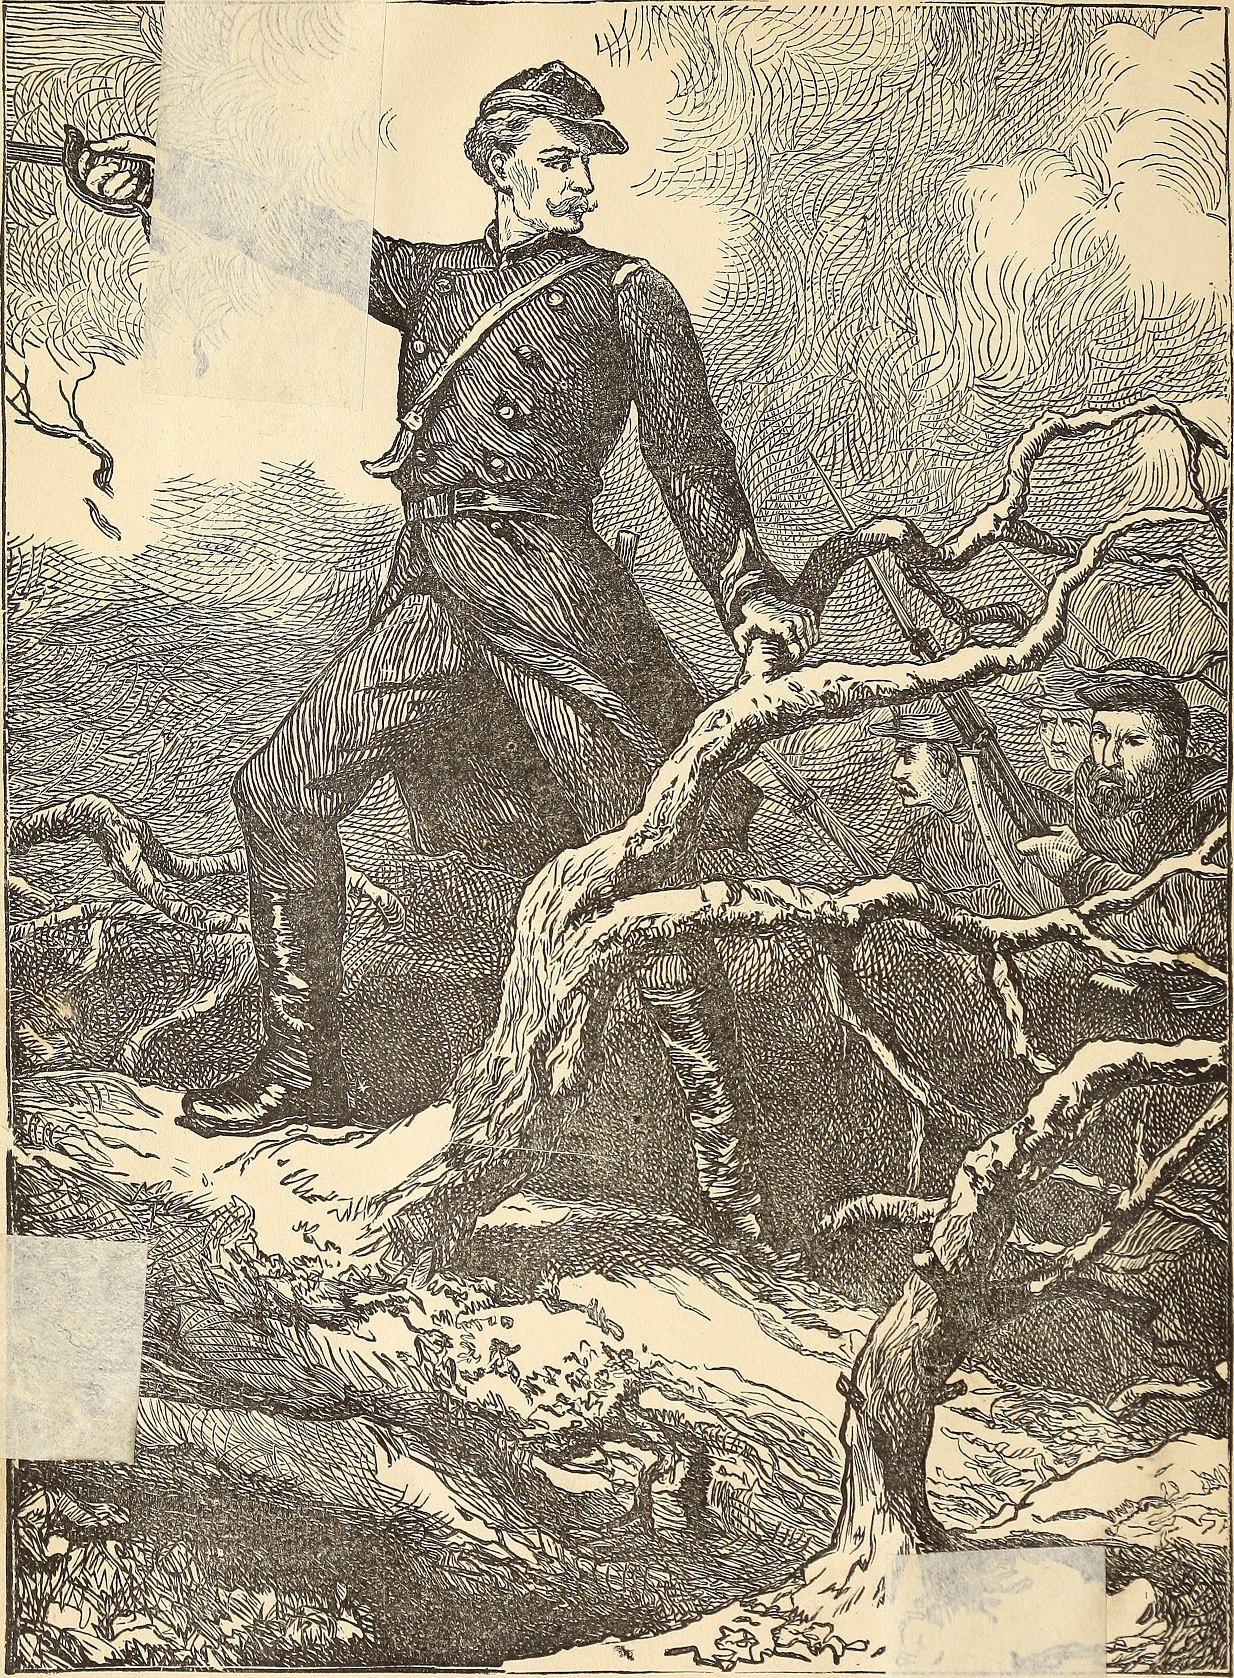 A (somewhat romanticised) image of assaulting through an abbatis. |
 An abbatis of trees and sharpened logs. Note the emplacements in the background. |
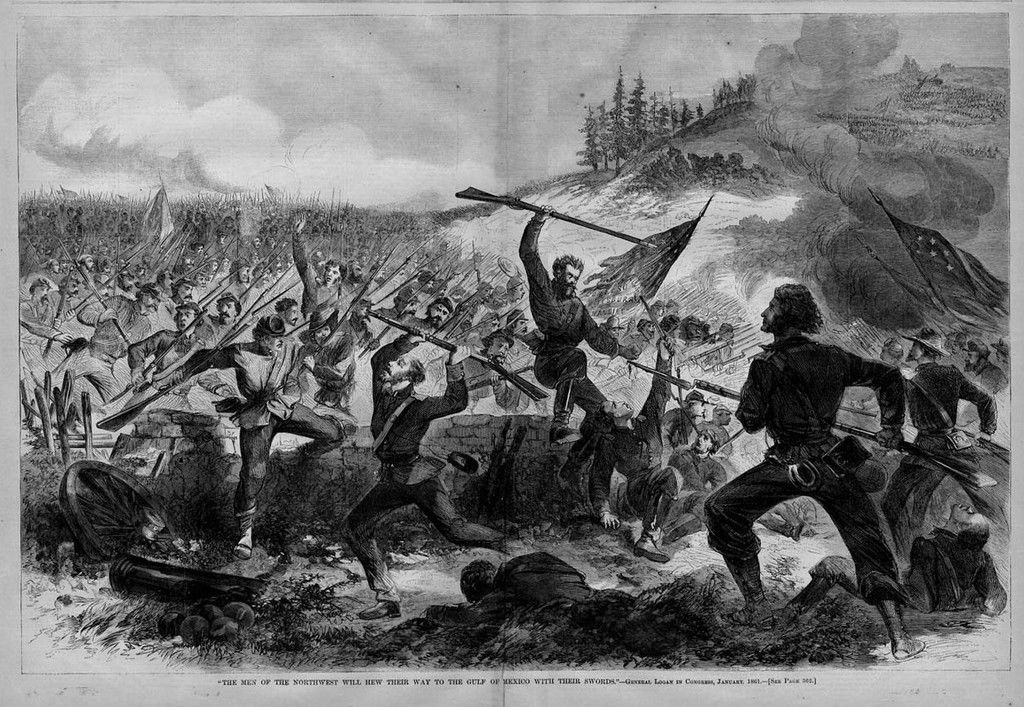 The ad-hoc nature of battlefield positions can be seen here: a brick wall reenforced with rails (left-hand side) is taken by attackers. |
Hills: Hills are needed for almost any miniatures wargame, but they present a challenge: realistically-sculpted hills tend to not work very well with based miniatures - flat bases want flat surfaces to sit on, and most hills aren't very flat! The solution which seems to be most common is to use flat-topped hills, even when representing sloping ones with a distinct crest, and then to indicate in the game scenario where the crest lines are (these are sometimes indicated on the tabletop with a bit of brown yarn, etc., when relevant to game play).
Such hills can be made to look realistic, even if they do not accurately depict the hills they represent. We have come up with an easy-to-make and durable wargames hill, using the cushion foam described above for making rifle pits. The foam is easy to work with, as it can be sculpted using a sharp pair of scissors. Cut out the shape of the hill desired, and then create irregular, angled sides by snipping at it with the scissors vertically (that is, point the scissors from the bottom of the foam sheet to the top, and take bites out of the edges). A few minutes work produces something which looks like the edge of a plateau, angled at about 45 degrees back from the ground, all around the perimeter of the hill.
Once shaped, the entire hill is given one or more coats of cheap spraypaint (black or grey both work well). After this has dried, spray a combination of tan, brown, green, and shades of grey on the hill, to produce patches of different colors. The top should get more brown and green, the sides more grey. While the paint is still wet, flocking can be applied to the top of the hill. When it has dried, shake off any excess flocking and give the hill a coat of matte finish to lock everything in place.
The resulting hill is flat and flexible, and travels well even when tossed into a box. They are very durable, since they don't break or crack. Made in various sizes, they can be stacked on the tabletop to represent hill contours. Although not as beautiful as more finely-crafted models, when adorned with some small rocks and some foliage clusters, they generally pass muster. What they are is easy, quick, and relatively cheap (a foam cushion of 2" in thickness, 2 foot by 6 foot, can be had for $20 or $30 US. This is big enough to make several hills, with scraps left over for making rifle pits, etc. You can buy the cheaper "medium density" stuff, since you aren't planning to sit on it!).
Rivers and Roads: There are many techniques for modelling gorgeous-looking game mats from craft fur (etc.) and getting roads and rivers to fit completely into the landscape. The downside of this is that they cannot be re-configured to represent different historical battlefields. The ACW requires lots of roads and rivers/creeks/brooks/runs/streams. What we give here is a technique for producing road and river segments which can be re-configured to represent different historical battlefields. They may not be as gorgeous, but they do good service, and they are cheap.
Using felt or other heavy, limp fabric, cut out the segments of river or road you wish to have. Color is not important, as you will be painting them. Make sure that the ends are all of the desired width, so they will match up on the tabletop. (We experimented using thin hobby foam, but even though it was easier to work with, it had a tendency to curl up at the edges when finished. You want your roads and rivers to lay flat.)
Get a tube of flexible acrylic caulk in white or tan, and a paint scraper with a wide blade (or even a thin piece of wood). Spread the fabric shapes out on a work surface (a large cardboard box works, since you can just toss it afterward) and lay a heavy "snake" of caulk on one. Using the scraper (and any other tools which good) sculpt the surface of the road or river desired. Add more caulk as needed. If texturing is desired, sand or very small gravel can be added. You can choose to sculpt sides onto the road or river (for rivers this is a definite plus, for roads it seems to make less difference). Use a lot of caulk, and cover the fabric completely.
When dry, the river and road segments will still be flexible, but will no longer be limp. These can now be painted as desired - a solid coat followed by dry-brushing and a wash produces good results. The end product should be covered with at least two coats of spray finish, as the flexibility of the pieces will otherwise crack the paint.
This is a somewhat messy process, but when you consider the money saved, it is a burden worth shouldering.
Trees: Wargames trees are a constant source of trouble. The ones you buy which are sold for HO railroad layouts are sometimes so poorly made that all of the leaves come off. They break off of stands easily. Wargamers - even with the best of intentions - are constantly knocking them over. Bases with multiple trees are often destroyed in transit. For the ACW you will need a lot of them, and they get expensive.
What we have found over the years is that it is possible to make durable and reasonably cheap trees, and that it is best to accept that they will be abused, and to take this fact into account. We base all of our trees individually, on the assumption that they will be knocked over on a regular basis. We do not mount them on neat little terrained bases with several trees, because even though these look good, they are inevitably destroyed by gamers or travel.
Below I describe what we do, so that, even if you decide to do something else, you can at least learn from our mistakes. (There have been many of them over the years!)
Get some round wooden bases of 1 to 2 inches in diameter (depending on the size of the tree) and 0.125 to 0.15 inches in thickness. You will need a good supply of twigs (you can buy plastic ones, but why bother? Twigs look exactly like small trees, because that is essentially what they are!). Find some small rocks (a quarter to a half inch). You will need a drill with a set of small bits, the thickness of the trunks of your trees. Get some clump foliage clusters in appropriate colors.
Cut the twigs so that they resemble trunks with level bottoms - the tops can branch a little if you like, and they will generally hold foliage better if they do. The branches should not be too thin, as these will snap off. Drill a hole into the center of a wooden disc so that the trunk fits snugly in and sticks straight up out of it. Superglue it in place. (You will want to fíle the bottom flat once this is done). Although tempting, it is always a mistake to try to use glue alone to attach a narrow trunk to a flat base - glue simply will not stand the sheer forces which are inevitably applied during gaming. Make sure that the trunk is well-seated into the hole in the base, as deep and as snug as possible.
Using a combination of white glue and superglue, attach foliage clumps to the tops of the trees to look like bunches of leaves. (White glue goes on the foliage cluster, superglue goes on the trunk. The superglue sets instantly once it touches the white glue.) Once the trunk and foliage are attached, take 2 or 3 small stones and glue them around the foot of the tree so that the base is heavy - this will stop them from falling over as easily, and keep them upright during play. Once dry, flock the base and spray the entire thing with a coat of matte varnish, which will help keep the foliage cluster together and attached to the trunk.
It sometimes pays to look out the window at actual trees - they are not the nice green fluffy globes which HO scale scenics manufacturers are so fond of - they are uneven. This is the effect that you are after - ACW battles took place in areas named things like "the Wilderness" - these are not groomed shrubberies, they are wild, ungroomed, untended trees! Note also that we do not use washers as a means of weighting down the bases of trees. There are a couple of reasons for this: (1) washers cost money, and small stones are free; (2) washers of sufficient weight make the trees bases stand above the table surface, producing a gap between the base and the ground cloth. This looks bad, and if you fill it and cover it with flocking, the bases become too deep. (It could be made to work, but why bother?)
Evergreen trees are a bit more problematic. We buy model railroad ones for these - you can sometimes find them in quantity online, and the plastic party trees just don't hold paint. These commercial evergreens may need to be glued to the wooden bases instead of the more durable drilling technique described above. Other than that, we take model railroad trees and treat them exactly like the deciduous ones we make from sticks and foliage clusters. A finishing coat of matte varnish helps to keep them together, but they are still not incredibly durable.
In the end, having a table full of good-looking wargames trees is a lifestyle, not a one-time project!