"The pursuit, which they declared to me, as I rode among them, was the 'finest frolic' they had ever been engaged in..."
- Brigadier-General Gordon, writing of his Georgia troops after the attack
This is a scenario written for the regimental-level rules In Freedom's Cause but could be played with any similar rules set for the American Civil War. It depicts the action at 7 PM on May 6, 1864 during the Battle of the Wilderness. Gordon, having scouted the Union position in the morning hours, has argued with his commander Early and Ewell that he can outflank the Union line, and anticipates a major success. Ewell, unconvinced, holds off on the attack until after meeting with Lee, sending the attack in at sundown. The Union troops, green soldiers who have spent the war manning the defenses in Washington, suddenly find their dinner rudely interrupted by a Confederate brigade charging into their flank from no more than 100 yards away!
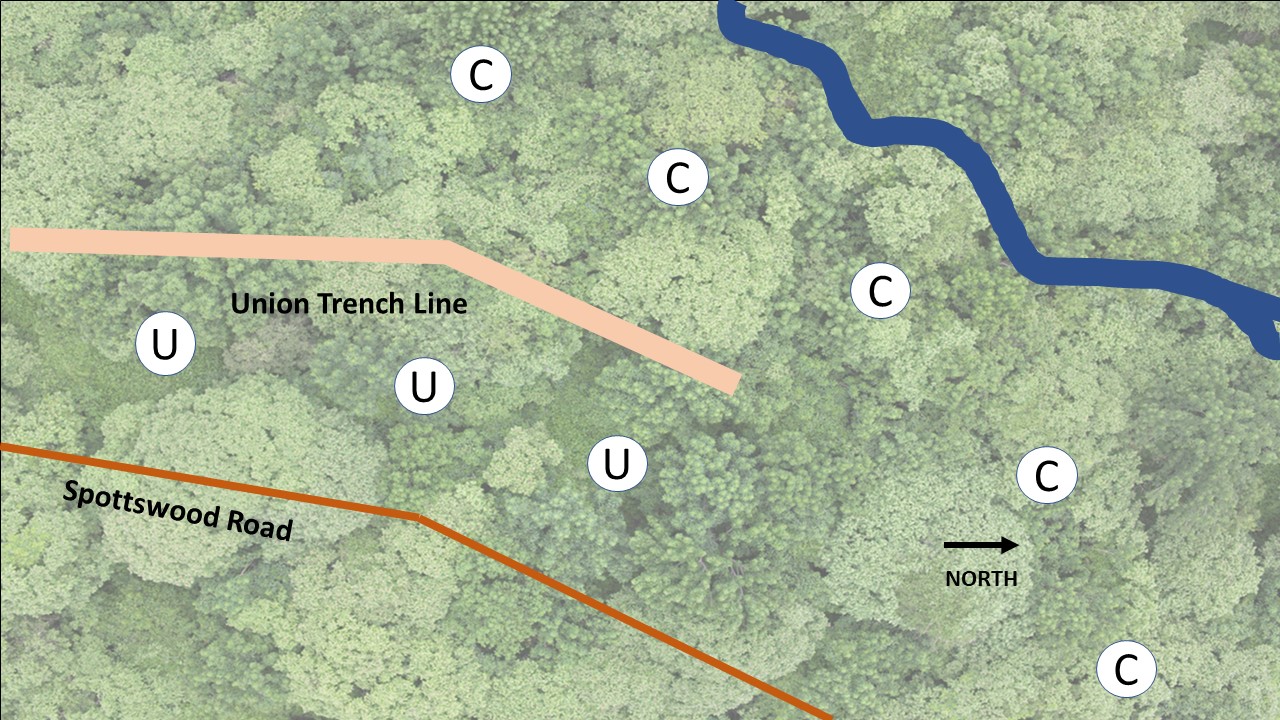
The map below shows the tabletop and the positions of the Confederate (C) and Union (U) troops at the beginning of play. The entire tabletop is covered with woods, aside from the road and the waterway. The woods will provide light cover and limit visibility to 6 inches. It impedes movement. The waterway - Flat Run - is a small creek which is fordable at any point, and counts as rough (no worse than the surrounding woods). The Union trenches have been occupied all day with only desultory fighting, and are assumed to provide hard cover against attacks from the West, but not from other directions.
The Confederates may set up anywhere along the line shown, or to the West or North. They may be no closer than 6 inches to the Union positions. Union troops must set up between their trench line and the Spottswood Road as shown. The Union troops set up, and then the Confederates, after they have seen the Union deployment. All Union troops will start the game in disorder, as they are relaxing and eating their supper when attacked. The Union general - Brigadier Shaler - must be on the table but may not be attached to any unit at the start of play. General Gordon may be attached or not, as preferred by the Confederate player. Seymour's regiments enter the table between the Union trench line and the Spottswood Road on the southern edge on the second (6th Maryland) and third (110th Ohio) turns.
This scenario depicts Gordon's brigade, composed of veterans of the Army of Northern Virginia, and the Union brigade manning the very end of the Union position, under Brigadier General Alexander Shaler. The next Union brigade in the line is Seymour's, which sends some units up in support.
Gordon's Brigade:
All units are rated Veteran, and all are equipped with Minie rifles. Each regiment has 18 figures.
Brigadier-General John B. Gordon
13th Georgia
26th Georgia
31st Georgia
38th Georgia
60th Georgia
61st Gerorgia
1 Virginia Battery - mixed battery of 4 guns (12# smoothbores and 10# Parrot rifles)
All of Shaler's units are rated Green, as is the artillery. The 6th Maryland, the 138th Pennsylvania, and 110th Ohio are Average. All are equipped with Minie rifles. Each regiment has 18 figures.
Shaler's Brigade:
Brigadier-General Alexander Shaler
65th New York
67th New York
122nd New York
New York Light Artillery (1 6-gun Battery 12# Napoleons)
From Seymour's Brigade:
6th Maryland
110th Ohio
138th Pennsylvania
The game lasts for 9 turns (an hour and a half), when it is assumed that darkness falls and the attack ends. The Confederate player has the initiative at the start of play.
Historically, both Shaler's and Seymour's brigades panicked and fled, and many soldiers were taken prisoner, as were both of the brigadiers. The Confederate player must have destroyed (or forced off the board) all Union units by the end of turn 9 to win.